#review

Wie angekündigt berichte ich über meine persönliche Erfahrungen mit verschiedenen Banken und ihren Produkten.

Deutsche Sparkassen sind in der Regel kommunale öffentlich-rechtliche Kreditinstitute die in einem geografische begrenzten Raum aktiv sind. Aktuell existieren ca. 410 Sparkassen die nach außen mit einem einheitlichen corporate design auftreten und ein vergleichbares Produktportfolio bieten. Tatsächlich sind es jedoch eigenständige und von einander unabhängige Unternehmen. Meine Erfahrungen beziehen sich auf die Sparkasse Dortmund.

Leistungsumfang & Komfort

Die SparkassenCard gehört zur Grundausstattung jedes Privatkontos. Dabei handelt es sich um eine Maestro Debit-Karte mit Geldkarten/GiroGo-Funktion. Die Bankleitzahl bzw. IBAN/BIC unterscheidet sich bei jeder der 410 Sparkassen. Wer umzieht und zur lokalen Sparkasse wechselt muss also seine Lastschriften neu einrichten und Kontodaten in Shops ändern. Das ist sehr nervig und erfordert eine gewisse Aufmerksamkeit um keine Rückbuchungen zu erzeugen.

Neben der SparkassenCard werden verschiedene Mastercard und VISA Karten angeboten. Dabei handelt es sich um Charge-Karten deren Leistungsumfang je nach Modell (Standard, Gold, Platinum) unterschiedlich und meiner Meinung nach nicht der Rede wert ist. Im Standardmodell sind grundlegende “Sicherheitsleistungen” wie Kartensperre/Ersatz und ein Reisenotfallservice (Medizin, Jurist, Dokumente, Bargeld) enthalten. Bei den Gold-Modellen kommen regionale “Clubangebote” sowie Reise-, Auslandskrankenversicherungen sowie ein EU-Ausland Kfz-Schutzbrief hinzu. Die Platinum-Karte enthält eine Mitgliedschaft in Sparkassen Golfclub (gähn), ein Priority Pass, Mietwagen Selbstbeteiligungsversichung, In/Auslands Kfz Schutzbrief und einen Concierge Service.

Die PIN der SparkassenCard lässt sich neuerdings an Automaten ändern. Applaus.

Filialen & Automaten

Das Filialnetz ist flächendeckend und es stehen ca. 25.000 Automaten zu Verfügung, so viele wie bei keinem anderen Verbund. An allen Automaten lassen sich kostenlose Bargeldabhebungen durchführen. Unverständlicherweise kann man aber nur bei seiner “Heimat-Sparkasse” Geld einzahlen oder andere Geschäfte tätigen. Münzeinzahler stehen in nahezu allen Filialen zur Verfügung.

Onlinebanking

Die Onlinefunktionen sind umfangreich, allerdings in der Benutzung altbacken. Es ist möglich Giro- und Sparkonten per HBCI anzusprechen, bei Kreditkartenkonten ist das nicht möglich. Das Angebot der TAN Verfahren ist sehr umfangreich und bietet smsTAN, pushTAN (per App) sowie chipTAN (per Kartenleser).

Gebühren & Auslandseinsatz

Je nach gewähltem Konto fallen unterschiedliche Gebührenmodelle an. Wirklich kostenlos bekommt man kein Konto da man zwar ein “Online-Konto” ohne monatliche Gebühr nutzen kann, dann jedoch €5,00 p.a. für die SparkassenCard zahlt. Wenn man sein Konto lediglich online und zur Bargeldversorung die Filiale nutzt kommt man mit diesem Konto gut aus. Wenn man jedoch häufig Filialdienstleistungen in Anspruch nimmt, werden saftige Gebühren fällig, beispielsweise €0,50 für den Kontoauszugsdrucker oder €2,50(!) für Buchungen/Auftragsverwaltung am SB Terminal oder beim Personal. Das sog. “Basis” Konto kostet €23 pro Jahr und erlaubt die kostenlose Nutzung des Kontoauszugsdruckers (yay!), allerdings kosten dann selbst Onlineüberweisungen und Aufträge je €0,25. Beim “Komfort” Konto sind schließlich alle üblichen Leistungen kostenlos enthalten, jedoch zahlt man stolze €83 pro Jahr zuzüglich Kreditkarte.

Die Bargeldversorgung via SparkassenCard ist mit €5,50 im Ausland unverhältnismäßig teuer. Kreditkarten sind grundsätzlich kostenpflichtig und reichen von €35 p.a. (Mastercard/Visa Standard) über €83 (Mastercard/Visa Gold) bis zu €250 (Mastercard Platinum). Eine Umsatzabhängige Rückerstattung dieser Gebühr ist nicht möglich. Bei Barauszahlungen per Kreditkarte fallen im Inland mind. €5,50 an, im Ausland ist die Auszahlung kostenlos. Bei Zahlungen mit Kreditkarten in nicht-Euro Währungen fallen Gebühren in Höhe von 1% des Zahlbetrags an. Im Vergleich zu den Leistungen sind die Gebühren meiner Meinung nach maßlos überzogen und nicht mehr zeitgemäß.

Weiterhin fallen Nutzungen für die TAN-Erzeugung an. Entweder €9,90 für ein Kartenleser, €0,12 pro smsTAN oder €0,06 pro pushTAN. Letzteres ist eine Frechheit da im Gegensatz zu chipTAN und smsTAN keine relevanten Kosten für Hardware oder Versand anfallen.

Insgesamt ist die Kontoführung bei der Sparkasse eine teure Angelegenheit. Ich nutze ein kostenloses Online-Konto lediglich um Bareinzahlungen vor Ort auszuführen und überweise den Betrag anschließend online auf mein reguläres Konto.

Reputation

Mit einer SparkassenCard oder den entsprechenden Kreditkarten lässt sich mit Sicherheit kein Eindruck schinden. Die Exklusivität, Design und Produktumfänge sind schlichte Hausmannskost. Im Gegenteil dokumentiert jemand der €250 für eine Sparkassen MasterCard Platinum ausgibt meiner Meinung nach seine Unkenntnis im Bezug auf Finanzdienstleistungen.

Service

Durch das dichte Filialnetz würden sich erstklassige Serviceleistungen realisieren lassen. Das Regionalkonzept macht dies jedoch wieder zunichte. Wer als Kunde der Sparkasse Dortmund in Essen oder München unterwegs ist, gilt in der Filiale als “Fremdkunde” und man kann praktisch keine Dienstleistung abgesehen von kostenloser Bargeldauszahlung am Automaten in Anspruch nehmen.

Den Service in Filialen habe ich als mittelmäßig erlebt, man merkt dass viele ihre Bänkerkarriere bei der Sparkasse beginnen. Häufig müssen Rückfragen eingeholt werden und die Bearbeitung läuft überwiegend schleppend. Leider passieren dabei auch unschöne Fehler. Als ich meine Kreditkarte kündigen wollte musste die Kompetenz des Filialdirektors bemüht werden, zuvor waren 3 KollegInnen an dieser Aufgabe gescheitert. Letztendlich wurde die Karte durch diese Versuche gekündigt, allerdings im Sinne von “Zahlungsausfall, Karte eingezogen”. Das führte zu einem negativen Schufa-Eintrag und entsprechendem Aufwand diesen wieder zu löschen. Immerhin hat sich die Filiale mit ein paar Werbegeschenken entschuldigt…

Das Personal ist sehr engagiert was die Bewerbung von Vorsorge- und Versicherungsangeboten angeht. Offensichtlich dient der persönliche Kundenservice bei Kontoangelegenheiten im wesentlichen als Fuß in der Tür um weitere Angebote zu vermarkten. Häufig sind diese Verkaufsversuche aufdringlich und unfreiwillig komisch, insbesondere wenn man wegen einer Trivialität zum Schalter muss und eine Immobilie angeboten bekommt. Die Kontaktaufnahme per Post ist erfreulich zurückhaltend.

Auf meiner Bewertungsskala von 1 (schlecht) bis 10 (gut) vergebe ich eine 3 für die Sparkasse Dortmund.
Holiday time, home network improvement time :)

IPv6

like most ISPs in Germany, Telefonica/O2 STILL does not provide IPv6 to their residential customers. During the past year i’ve been using the IPv6 tunnel broker offering from Hurricane Electric (HE). A alternative service would have been SixXS, but besides having multiple local PoP, it lacks some functionality and i had very bad experience with their support team. Being called a liar and getting insulted because of a typo or overcautious fraud detection system is not nice guys.

HE provides you with a /64 network and a optional /48 if 18446744073709551616 hosts simply don’t cut it and you rather need 1208925819614629174706176. HE turned out to be super reliable, fast and of great value - well, it’s free. The documentation is a bit scarse and the user interface obviously targets experienced users. However, i made my way through and also migrated my domains DNS/rDNS services there. A real killer-feature is the included DDNS (Dynamic-IP-to-DNS mapping) option, so you can update and assign a dynamic IP to a regular A or AAAA record without CNAM’ing via one of those dyndns domains. Especially mail servers don’t like CNAMEs for sender domain/servers. Thanks HE, you’re awesome!

Now, having my router configured for DDNS and tunneling IPv6 is one thing but i wanted to use native IPv6 for all clients within my home network. Turns out that dd-wrt, which powers my Asus RT-AC66U router, has solid support for RA (Router advertisement) and DHCPv6. Certain features do not work reliable with specific dd-wrt beta (aka. recent) builds so i had to trial&error myself to “v3.0-r27858 giga” to find a “good” build. Configuring IPv6 is straight forward but some components, especially wide-dhcp6, are very picky about their syntax and not very verbose when it comes to errors. Therefor i’m sharing the configuration, i hope it will help others and spare some frustration.

A central thing to understand with IPv6 is that DHCP works a bit different compared to IPv4. In good’ol IPv4 DHCP provided clients with information about DNS, Gateway/Router, Subnets and of course a IP address. With IPv6 those tasks are split between RA and DHCP. RA takes care about providing router information to the local network while DHCP assigns everything except router information. RA can actually also provide prefix information, which makes clients pick a random IPv6. Most small networks will just work fine with RA but DHCPv6 is more powerful in terms of assigning ranges or even do reservations for specific hosts. Therefor i chose to go with RA and DHCPv6 to learn some stuff in the processb.

To configure DHCP for IPv6, enable “Dhcp6s” at the “Setup” -> “IPv6” tab of dd-wrt. Also enable “Dhcp6s custom” and provide configuration like this:

1
2
3
4
5
6
7
8
9
10
11
12
13
14
15
16
17
option refreshtime 900;
#option domain-name-servers 2001:470:1f0a:d2a::2;
option domain-name "heiland.io";

interface br0 {
allow rapid-commit;
address-pool home 3600;
};

pool home {
range 2001:470:1111:aaaa:acab:c0ff:ee:1 to 2001:470:1111:aaaa:acab:c0ff:ee:ffff;
};

host vip {
duid 00:01:00:01:1d:9f:e9:8d:20:c9:aa:bb:cc:dd;
address 2001:470:1111:aaaa:acab:c0ff:ee:1337 infinity;
};

The domain-name-servers option is commented out since i chose to distribute DNS resolver information via radvd. Usually that would be a task that gets handled by the DHCP server, but my efforts so far were not working out. For some reason the local address of the router was propagated as DNS server even though i’m not running a DNS cache or forwarder there. This could be some dd-wrt quirk.

I’m distributing search-domain and IPv6 client information via DHCP. As an example i added a specific host that shall get a reserved IPv6. Note that you can assign multiple IPv6 ranges to multiple interfaces if needed. Compared to IPv4 DHCP, hosts are specified via their DUID instead of just their MAC address. The MAC address of the network card is still part of DUID but it gets prefixed by a timestamp that gets generated by software, usually when installing your OS.

Getting your clients DUID is a bit more complicated than just getting a MAC address. Johannes Ullrich posted a nice article about where to find it on various operating systems. Again, wide-dhcp is very picky about syntax, duid 0:1:0:1:1d:9f:e9:8d:20:c9:aa:bb:cc:dd would not work properly while duid 00:01:00:01:1d:9f:e9:8d:20:c9:aa:bb:cc:dd does.

RA is implemented by the radvd service and that gets enabled at the same page. “Radvd config” allows to specify some more details, like this:

1
2
3
4
5
6
7
8
9
10
11
interface br0
{
AdvManagedFlag on;
AdvSendAdvert on;
AdvOtherConfigFlag on;
MinRtrAdvInterval 3;
MaxRtrAdvInterval 10;
RDNSS 2001:470:20::2 2001:418:3ff::53
{
};
};

This is a very simple configuration, note that it does not contain any prefix delegation since assigning addresses is done via DHCP. IPv6 DNS resolver configuration is performed via the RDNSS option.

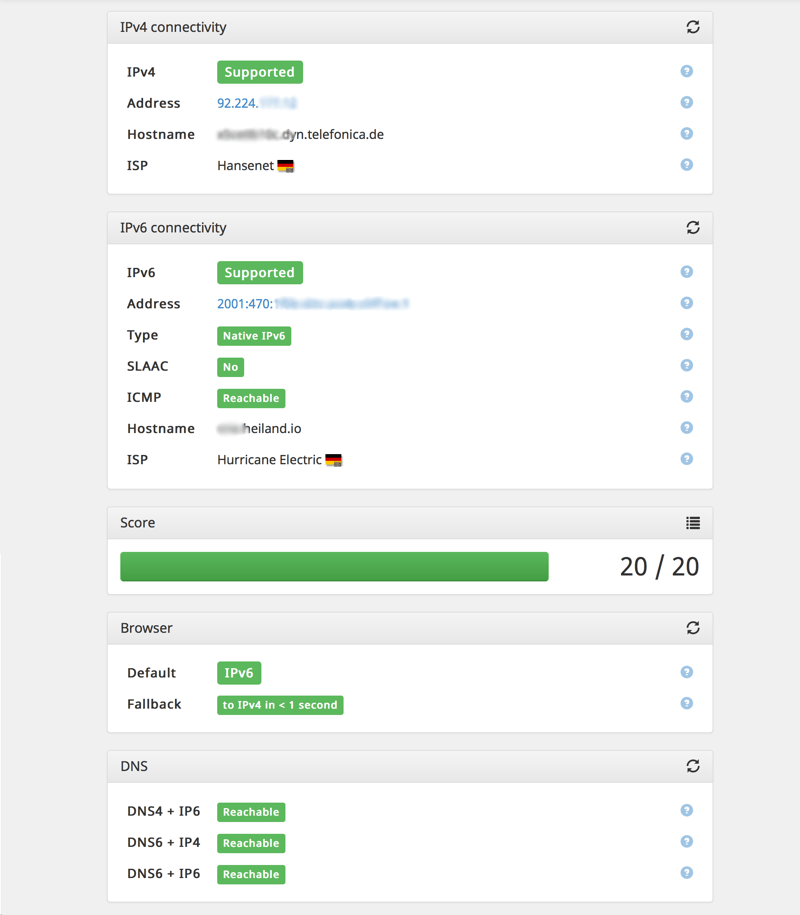
Tada, 20/20 at ipv6-test.com

DNS

Next, i headed to my DNS setup. My colleague Bert recently held a great presentation that outlined how important proper DNS is for a good online experience. Virtually any service nowadays depends on DNS and websites use dozens of lookups that suffer from bad DNS performance. Google introduced their Public DNS as a cure-all solution and almost 500M users re-configured their default DNS to point to Google or use it as a default with Android. That service is blazing fast and reliable, no discussion about that. However, Google already knows all your searches - using their DNS also exposes all your other online activity to them, without even using a Google account.

So i gave namebench a spin and tested several DNS servers close to my IPv4 and IPv6 exit points. The results were quite interesting, especially when it comes to speed. The gap between fast and slow services was about 40%. The default IPv4 DNS of my ISP was already good and i kept it as secondary DNS. I added the quickest one as primary and a backup DNS within a different state as tertiary. My local clients get the IPv4/IPv6 of the router as DNS, which acts as a forwarder. I ended with the following servers which were quick, uncensored and reliable:

IPv4

  • 193.189.250.100 (Telefonica, Kassel)
  • 213.191.74.18 (Hansenet, Hamburg)
  • 213.73.91.35 (CCC, Berlin)

IPv6

  • 2001:470:20::2 (HE, Fremont)
  • 2001:418:3ff::53 (NTT, Denver)

A while ago, we decided that our living room is occupied by too many remotes. While this is a common issue when building a HDTV/BD/ATV/Audio rack, the solution is plain and simple: Get a universal remote. I decided for a Logitech Harmony Ultimate which does have quite some track record in terms of building remotes. There are other manufacturers that build such remotes as well and please feel free to evaluate them. I sticked with Logitech since i already own(ed) some of their stuff and it worked well. Also, their system is widely used and a de-facto standard. I like the idea of a more-or-less simple remote and a “invisible” hub quite a lot.

The good

Not going into details or writing some product review, however the Harmony Ultimate remote and the hub are very well built. The touch screen is okay’ish regarding responsiveness and all buttons have a nice feedback and illumination. The tilt sensor is a very good idea to wake up the remote on movement. Overall i’d say hardware is a B+ since i dislike the idea of the LCD splitting the buttons and the hub is perhaps a bit larger than required. I also got a pair of Harmony Precision IR cables to directly attach them to the devices rather than placing the IR blasters. These guys take care of the rack which is now behind closed doors while the hub manages the HDTV and speaker setup.

The bad

Logitech opted to go a all-online configuration. Generally that’s a good idea to spare fiddling around with USB cables and software installation. The hub connects via WiFi and fetches the current configuration when being told to do so. Same applies to the Android/iOS remote app.

What i really dislike about this choice is, that Logitech requires a browser-plugin to be installed. Hell, the 90ies are over! Technically it does not seem to be more than a Browser-USB bridge for initial setup of the Hub and the remote. Apart from that, Logitech opted for a user configuration frontend built with Silverlight… While arguing on Silverlight/Flash/HTML/Java is quite exhausting, i simply state that i don’t like the implementation. It works without larger glitches, but feels quite slow and clunky.

Some very basic features are missing from the Harmony Ultimate: PIN lock of the remote and multi-user support. So in case you don’t want your kids to use the Harmony to play around, you have to hide it. A simple 4-digit PIN lock should not be rocket-science, eh? Even worse than that, you do have one online account at myharmony.com which is bound to your remote. Meaning that if you don’t want to share the credentials with your husband/wife/kids. On top, you cannot change the accounts mail address and your configuration cannot be exported. I’d really hope that Logitech accepts that there is more than one person within a typical household which wants to configure the remote.

The ugly

Apart from controlling some TV/Audio devices, i use a set of remote power outlets (Intertechno IT-1500) to shut down any standby activity of my TV/Audio rack. In order to do so, it’s mandatory to have a piece of hardware that’s compatible with your Harmony and your RF outlets. Harmony Ultimate does use IR and Bluetooth, no RF. In my case, i opted for the LightManager Pro+ which can handle my outlets and is compatible to most RF outlets offered in EU/Germany. This nice piece of hardware gets configured separately to communicate with your outlets. In the end, it offers 254 slots for RF devices and can assign several commands to each (on/off/toggle/dim) as well as time or even temperature based actions.

Integrating the LightManager to your list of devices and activities is quite straight forward since Logitech already knows the IR codes. But to my surprise, i simply could not do anything afterwards! I could customize my Activity and add a command for the LightManager, but it kept being added to the bottom slot of my activities command list. Of course i’d need it in #1 slot since all subsequent devices rely on power supply. Logitech states, that additional commands to an existing Activity must be added to the bottom of the list and that there is no way to re-order them. Damn!

After some quite friendly but not very productive calls to the Logitech support, i did take some time to work around the issue. As it turned out, there is a way!

Turning on outlets before turning on devices

I assume that LightManager is already configured and your remote outlet takes “L001” as “on” and “L002” as “off”.

First, go to the crappy Silverlight abomination which calls itself “MyHarmony” and login. Chose your remote and select “Devices”. Now select your LightManager and click “Change Device Settings” and go for “Power settings” and chose “I want to keep this device on… turn it off when i press the Off button”. This will help saving a lot of time when switching Activities that rely on the same power outlet. At the next step, tell Myharmony, that you use two different buttons for power on and power off. Finally, Myharmony lets you assign power on and power off actions. There, you assign command “L001” for power on and “L002” for power off. When you now add the LightManager to an activity, you can put your LightManager “power on” to slot #1. The downside is, that you need one LightManager “device” for each outlet you want to power on/off, but Harmony Ultimate can handle 15 so that should work out for post people.

When it comes to load testing a web application, usually JMeter comes up as the go-to solution. It has a huge amount of features, protocol support, is opensource, establishment - and boy it has a GUI! There are some other alternatives like pyLot, locust, Grinder, radview, wapt or LoadUI which are either commercial or not as feature rich and less established.

Lately, some hosted solutions like loader.io, neotys, blitz.io, blazemeter, loadstorm etc. joined the party. These offerings are nice for testing the whole stack from an end-user perspective or running limited tests. The downside is, that these are typically sold by bandwidth or threads (users) which is a good business model but comes unhandy when really stress testing an application over a long period of time or testing within an internal network.

Usability

One of the biggest benefits of JMeter, in many peoples minds, has been its graphical user interface. Well, it’s kinda powerful and it kinda allows easy test creation. People tend to think that a GUI makes everything easier since many concepts are well known.

A GUI makes everything easier, right?

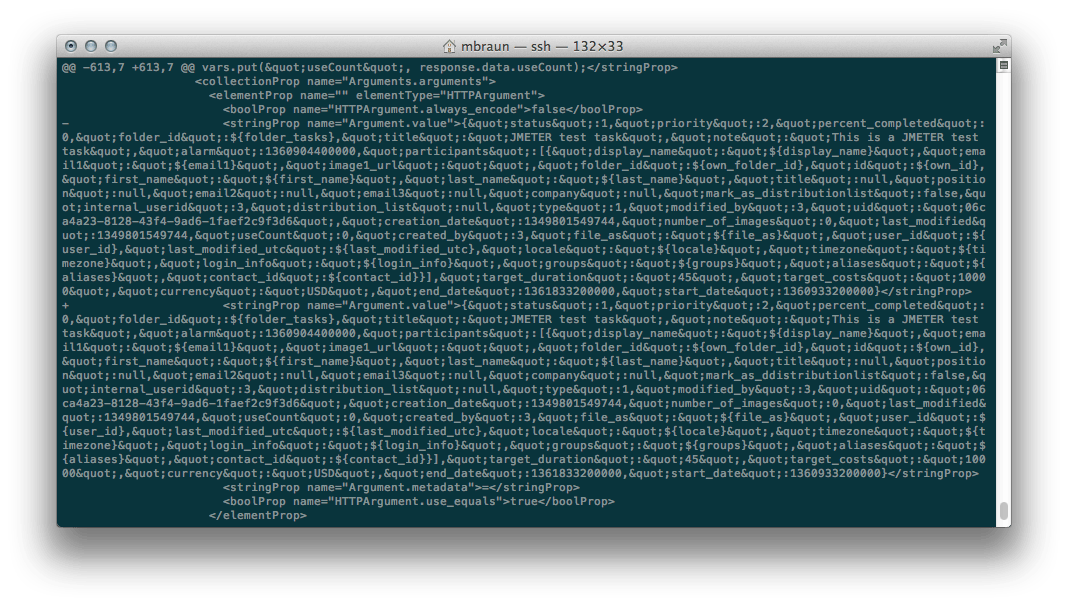
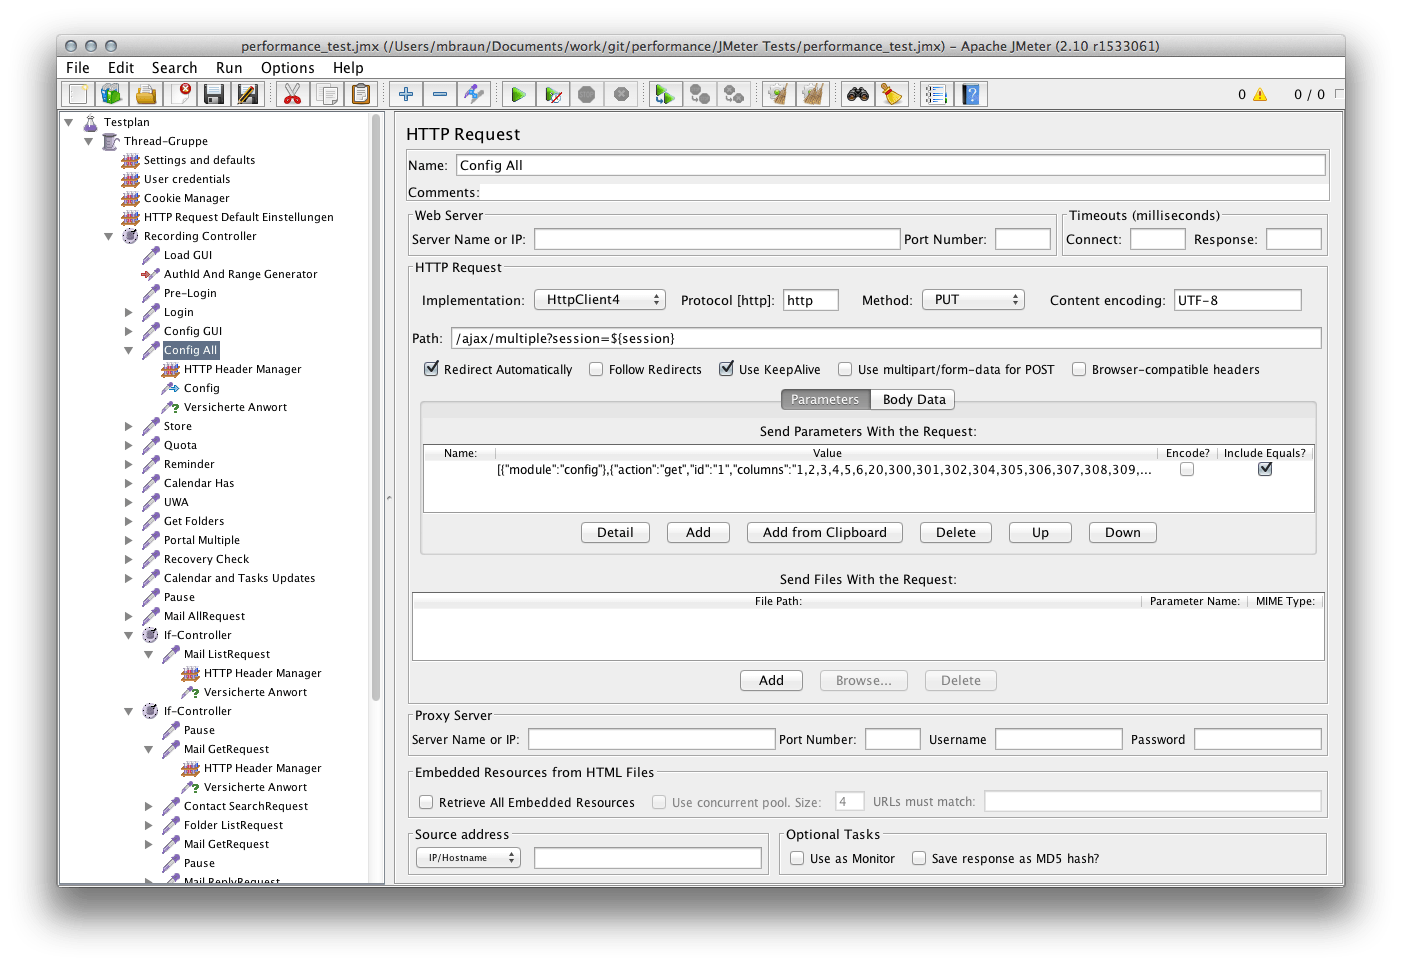
In my opinion the opposite is true, at least for JMeter. Its GUI is quite bloated, which is natural given its complexity and amount of features, but in the end is some button-input-and-knob representation of an XML structure. Under the hood, JMeter generates massive amounts of XML, based on what tests the user defined at the GUI. By itself, this is not bad. However, it shuts down any serious attempt on manual interaction on an XML level. This becomes very visible when using JMeter tests while working within a team. We use git for source control and due to a lack of good and powerful GUI based tools, primarily work with the command line implementation. Reviewing commits or merging is really a pain when you have to diff and compare on a XML level.

Even with great syntax highlighting, this is where you probably just want to go home.

Much better

Readability of code is usually determined by the skills of the author, in this case the author really doesn’t do anything wrong - but by focusing on a GUI, readability for all other forms of representation suffers. Even if you manually tame the XML output, JMeter will just overwrite it using machine-readable-only code. XML is very well structured but apart from being structured, there are other requirements to good code. Even easy tasks like replacing some parameter or defining properties becomes a pain using the GUI since you have to browse it and manually spot elements. Either you got almost everything within variables, or you’re doomed.

In my opinion, JMeter is nice to rapidly create one-shot tests that can be shown around for education, validation or audit. For any kind of sustainable agile development or testing, it’s next to useless.

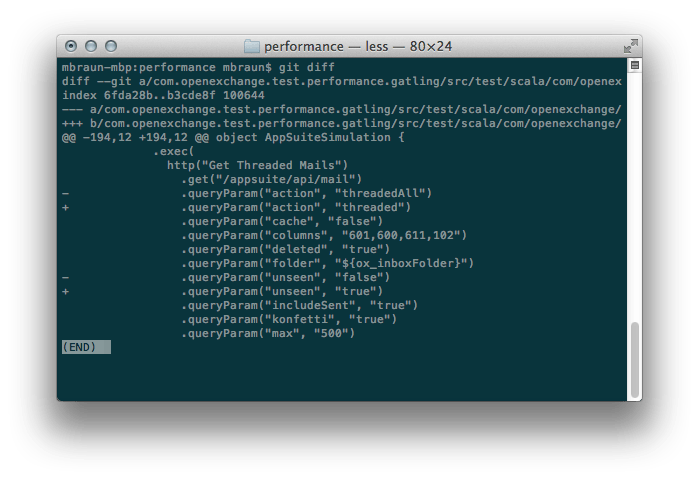
Gatling on the other hand uses Scala to define load tests. Scala is probably not as established as XML but (as programming languages in general) it allows to code much cleaner and use the power of a functional programming language. Being object oriented and relatively up to date, it allows re-using code to avoid redundancy and pretty much everything one would expect from a modern programming language. While coding Scala requires some specific toolchain, the compiled code runs within a standard JVM. This makes it very easy to deploy and leverage existing workflows and tools. If you’re a programmer you probably can start with Scala right away. If you’re not familiar with programming, some hurdle may exist but learning a programming language while creating load tests sounds a good deal, right? There is no need to learn each and every bit of Scala right away, tests usually consist of the same fragments that just need to get put together.

Since Gatling is under very active development and currently transitioning from version 1 to version 2, some API vs. documentation hickups and bugs may happen from time to time. The core developers and community is very responsive and most issues get covered within hours.

Performance

The funny thing about load tests is, that many environments actually test the efficiency and performance of the test runner, rather than the application thats supposed to be tested. In projects i’ve seen people building monstrous phalanxes of test clients to stress-test a single server. Distributed test clients and down-sizing both the servers spec and the test coverage seem to be appropriate measures to get the server under load. Lets check some real-world example.

At work we got a nice Intel Modular Server box dedicated for load testing. This baby sports a chassis with redundant PSU, networking, storage and six identical blades loaded with dual Xeons and lots of memory. In a nutshell, this is a datacenter within 6HE where testing can happen without external influences. Earlier, we used one virtual machine as test director and result-parser, 4 machines running JMeter and one machine running the application (including all infrastructure) we wanted to test. JMeter has been configured to spread the test scenario to all 4 machines, effectively cutting the number of threads by 4 and feed them to the test clients to execute them simultaneously. While this worked well, it really felt odd to have 4 specialised machines hammering on one specialised machine to push it to its limits.

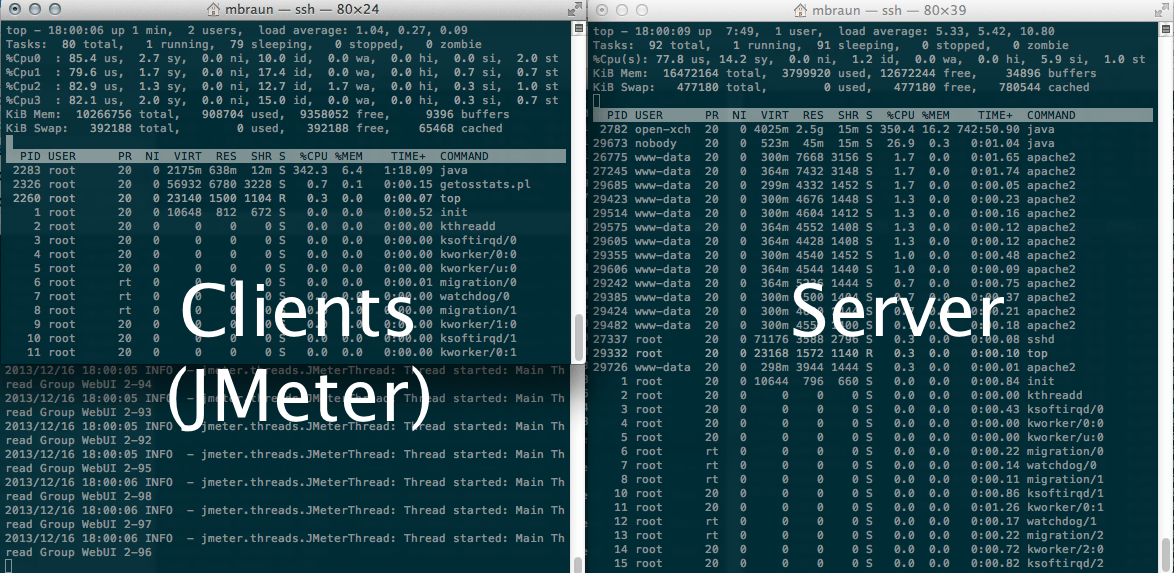
JMeter system load

What we see at this screenshot is one machine running about 100 concurrent threads (“virtual users”) occupying 4 CPUs. The server on the other hand is also quite stressed but keep in mind there are 4 test machines with 4 CPUs each running 400 concurrent threads in total. Even these 4 test machines did not manage to create significant load at the server, to find out its diminishing or even tensile point. One major drawback with JMeter is that it uses one system thread per user, handling large numbers of active threads is very expensive on the CPU.

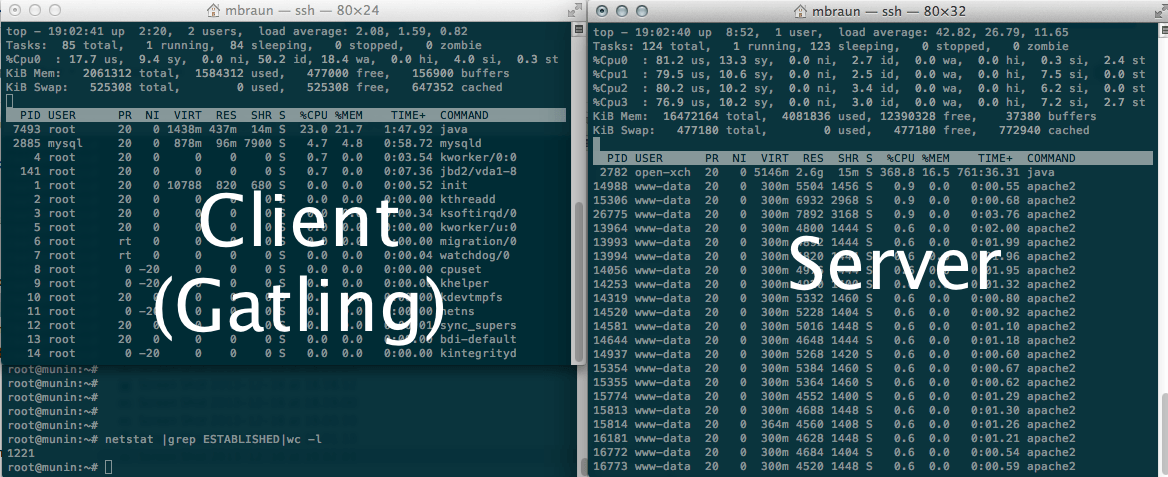
When using Gatling, we easily manage to get 1200 concurrent threads running at just 25% CPU load of one CPU of a single virtual machine. This is about 200x more efficient than JMeter (1/64th of the CPU load while creating 3x the load). The server is also stressed quite well and we’re able to push load testing far beyond its tensile point.

Gatling system load

Reporting

When running JMeter using its GUI, reports are fairly nice, real time and the tool offers some help to dig through the results. However, when not being able to use the GUI (e.g. for unattended testing, continuous integration), you get a bunch of .jtl files, either XML or CSV. These can then be put into JMeter again for analysis or get processed using XSLT or tools that understand CSV (yeah… Excel). Thats all good and at this point highly structured data makes a lot of sense. There is a variety of tools that help with graphing, charting and analysing of its data. The downside is that you almost always need some kind of extra tool to make JMeter reports understandable - and you always have to wait until the test run finished. At least to my knowledge, there is no realtime graphing apart of the JMeter GUI.

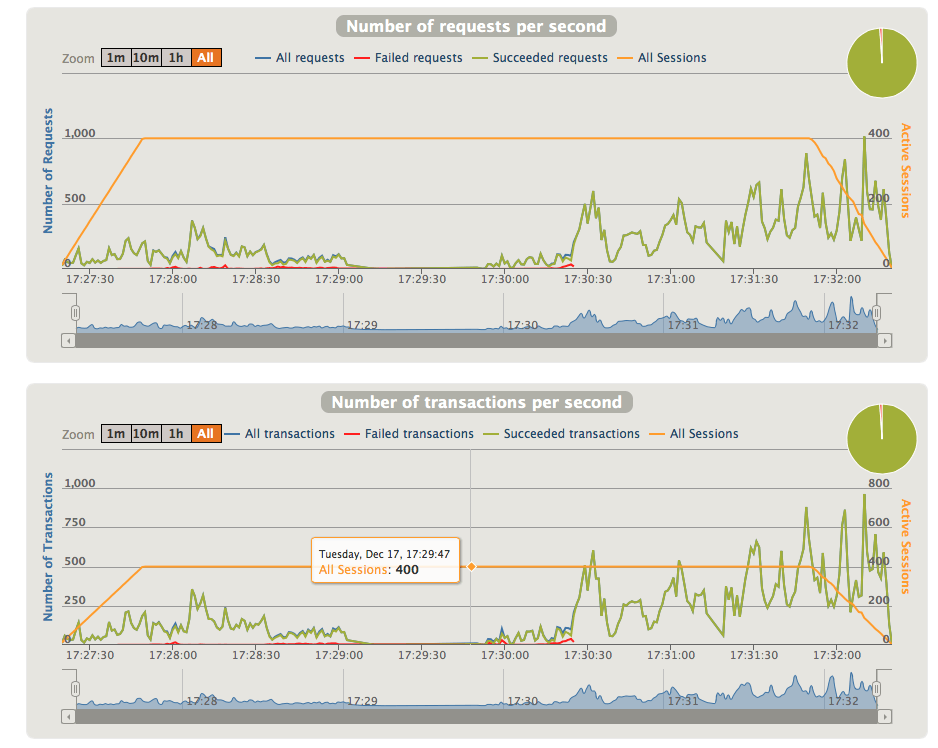
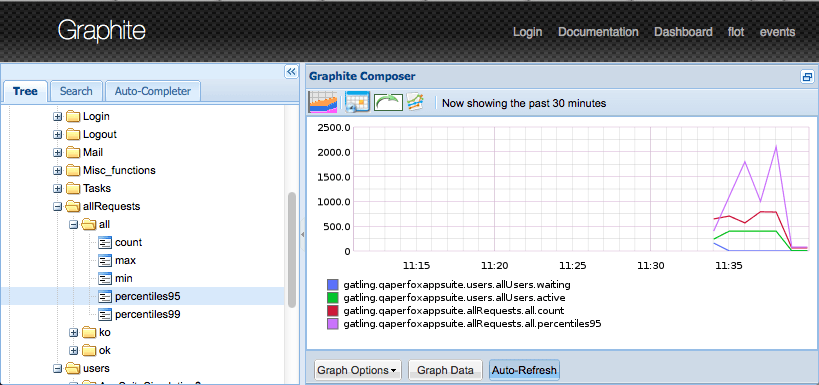
Gatling also creates machine readable data files, but already provides a really nice report module that generates HTML pages with charts and graphs. In addition, the integrated Graphite feeder allows real-time charting of test runs to tools like Graphite or Grafana. This becomes really powerful for showcases or unattended test runs. Overall i think the built-in reporting of Gatling outperforms JMeter by large, even if JMeter reporting may be more accurate and comprehensive on a scientific level.

Default Gatling graphs

Graphite realtime graphs

As with every discussion, there is no “using the wrong tool” - it just depends on the job that needs to be done and some thinking outside the box. There are a lot of great tools that are not (yet) mainstream but help with every days work and contribute to getting better tests, results and software.

Your browser is out-of-date!

Update your browser to view this website correctly. Update my browser now

×