#tech

I finally got the option of switching to a fully electric car after using a hybrid car for some time. The hybrid, an Audi A3 TFSIe, was okay’ish, but just a stopgap until upgrading to the real deal. I used it for about a year to bridge the pretty long delivery times for EVs. As with all Volkswagen cars, the Audi was a solid car but plagued with software issues. At the same time, none of their brands were able to deliver an EV within 18 months or less, so I looked elsewhere.

Since I despise SUV-style cars, there is little to choose from, and the company car policy narrowed it further down to two options: the BMW i4 or the Tesla Model 3. I went for the Bimmer, and it was delivered after only 6 months of waiting. A year ago, I was pretty convinced to go for a Tesla, but that changed quite drastically after test-driving the i4 earlier this year. Three things that swayed me over to Camp BMW were: interior, ride comfort, and practicality. Let me explain.

BMW i4

Interieur

Tesla is known for its very minimalistic approach to the interior; there are hardly any knobs, and everything is controlled through the central screen, at least as far as security regulations allow. This was already awkward during my Model 3 test drive some time ago, and it became obvious that this is not for me. I heavily rely on muscle memory when driving; I keep my eyes on the road, not on a display in the peripheral visual field that has a menu structure that hides basic functions away. This creates too much mental load for me. I’d even consider it a security risk due to distraction.

BMW also uses a huge curved display in their iDrive 8.5 system, but all the relevant information is in the driver’s field of view. That’s a huge difference. The number of knobs is already pretty reduced, but they are still practical and can be operated without looking off the road. The system is also very advanced and snappy, much better than what VW provides. Certainly, Tesla’s software is even more refined and better integrated, but the difference has become pretty small.

Other than software, the materials, haptics, and geometry of the BMW i4 are superior. One can argue about taste, but it feels much more luxurious and offers neat options that are not available on the Model 3 for manufacturing efficiency and margin. Holding the toy’ish steering wheel of a Tesla and looking at the plasticy interior just does not feel like a €50k car to me. The same goes for a lack of modern-day features like a HUD, Android Auto and Apple CarPlay integration. A feature update is far overdue for this car.

Ride comfort

There seems to be consensus that the Model 3 has a “sportive” chassis and damping. I dare to disagree. It’s just poorly built or adjusted. Driving it on some bad roads reminded me of driving a 1980s-era car with basic steel springs. It does not “dampen away” bad roads; it just rumbles along. The suspension may be stiff, but it’s just not comfortable. The i4 is a very different proposition, with air-ride dampening in the back and a well-balanced experience. Sure, it does not feel like a hard-core sports car, but that’s not what I am looking for, and that’s also not what a mid-range Model 3 is really delivering.

Practicality

The Model 3 is a practical car in general. However, the hatch is far too small to use all that space. You could not get a bike in there, and stacking luggage for a road trip would feel like playing Tetris. The BMW i4’s hatch opens entirely, including the rear window. That allows a lot more space to actually put things in the trunk. Simply put, the i4 is more useful in daily business.

The ugly

Design

So what don’t I like about the BMW i4? Well, foremost, it’s the front design. The “grill” just looks totally awkward and misplaced on an otherwise beautiful grand coupe. I don’t mind that too much, though, and I’d definitely pay extra to replace it with a nicer option. It’s totally subjective, and I don’t like the round front of the Model 3 either. That car looks like a piece of soap.

Quality

While the BMW i4 interior is one of the best I’ve seen so far in mid-range EVs, some items feel misplaced in a car like this. Especially the buttons on the center console next to the iDrive wheel feel very cheap and are not worthy of a €65k car. The same goes for the hood, which hides the front cupholders and wireless charging pad. Making this more high-end would certainly not break the bank for BMW but improve the overall quality impression. Speaking of the charging pad, BMW went for a horizontal surface to put your phone on. Apparently they did not expect that people would accelerate with their EVs, so the phone slides away from the pad all the time when having fun. Other brands solve that with angled charging pads.

Space

Since the car shares a platform with the ICE 4-series, it has a transmission tunnel and a regular bonnet. Not having a frunk is no big deal, but the transmission tunnel takes a lot of space at the rear, considering that the roof is already so low that you can’t have someone with >185 cm sit there for an extended period of time. Reducing the size of the bonnet could certainly add 20cm or more space for passengers; for a 4,76-meter-long executive car, there is not a lot of space.

Top-speed

The speed limit of 193 km/h seems to have been added exclusively for model segmentation. The i4 M50 has two motors and is limited to 225 km/h, but I don’t see a reason why the lesser models would be capped below 220. They have plenty of power and torque, and it does not feel like the electric motor would be a limiting factor here. Even the power consumption stays acceptable once top speed is reached.

The good

Everything else about this car is very positive: it has good efficiency (15 kWh/100 km is possible when driving carefully, but who would?) and is very well-built. It’s a great car with an electric engine rather than a native EV, but that’s fine since its EV qualities are outstanding. I saw DC fast-charging rates of 180 kW after preconditioning the battery.

Even the eDrive35 version, with its smaller 61 kWh battery, is perfect for longer trips on the Autobahn. Taking a 20-minute break to relax and charge every 300 kilometers is completely reasonable for me. In 95% of all cases, I charge at home anyway; having a fully charged EV at my disposal every morning is so much more convenient than pumping dinosaur blood! The interesting thing about range anxiety is that almost always, drivers without EV experience are affected by it.

iDrive 8.5 is far better than anything VW has hacked together so far, and it’s a breeze to use. Even the Apple CarPlay integration works flawlessly; although it only supports wireless CarPlay, cables are only for charging. Oddly enough, there is a single USB-A socket in the front, while the sockets in the center box and the rear are USB-C. That one USB-A socket is probably only good for updating maps from a USB stick, as the hood won’t close with most USB devices plugged in.

The handling of the car is phenomenal considering that it weighs just over 2 tons. It’s certainly not super agile on curvy roads, but it’s much better than anticipated. While turning requires at least 12,5m, which is a lot, moving the car in the city or other restricted spaces works very well in general. With the rather low top speed, cruising on the Autobahn is very comfy, and noise isolation is excellent.

Verdict

Considering those minor issues, I think it is fair to say that the Tesla Model 3 is the better EV, but the BMW i4 is the better car overall.

Energy has become a headline topic in Europe and Germany, primarily because of high prices and supply uncertainty. I will not rant about how the dependency on single suppliers with their own political agenda was a terrible mistake, or that we were indifferent about energy sources as long as the price was low, no matter the ecological impact and financing of a fascist regime. I’ll also not go into details how the transformation to cheap renewable energy was procrastinated for at least 20 years to serve lobby groups that love to externalize the cost of fossil fuels to society - in addition to consumers paying a lot of tax on energy.

Whatever you may have heard, Germany is not a role model for the Energiewende and usage of renewables. We still burn gigatons of lignite and hard coal, other countries have a much cleaner mix of energy sources to produce electricity. As long as we burn a single chunk of lignite, Germany is in no position to give energy advice to others.

Anyway, I write this as an example for how technology can be leveraged to improve the economic and ecologic impact of energy consumption, electricity in particular. Perhaps you can use it as food for thought or consider if the project may be useful for you to replicate. I assume that using low-consumption appliances, LED lighting etc. are a given, if not start doing this before optimizing.

As every household, we were faced with rising cost of electricity. It is very common in Germany to use utilities contracts that lock in a certain price per kWh for a certain duration, usually 12 months. Energy suppliers hedge their risk of price changes by using the electricity futures market, rather than buying on the spot market. At least the good ones do, those who didn’t hedge but sell at 30ct while buying at 60ct on the spot market went bust quite early. Our electricity supplier sent a notice that after the end of the 12-month period, our price would rise from 30ct/kWh to 69ct/kWh, just in time when we got our first EV.

Big Oof!

Since all suppliers are in a similar situation, there is no real alternative, since others either charge the same price or don’t accept new customers to reduce their risk.

While paying 30ct/kWh may be reasonable under normal market conditions with low price volatility, the new pricing contains lots of uncertainty about price development. We would have essentially locked in that uncertainty for 12 more months. We use a lot of electricity, caused by charging EVs, working from home, operating the IT-homelab and smart-home equipment. In our case, that would have meant a price hike of about €1.500 per year. At the same time, monitoring the spot- and futures market shows that prices are indeed fluctuating a lot. Among other factors, this happens because of the merit-order system used in Europe.

In a nutshell, it is an auctioning system where a given power requirement (say 1000MW for 10:00 to 11:00) is purchased from electricity suppliers and the cheapest energy source goes first. Let’s say there are 500MWh renewables at 3ct/kWh, 200MWh nuclear at 8ct/kWh and 200MWh coal at 10ct/kWh. Unfortunately Germany, and many other countries, chose to rely on natural gas to cover peak load. If the other energy sources are not sufficient, gas power plants are being switched on to cover the spikes. Assume that another 100MWh are provided by natural gas at 100ct/kWh to produce the 1000MWh required. Now the merit-order systems falls apart from the perspective of the consumer. Instead of paying 6ct/kWh for the cheap 90% and 100ct for the remaining 10%, the most expensive part of the mix sets the price for all other constituents - so the consumer pays 100ct/kWh.

In this process, providers of renewable energy earn a large profit since they produce for 3ct/kWh but get paid 100ct/kWh, hence “merit”. Most large electricity producers operate multiple sources of energy, including renewables and natural gas, which means they profit a lot from shortages. This system is totally fine in cases where prices for energy sources are relatively similar, however it creates huge price volatility in cases where single energy sources have extremely high prices. Since adding renewable energy sources was more or less blocked by political initiatives for years, there is little the market can do to actually invest and get rid of gas. Regardless if it’s natural gas no longer arriving via pipeline or expensive LNG shipped around the world - gas pushes up prices a lot. Other countries in Europe have similar issues, so there is no quick way of just purchasing electricity from our neighbors to fill the gaps.

After gathering some background knowledge about the market mechanics, I tried to find a better solution for our electricity supply. One where we don’t pay the risk premium incurred by the electricity provider, and one where we don’t have to reduce power consumption. Advanced societies require lots of energy to develop further - and that’s fine as long as they are sourced sustainably and little gets wasted. Adding solar or other self-generated electricity is unfortunately not an option since we live in an apartment, the grid is the only viable electricity provider.

It turned out however that some electricity providers entered the market which don’t use fixed prices but instead forward spot market prices to their customers, with a small fixed fee to cover their operations. Some of those see themselves as technology companies and offer integrations and APIs to automate stuff based on electricity prices and consumption. That’s why I had a good look at Tibber, which provide 100% renewable energy and have created a nice ecosystem of integrations. Using Tibber Pulse as an addon to our power meter allows per-hour billing, which is a great incentive to use less electricity at peak times. Compared to “actual” smart meters, this addon is a one-time expense and does not require professional installation.

Interested? Sign up using my reflink, we both get €50: https://invite.tibber.com/tjibqpvo

During my research, it became obvious that volatile electricity prices offer a great opportunity for arbitrage, regardless of the absolute price. While there are the typical spikes in the morning and the afternoon, electricity is in fact relatively cheap during the night. Here is a graph of electricity prices at a typical weekend in Germany, price spikes are a lot more pronounced during the week.

Normal price curve (weekend)

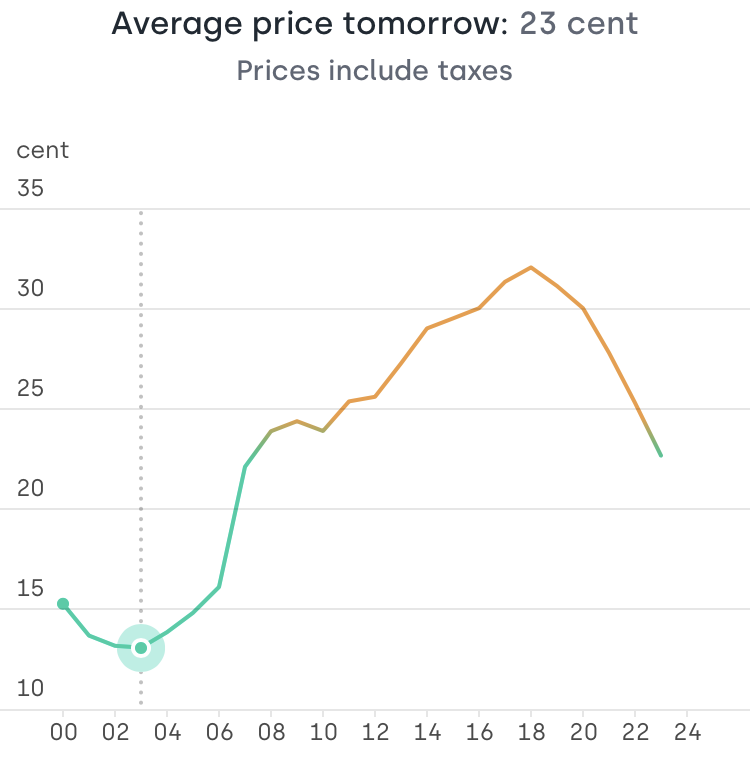
At this day prices spike to about 32ct/kWh but are below 15ct/kWh for multiple hours. Most people pay a fixed price per kWh and just don’t care about peak load. This leads to the need for electricity producers to switch on their expensive natural gas power plants. Not following this trend would save money and help reduce peak load in the grid.

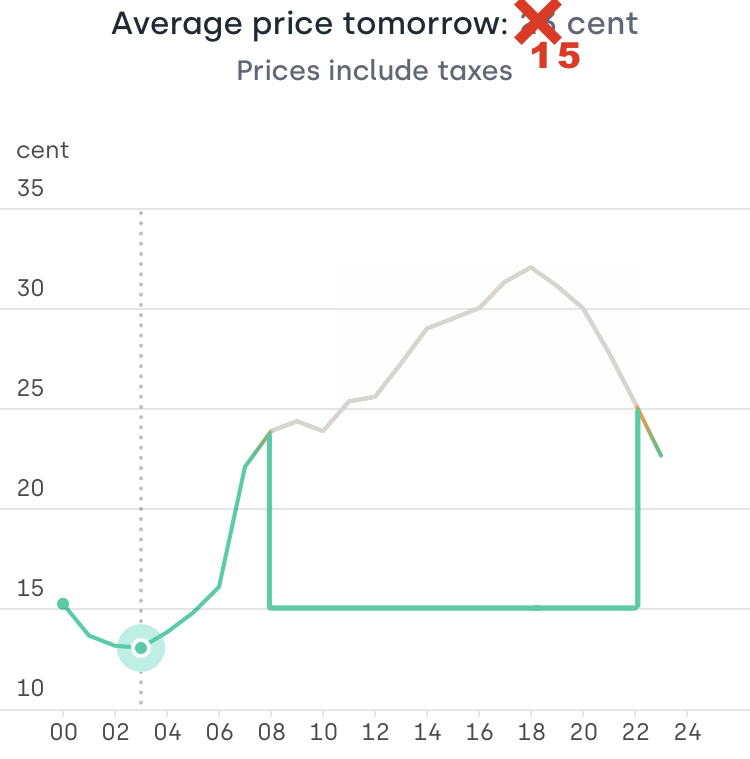
Great, so how can we save money? And how did I manage to make this price chart look like this?

Optimized price curve

Moving off-peak

Obviously, it makes sense to move some electricity consumption to the night if it is not time sensitive. No - we don’t cook our meals at night, but charging an EV off-peak while power is cheap is entirely possible. Tibber integrates with many Charge Box and EV makers as first-class citizens right at its App. So instead of charging when plugging in, the car will start charging when Tibber tells it to. Since Tibber does not make money with the amount of energy you consume, they don’t care if you use cheap or expensive electricity, either. This is a huge difference to legacy power tariffs and changes economic incentives dramatically.

The same is true for household appliances. In most cases, I don’t care if the dishwasher or the washing machine runs at 17:00 or at 02:00. Modern appliances are “connected” but not directly integrated with Tibber, so I had to build something that takes Tibber price information and triggers the appliances “remote start” abilities when electricity is cheap. I did that with HomeBridge, which comes with many plugins both for Tibber and for smart appliances from Bosch, Miele, Siemens etc. HomeBridge plugins like tibberswitch create events if electricity prices are cheap, those events can then be consumed by your home automation solution, for example HomeKit, to trigger events like “start the dishwasher”.

Automate all the things!

Our baseline electricity consumption could however not be moved since it does not make sense to turn off the freezer for multiple hours or, behold, even our network infrastructure and home server. Instead of moving consumption to times of low electricity prices, we need to move low electricity prices to times of consumption. Batteries are good at this.

Battery buffer

So I started looking into home power backup solutions. There is a great bunch of solutions and educational content out there, just be careful not to get lured into the prepper/doomer rabbit-hole. Jokes aside, of course this is primarily about saving money, but it can’t hurt to have some kWh of backup power in case of a blackout or the zombie apocalypse. Most solutions are made to store electricity from solar panels and feed it back to individual appliances as AC, like powering your cabin somewhere in the woods where there is no power grid.

With advances in battery technology, there have been some very interesting solutions lately that combine quick charging, good capacity with outstanding durability. Products based on LiFePO4 (“LFP”) batteries can store multiple kWh of electricity in a small package, endure thousands of charging cycles and charge within a few hours. Importantly, LFP batteries are very safe and can be run unsupervised forever without the risk of fire based on malfunction or defects. You can literally shoot those batteries without adverse side effects.

Some brands to watch are EcoFlow, Bluetti and Zendure. Zendure is pretty hard to come by in Europe, and they seem to copy EcoFlow quite a bit. Their focus is much for on “solar” generators, while Bluetti and EcoFlow play the “AC charging” tune a bit more prominent. It felt that Bluetti is not really making an up-to-date device that fits my needs, so I ended up in the EcoFlow ecosystem.

This is a case-study and not a product review, however I will include some kinks and learnings that never get noticed in paid “reviews”. Judging from the number of videos at YouTube, manufacturers sends out hundreds of free review kits. The only reviews I can recommend are the ones where people are taking the device apart and check for actual build quality and engineering decisions rather than reading a feature list. All was paid for with own money and I did not take any incentives. Note that all this relates to a 230V/50Hz grid and “EU versions” of devices.

Exploring the ecosystem

First, I had a look at the EcoFlow Delta Pro, which is a behemoth of a “portable” battery. It certainly fills a niche that is left by “true” home battery solutions from BYD, Tesla, E3DC and others. But since I did not plan to re-wire my home grid for battery backup and all the effort would not really pay off financially, I went for the much smaller and economical EcoFlow Delta 2 instead. You can read all the specs on their website, they are correct, I won’t repeat them here.

While reducing our power consumption, I identified that there are just two major appliances left, which continuously use power. A deep freezer and our home server rack. Since those have very predictable power usage profiles, they are the optimal candidates to start gathering experience with battery buffer. Both devices are located in the same room, so infrastructure changes would be minimal.

The Delta 2 has a 1kWh LFP battery built in and can be connected with an extra 1kWh LFP battery to a max capacity of 2kWh for about €1850 all-inclusive. It can also be connected to the 2kWH “Delta Max” extra battery for 3kWh of total capacity. However, that older NMC-based battery will just support ~800 charging cycles before reaching 80% capacity.

Just to mention one downside of EcoFlows expansion system: The connection plug is on the side of the devices and the proprietary plug is not angled and has a very inflexible cable. This is a super inconvenient placement if you use the Delta 2 at any space-constrained area, since you already need a gap for airflow on both sides. Please EcoFlow, put that port to the front or the back or at least offer an angled connector that creates a flush connection!

Usage considerations

The freezer and the rack consume a combined 120W, which means 2kWh is already plenty to cover 14 expensive hours of electricity. It also leaves enough time to charge the batteries with a gentle 300W. The Delta 2 can actually charge at 1200W (1500W with extra battery) but that can’t be good for longevity and efficiency. After all, I’m trying to get as much capacity out of this thing as possible - 2kWh x 365days x 10years.

With the latest firmware updates, the Delta 2 is very quiet when charging or delivering less than 500W. The 1.0 firmware apparently had no fan management built in. Out of the box, it was so loud (easily 60db) that it would disqualify the Delta 2 for in-home use. Luckily, that got patched. Talking about firmware, updating it does usually interrupt AC output. That needs to be taken into consideration when using it as power supply for sensitive devices.

UPS feature

The Delta 2 does bypass AC power while being connected to the grid and only switches to the inverter if the grid power supply fails. That is pretty much what basic UPSs do. EcoFlow actually advertises this feature, but is not very vocal about switching times and compatibility to computers. If switching times are too slow, the connected devices will suffer a brief power outage and restart. A proper double-conversion online-UPS requires 0ms to switch from mains to battery, which means any device connected to the UPS will not even notice that it has switched. Cheaper “line interactive” UPSs require 10-20ms to switch over. The ATX standard requires switching times of about 15ms and many servers will require even lower switching times.

It turns out that the Delta 2 can switch quick enough depending on its load. Switching while being loaded with 600W did not work for my setup, but when only being loaded with 120W the switching time is low enough to keep my home server and network equipment running. Cool! Producing the cleanest sine-wave I have ever seen out of a consumer-product inverter certainly helps.

Efficiency

With 2kWh of capacity and 120W continuous load, one would expect about 17h of runtime. Of course all the electronics of the battery (BMS, WiFi, Inverter…) take an efficiency toll. I found that the Delta 2 is using about 12W continuously while charging and providing AC at 120W through its bypass. 90% output efficiency is a good number for a portable device, especially for such low-power usage considering its beefy 1800W inverter. Input efficiency is about 90% as well, you need to charge 1200Wh at 300W to max out the 1024Wh battery. Many devices are most efficient at 50% load with a bias to the top, you don’t buy a 1000W device if you just plan to just use a fraction of that. The EcoFlow Delta 2 appears to be very well-balanced to serve all ends of the spectrum, though.

Automation

EcoFlow recently started adding basic automation capabilities to their app and labeled them as “lab features”. They are exactly as buggy as that sounds. Until they become more usable, I’m resorting to external automation to control battery charging. For now, that’s an Eve Energy plug, which gets switched on and off based on time of day to trigger the UPS function and switch back to charging the battery. I could create automation that factors in energy prices, but I don’t think it is worth it. Energy prices are just one factor, each charging cycle also translates to costs for battery lifetime and the concept of “scalping” only works if there is a large enough difference in price that offsets electrical inefficiencies. That’s almost never the case during the day. Simplicity beats overly complex solutions every time.

Guesstimates

One thing that really struck me is the estimate - or rather guesstimate - for remaining battery runtime. This metric is absurdly inaccurate, even though I did a “calibration run”, including a full charge and discharge cycle. Being in IT long enough means I’m skeptical towards any kind of progress bar, but I never experienced a device under-estimating its runtime by 30%. That’s not terrible since I have a very consistent power usage profile, but it led to some suspicion about actual battery capacity and efficiency at the start. The battery will just continue to provide power with “0% remaining” for a couple of hours.

DC operations

Having a battery connected to a server and network equipment at all times raises a question: Why use alternating current (AC) at all? AC is provided by the grid, so many devices that run on DC have AC-to-DC converters at their PSUs. A battery natively produces direct current (DC) and a computer natively consumes direct current, this conversion mumbo-jumbo does not really make sense at first sight. Using DC would reduce the load of the inverter at the Delta 2 and also remove the need to have a traditional PSU at the server. Each of the output sections (AC, USB, DC) can be disabled individually, doing so helps to conserve power, especially the AC unit as it requires an inverter to run regardless of the output load.

Unfortunately, DC output is somewhat limited. The Delta 2 has a car-charger plug output which provides 12V DC at 10A max, not much but just enough to run my server and some network equipment directly off DC. I used a couple of XT60 connectors and a 80W PicoPSU for my server, and indeed that led to ~15% longer battery runtime. While the DC-DC PicoPSU is a lot more efficient at low load, compared to a 300W Seasonic PSU (~95% vs. ~85%), the DC-DC conversion within the Delta 2, converting from the battery cell’s combined 48V to 12V, does not seem to be super efficient. Perhaps that feature is not considered very important, but it’s quite disappointing to see 85% DC-DC efficiency while DC-AC is at 90%. I did not test the USB-C PD output since it would produce 20V at the required wattage and that needs to get converted down again, adding even more inefficiency.

There is another reason to avoid using the DC output on the Delta 2 - DC will always use the battery, while AC can bypass the battery while it is connected to the grid. DC usage will lead to small charge cycles that push the battery from 98% to 100% every couple of minutes, which will certainly have an effect on battery lifetime when doing so for years. It is very possible that all the benefits of DC-DC efficiency gets eaten away by this factor. Since I have to use the inverter anyway for the freezer and the POE Switch, I dumped the idea of using DC directly from the battery.

Final thoughts

With manual and automated energy consumption changes, we were able to dodge most of the price crisis. Using a flexible rather than a fixed price tariff can cut both ways, and one definitely needs to have the means (aka. idle cash) to endure a bad month. I’m convinced it is the right way to do over the long term, as it changes consumption incentives. With enough home automation in place, there are a number of optimizations that can happen without affecting quality of life.

Using a battery buffer to scalp cheap energy may seem to be a bit extreme, but when you play with the idea of owning a powerstation anyway, it’s certainly a consideration. The alternative for me would be a rather expensive gadget that sits on the shelf until it needs replacing. Those modern LFP-based powerstations are super useful for camping or backup power, quite a development compared to the NMC age.

During the past months i’ve launched several initiatives to improve the security posture of our corporate infrastructure. As most companies we have the notion of a “internal” and an “external” network, which becomes more obsolete every day. For more background on this, look for good resources on “Zero Trust” networking and try to avoid marketing material.

Some of our assets are stored within GitLab, for example source-code, documentation, configuration, automation and build pipelines. As most Git server and CI implementations client access is offered through HTTPS and Git+SSH, with the latter being much more efficient. We have already moved web-browser access over HTTPS to flow through an authentication proxy some time ago. This means users run through our OpenID based single-sign on process before being granted access to GitLabs web interface.

When cloning or pushing Git repositories however, we still depend on static SSH keys. While SSH authentication using public/private keys is already a lot better than passwords, it still comes at the risk of losing the private key and by that allowing a third party elevated access to our repositories. GitLab is exposed to the Internet as we share lots of code with the open-source community. The main issue with those private keys is eternal trust and the fact that they are “only” protected by client-side security measures, some of which are optional and cannot really be attested, like encryption of the key material.

Teleport to the rescue

We’re using Gravitational Teleport for privileged access management, for example maintenance access to machines through SSH. It’s built around the idea that access is granted in an ephemeral way and that authentication runs through SSO, which means out-of-band techniques like 2FA can be used before access to SSH key material is provided.

Sequence diagram

Teleport works well with kubectl, which employs OpenSSH to control Kubernetes deployments. This quickly led to the idea of just using Teleport to provide access management to GitLab, which offers Git+SSH access through OpenSSH as well. In theory that’s pretty straight forward but came with some quirks related to GitLab.

In an optimal scenario a GitLab user would not upload any key material but get authenticated through Teleport and authorized through GitLab. Without knowing the users key fingerprint it’s however hard to map incoming SSH connections to user accounts and subsequently make authorization decisions. As a bonus, login to SSH works through a generic “git” user, so the users name and access permissions have to come from the certificate metadata.

Integrating Teleport

Let’s assume that Teleport is already up and running and users can tsh login to get their key material. On the Teleport side there is only one more thing to change, which is encoding specific “Principal” information to key material for users that are eligible to use GitLab. This information can be obtained by Teleport through the SSO system by checking what “claims” the user has, a LDAP backend or through static configuration. For the sake of this example let’s assume static configuration.

1
2
3
4
5
6
7
spec:
allow:
logins:
- '{{internal.logins}}'
- root
- git
- gitlab

The next time a user logs in to Teleport and gets access to key material, it will have those “logins” encoded as principals.

1
2
3
4
5
6
7
8
9
10
11
12
$ ssh-add -L | grep cert | ssh-keygen -L -f -
(stdin):1:
Type: ssh-rsa-cert-v01@openssh.com user certificate
Public key: RSA-CERT SHA256:1XU6aQIA8k2lx0S1oWvh+HbBDu6brERP4ezkO5mlPGQ
Signing CA: RSA SHA256:zH/mlNuyOSQMSerrbXWPVseu1rHHcA1vtQr3KVIkwZ8
Key ID: "martin"
Serial: 0
Valid: from 2020-03-19T09:57:22 to 2020-03-19T21:58:22
Principals:
root
git
gitlab

At this point also make sure the “Key ID” matches your GitLab user, this is essential to allow authorization.

Integrating GitLab

Public key information provided by the user through GitLabs user settings is stored within the home directory of the “git” user, at /var/opt/gitlab/.ssh/authorized_keys. Examining that file shows that a bit more is going on, for example that a command is called which maps the key to a user within the GitLab database. This will not work when authenticating with an ephemeral key that is not known or mapped at GitLab. At the same time we won’t need any integration by GitLab to make this work. It may make sense to restrict HTTPS access to force users on Git+SSH and somehow remove all existing user SSH keys, but thats rather optional.

Integrating OpenSSH

Server-side

To solve this, we can configure OpenSSHd to positively authenticate all connections that use a valid certificate which got signed by the Teleport CA. This follows the normal “OpenSSH integration” guideline from Gravitational. Export the public key of the Teleport CA and put it to the OpenSSH configuration at the GitLab server using the TrustedUserCAKeys parameter.

1
2
3
4
5
root@teleport $ tctl auth export --type=host > cluster_node_keys
root@gitlab $ cp cluster_node_keys /etc/ssh/teleport-user-ca.pub
root@gitlab $ vim /etc/ssh/sshd_config
[...]
TrustedUserCAKeys /etc/ssh/teleport-user-ca.pub

The other very important part is to use AuthorizedPrincipalsCommand to allow sessions of the SSH “git” user to get mapped to GitLab users. This command can be run as user “git” and contains the “Principal” to make sure only certs with the encoded value gain access. Finally, the “Key ID” value is inserted as %i to tell GitLab which user shall be authorized. Note that this information can only be encoded to the certificate by Teleport as only certificates signed by Teleports CA are accepted.

1
2
3
4
5
root@gitlab $ vim /etc/ssh/sshd_config
[...]
Match User git
AuthorizedPrincipalsCommandUser git
AuthorizedPrincipalsCommand /opt/gitlab/embedded/service/gitlab-shell/bin/gitlab-shell-authorized-principals-check %i gitlab

Client-side

Now the users OpenSSH client configuration needs to be updated to make sure the key material provided through Teleport is being used, instead of the users default key.

1
2
3
4
5
6
7
user@workstation $ vim ~/.ssh/config
[...]
host gitlab.heiland.io
Preferredauthentications publickey
HostName gitlab.heiland.io
IdentityFile ~/.tsh/keys/teleport/martin
User git

This makes sure the key stored at ~/.tsh/keys/teleport/martin is being used for SSH connections to gitlab.heiland.io when using the git user. Git will use this configuration when performing remote operations through Git+SSH.

Wrapping up

Now users should be able to git clone and work with repositories for which they are authorized in GitLab - once they ran through Teleports authentication process. There is no need anymore to upload any per-user key material to GitLab. However, GitLab always allow to fall-back to SSH keys, which can still be very useful for non-interactive access.

Limitations

This examples showcases how access to GitLab can be controlled through Gravitational Teleport. It builds upon OpenSSH integration and does not require a premium subscription of Teleport. However, this comes at the disadvantage that access to GitLab is not logged or monitored by Teleport, which can be worked around by monitoring OpenSSH logs which contain all that information.

A generic piece of advice on tuning

ZFS is a mature piece of software, engineered by file- and storage-system experts with lots of knowledge from practical experience. Sun invested a lot of money and built enterprise grade appliances around it for a decade. Always keep this in mind when optimizing it, there is reason to trust that defaults are chosen very reasonably even though they may not appear obvious at first look. Mind that enterprise class storage systems are primarily about safety and not about speed at all cost. If there would be settings that were better in all regards, someone would have already figured out and made them the default.

That being said, there is usually a chance to optimize software in order to fit the specific workload and environment. Doing so can save a lot of money compared to throwing more expensive hardware on a problem. This process is based on knowledge, context, testing methodology and goals. Always verify that a change has actual holistic positive impact and adjust back if not. Optimizing complex systems requires a systematic approach, which is not pasting every setting that has been suggested on the internet. It’s very likely that random settings which worked for a specific case won’t yield any improvement for another case but instead introduce problems or even data loss. The same applies to any suggestion given at this article, it could be totally worthless for you to replicate settings that worked well for me.

Before actually changing anything, make sure you understand the underlying concepts, have read or listened to all relevant documentation and are in a position to second-guess suggestions made by others. Make sure you understand the context in which ZFS is operating and define plausible success criteria. It does not make sense to aim for 2000 IOPS at 4K blocks out of a single HDD or expect 1GB/s throughput on encrypted storage on a Raspberry. It’s also not useful to expect the same kind of performance for any given workload since each configuration and optimization stands for itself. If you don’t know how block storage works in general or what parameters are relevant to measure and rate storage systems, then please gather this knowledge. Only if you can say with confidence that you understand what you are doing, why you are doing it, what you roughly expect and have found a proper testing methodology, only then you should attempt to “tune” a complex system such as ZFS.

Context

I’m using a 3-way RAIDZ1 array with HGST HUH721010ALN600 disks (10TB, 7200rpm, 4Kn) and a Intel Optane 900p card as ZIL/L2ARC within a entry-level server (E3-1260L, 32GB, 2x1Gbps) running Debian Linux and Proxmox/KVM for virtualization. Virtual machines (currently 10) run headless Debian Linux and provide general purpose residential services such as Mail, File, Web, VPN, Authentication, Monitoring etc. This article was written while running ZFS on Linux “ZoL” 0.7.6.

Current situation

Storage access within VMs is terribly slow and the host system shows high on IOwait numbers. Especially encrypted disks almost flat-line when moving some data around.

Defining success criteria

My goal is to fully saturate one of the servers 1Gbps links with a 10GB file transfer from within a virtual machine doing full-disk encryption. I want my VMs to be snappy and deliver their service without significant latency, even if other VMs are busy. The first is a objective goal regarding throughput which can be easily measured, the second a subjective one regarding latency.

Storage benchmark background

Benchmark parameters

Storage benchmarks have a few important variables:

  • Test file size, which should be large enough to get past cache sizes and represent real-world usage.
  • IO request size, usually between 4K and 1M, depending on the workload. Databases are more at the 4K side while moving large files is more at the 1M side.
  • Access pattern, random or sequential
  • Queue depth, which is the amount of IO commands that are issued by an application and queued within the controller at the same time. Depending on the drive, those commands can get executed in parallel (SSDs). Some queue saturation can be beneficial to improve performance, however too much parallelism can severely impact latency especially for HDDs.
  • Distribution of write and read access based on application type. Web servers usually trigger 95% read, databases are usually 75% read and 25% write and specific applications like log servers can even use 95% write. This heavily influence how efficient caches are used, for example.

Benchmark results

A very relevant value we get out of this test is latency, which translates to IOPS which translates to throughput. As a rough example, if a IO request takes 1ms (latency) and we apply a request size of 4KiB, this means we will get 4000KiB per second (or 4MiB/s) of throughput out of this device in a perfect scenario. 1ms of latency is already very low for a HDD, which is why HDD suck at small request sizes.

When running random access on spindle storage, throughput can go down even more as read/write heads need to reposition all the time. Solid-state storage does not have that mechanical impairment. If we crank up the request size to 64KB, we suddenly get 64MB/s out of the same drive. Latency is not always the same due to storage device characteristics, especially for random access. Therefor the percentile for latency is more interesting than the average, having a 99th percentile of 1ms means that 99% of all IO requests finished within 1ms, 1% took longer. This gives an idea about consistency of latency.

Limitations

At some point with lower latency or higher request size we will hit a throughput limit defined by mechanical constraints, internal transfer to cache or by the external interface that handles transfer to the storage controller, usually 6 or 12Gb/s for SATA/SAS, 16 or 32Gb/s for PCIe. Even high-end HDDs are capped by their rotation speed, which affects both latency and throughput. Modern SSDs are usually capped by their external storage interface or by thermal issues when doing sequential access. Random access is usually limited by memory cell technology (NAND, 3D-XPoint) or controller characteristics.

Storage layout decision introduce limitations as well. When running 10 disks in mirror mode they will provide the same write performance like one disk would. Actually it depends on the slowest disk within the array. Of course drives should be matched in such arrays but there are always variances and drive performance tends to degrade over time. Running the same 10 disks as stripe, we can expect almost 10x the performance than a single drive, assuming other components can handle it. A RAIDZ1 with three disks can in theory provide the same level of performance as a single drive would. On top of checksums, ZFS will calculate parity and store it to a second drive. This means RAIDZ1 is quite CPU/Memory hungry and will occupy two disks for a single write request.

File systems itself have characteristics that impact performance. There are simple file-systems like ext2 or FAT which just put a block to disk and read it. Other systems are more advanced to avoid data loss, for example keeping a journal or creating checksums of data which got written. All those extra features require resources and can reduce file-system performance. Last but certainly not least properties like sector sizes should be aligned between file-system and physical hardware to avoid unnecessary operations like read-modify-write.

Caches

Caches are very helpful to speed up things, however they are also a disadvantage when doing benchmarks that needs to be taken into consideration. After all, we want to get results for the storage system, not system RAM or other caches. Caches are there for a reason, so they should not be disabled for benchmarking but instead real-world data and pattern needs to be used for testing.

HDDs and NAND SSDs usually have very quick but small internal cache of 128MB to 1GB. This is not just used for buffering but also internal organization, especially for SSDs which need to take care about wear leveling and compression a lot.
Some HBAs have additional caches themselves which are much larger and supports the storage array instead of individual drives.
For ZFS specifically there is a whole range of caches (ZIL, ARC, L2ARC) independently from hardware as ZFS expects to directly access drives with no “intelligent” controller in between. Their way of working could be changed but is optimized for most workloads already, however their size can and should be matched with the system configuration.

Analysis

First benchmarking

File transfers from and to the server are very unstable, bouncing between 20 and 60MB/s. Those values are not very helpful and include a lot of unnecessary moving parts (client computer, network…) so i decided to locally benchmark the VM for random and sequential read and write. To do so i chose fio which is a handy IO benchmarking tool for Linux and other platforms.

To find out what my array is actually capable of, i started benchmarking ZFS directly at the host system. This removes several layers of indirection, which could hide potential root causes for bad performance. I also started there to find out how different benchmark settings would affect my results.

I created a matrix of benchmark settings and IOPS/throughput results and started with request sizes of 4KiB, 64KiB and 1MiB at a queue-depth of 1, 4, 8 and 16 at random read, random write, sequential read and sequential write patterns. At this point i kept my application profile simple since i was more interested in how read and write perform in general. Again reducing the complexity of having mixed workloads that could hide bottlenecks.

Results did tell me that there is negligible difference between queue-depths, so i sticked with QD4 for all future tests. Second, read performance is crazy high, indicating that ZFS caches are doing what they are supposed to do. The test first creates a data block - which ZFS stores in ARC (aka. DRAM) or L2ARC (Intel Optane 900p) - and then reads the same very same block from those caches. This is not a usual real-world scenario so i put more emphasis on write performance.

fio commands

During my benchmarks i used the following fio parameters. Adjust block size bs accordingly:

Pattern Command
Random read fio --filename=test --sync=1 --rw=randread --bs=4k --numjobs=1 --iodepth=4 --group_reporting --name=test --filesize=10G --runtime=300 && rm test
Random write fio --filename=test --sync=1 --rw=randwrite --bs=4k --numjobs=1 --iodepth=4 --group_reporting --name=test --filesize=10G --runtime=300 && rm test
Sequential read fio --filename=test --sync=1 --rw=read --bs=4k --numjobs=1 --iodepth=4 --group_reporting --name=test --filesize=10G --runtime=300 && rm test
Sequential write fio --filename=test --sync=1 --rw=write --bs=4k --numjobs=1 --iodepth=4 --group_reporting --name=test --filesize=10G --runtime=300 && rm test

Results from ZFS

Pattern IOPS MB/s
4K QD4 rnd read 47464 190
4K QD4 rnd write 10644 43
4K QD4 seq read 347210 1356
4K QD4 seq write 16020 64
64K QD4 rnd read 62773 3923
64K QD4 rnd write 5039 323
64K QD4 seq read 58514 3657
64K QD4 seq write 5497 352
1M QD4 rnd read 6872 6872
1M QD4 rnd write 645 661
1M QD4 seq read 2348 2348
1M QD4 seq write 664 680

Not so shabby! My system is able to do random writes up to 660MB/s on large request sizes and serve 10k IOPS on small request sizes. This gets certainly supported a lot by ZFS caches and the Optane card, but hey thats what they’re supposed to do. For a 3-disk system i’d call it a day since performance is much better than my success criteria even with default ZFS settings.

However, there still is the fact that performance within VMs is terrible and with the results so far i pretty much ruled out ZFS as the root cause. So what could it be?

Results from VM

Measuring IO within the VM confirms my impression. There is a huge gap compared to the numbers i see at the host, ranging from 85x at 4K to 6x at 1M request sizes.

Pattern IOPS MB/s
4K QD4 rnd read 126 0,5
4K QD4 rnd write 124 0,5
4K QD4 seq read 28192 113
4K QD4 seq write 125 0,5
64K QD4 rnd read 9626 616
64K QD4 rnd write 126 8
64K QD4 seq read 17925 1120
64K QD4 seq write 126 8
1M QD4 rnd read 1087 1088
1M QD4 rnd write 94 97
1M QD4 seq read 1028 1028
1M QD4 seq write 96 99

What the heck is going on here?

Working theories

ZFS

The following parameter help to adjust ZFS behavior to a specific system. The size of ARC should be defined based on spare DRAM, in my case about 16 out of 32GB RAM are assigned to VMs, so i chose to limit ZFS ARC to 12GB. Doing that requires a Linux kernel module option, which becomes available after reloading the module.

1
2
$ vim /etc/modprobe.d/zfs.conf
options zfs zfs_arc_max=12884901888

I assigned a quite speedy Intel Optane 900p card as ZIL and L2ARC. By default L2ARC would be stored to the pool, which explains why there is a rather low throughput limitation of 8MB/s for it. Since the Optane card is independent from my HDD i set this to 1GB/s instead. Note that this can harm pool performance in case L2ARC is not using dedicated memory.

1
2
$ vim /etc/modprobe.d/zfs.conf
options zfs l2arc_write_max=1048576000

Further low-level tuning seems unnecessary until the VM comes close to the numbers seen at the host. So what can cause this? Looking at the architecture, data within VMs uses the following path:

HDDs <-> Cache <-> ZFS <-> Dataset <-> VM image <-> KVM <-> LVM <-> Encryption <-> VM file system

Dataset

Disk, ZFS and Cache are ruled out, so lets do a sanity check on my datasets. My VM images are stored on ZFS using datasets like storage/vm-100-disk-1 instead of storing them as file to the pool directly. This setup allows to specify some per-VM settings in ZFS, for example compression. One dataset property in particular made me curious:

1
2
3
4
$ zfs get all storage/vm-100-disk-1
storage/vm-100-disk-1 volsize 10G local
storage/vm-100-disk-1 volblocksize 8K -
storage/vm-100-disk-1 checksum on default

The volblocksize property is relevant to align the datasets block size with the physical disks sector size. Since i’m using 4Kn disks, my sector size is 4K, not 8K - leading to a misalignment and potentially wasted storage access.

1
2
$ cat /sys/block/sda/queue/hw_sector_size
4096

I don’t know exactly why the dataset was created with a 8K volblocksize but since i migrated some datasets around its possible that this was set when originally creating the dataset on SSD. SSDs tend to have 8K blocks. Setting this to a aligned value just makes sense in every way:

1
$ zfs set volblocksize=4K storage/vm-100-disk-1

Compression

Next up is compression. It’s common sense that compression consumes some resources and ZFS is no exception here. It already uses a quite fast and efficient default (LZ4) and i benchmarked the performance impact of switching off compression to be around 10%. Chosing this setting is really not just about speed, depending on the data it can help to severely save space and money. Bechmarks create random data which is hard to compress. I decided to keep it enabled for all datasets since ZFS already figures out if the data it writes can be compressed or not. However, for improved performance it should be disabled:

1
$ zfs set compression=off storage/vm-100-disk-1

Sync

ZFS offers to make every write request to be synchronous instead of asynchronous if the issuing application choses to do so. Having synchronous write makes sure data is actually written to non-volatile memory before confirming the IO request. In case even minimal “in-flight” data loss is unacceptable, one can use sync=always at the expense of some throughput. I found the effect on write performance to be almost 20% and since i’ve a UPS running i decided to use the default again, which allows asynchronous writes. This of course will not save me from PSU or cable failures, but i take the chance.

1
$ zfs set sync=standard storage/vm-100-disk-1

atime

ZFS has the default of storing the last access time of files. In case of datasets with a RAW image inside, this does not make a lot of sense. Disabling can save a extra write after any storage request.

1
$ zfs set atime=off storage/vm-100-disk-1

VM image

The RAW image of the VM is quite off the table since its just a bunch of blocks. I’d be careful with using qcow2 images on top of ZFS. ZFS already is a copy-on-write system and two levels of CoW don’t mix that well.

KVM

I manage my virtual machines using Proxmox and have chosen KVM as hypervisor. Since its emulating hardware, including mapping the RAW image to a configurable storage interface, there is a good chance to have big impact. Based on some posts i chose virtio-scsi as storage device since i thought its discard feature helps with moving orphaned data out of ZFS. I also chose the writeback cache since its description sounded promising without ever testing its impact. So i played around with some options and found that virtio-block as device and none as cache leads to massive performance improvements! Just look at benchmark results after this change:

Pattern IOPS MB/s
4K QD4 rnd read 19634 79
4K QD4 rnd write 3256 13
4K QD4 seq read 151791 607
4K QD4 seq write 2529 10
64K QD4 rnd read 7922 507
64K QD4 rnd write 909 58
64K QD4 seq read 18044 1128
64K QD4 seq write 1533 98
1M QD4 rnd read 657 673
1M QD4 rnd write 264 271
1M QD4 seq read 805 824
1M QD4 seq write 291 299

The iothread option had minor but still noticeable impact as well:

Pattern IOPS MB/s
4K QD4 rnd read 26240 105
4K QD4 rnd write 4011 16
4K QD4 seq read 158395 634
4K QD4 seq write 3067 12
64K QD4 rnd read 10422 667
64K QD4 rnd write 1495 96
64K QD4 seq read 9087 582
64K QD4 seq write 1557 100
1M QD4 rnd read 908 930
1M QD4 rnd write 254 261
1M QD4 seq read 1650 1650
1M QD4 seq write 303 311

Getting from 124 to 4011 random write IOPS at 4K is quite an impressive improvement already. Turns out that blindly tweaking ZFS/dataset properties can get you in trouble very easy. The biggest issue however was the KVM storage controller setting, which i believe has to be a bug with the controller simulation of virtio-scsi.

File systems

Next in stack would be the file system and volume manager of the virtual machine, which connects to the virtual storage device. I used Debians defaults of LVM and ext4 because defaults are always great, right? Wrong! Even tough LVM is actually just a thin layer it turned out to have quite some effect. Testing with and without LVM has shown that using a plain old GPT or no partition table (if thats an option) led to a 10% improvement. Looking at file systems, xfs and ext4 appear to be bad choices for my environment, switching to ext3 (or ext2) improved performance by another 30% in some cases!

Pattern IOPS MB/s
4K QD4 rnd read 30393 122
4K QD4 rnd write 4222 17
4K QD4 seq read 164456 658
4K QD4 seq write 3281 13
64K QD4 rnd read 9256 592
64K QD4 rnd write 1813 116
64K QD4 seq read 694 711
64K QD4 seq write 1877 120
1M QD4 rnd read 1207 1207
1M QD4 rnd write 385 395
1M QD4 seq read 1965 1966
1M QD4 seq write 419 430

Encryption

When enabling full-disk encryption (LUKS) for the virtual drive, performance dropped a lot again. Of course thats expected to a certain degree but numbers went down below my acceptance criteria:

Pattern IOPS MB/s
4K QD4 rnd read 10530 42
4K QD4 rnd write 3637 15
4K QD4 seq read 52819 211
4K QD4 seq write 4216 17
64K QD4 rnd read 1710 109
64K QD4 rnd write 1178 75
64K QD4 seq read 3269 209
64K QD4 seq write 1217 78
1M QD4 rnd read 141 145
1M QD4 rnd write 94 97
1M QD4 seq read 155 159
1M QD4 seq write 94 96

There actually is a catch with encryption, which is that the encryption layer tries to be as fast as possible and therefore encrypts blocks in parallel, which can mess up optimizations of writing blocks sequentially. I have not validated this in detail but in fact going single-core within the VM did show a 25% improvement on small request sizes. Anyway i don’t want to sacrifice CPU cores, especially not when doing encryption all the time. Since encryption is not really storage related, i compared encryption speed on the host and on the VM:

1
2
3
4
5
6
7
8
9
10
11
12
13
14
$ cryptsetup benchmark
# Algorithm | Key | Encryption | Decryption
aes-cbc 128b 207.6 MiB/s 243.0 MiB/s
serpent-cbc 128b 82.0 MiB/s 310.6 MiB/s
twofish-cbc 128b 168.7 MiB/s 192.0 MiB/s
aes-cbc 256b 191.4 MiB/s 199.6 MiB/s
serpent-cbc 256b 88.3 MiB/s 278.8 MiB/s
twofish-cbc 256b 151.6 MiB/s 171.5 MiB/s
aes-xts 256b 266.2 MiB/s 251.4 MiB/s
serpent-xts 256b 286.3 MiB/s 285.9 MiB/s
twofish-xts 256b 191.7 MiB/s 195.6 MiB/s
aes-xts 512b 201.8 MiB/s 197.8 MiB/s
serpent-xts 512b 276.3 MiB/s 261.3 MiB/s
twofish-xts 512b 187.0 MiB/s 185.7 MiB/s

Quite consistent results, however looking at the host did reveal a different truth:

1
2
3
4
5
6
7
8
9
10
11
12
13
14
$ cryptsetup benchmark
# Algorithm | Key | Encryption | Decryption
aes-cbc 128b 1036.2 MiB/s 3206.6 MiB/s
serpent-cbc 128b 83.9 MiB/s 658.9 MiB/s
twofish-cbc 128b 192.5 MiB/s 316.4 MiB/s
aes-cbc 256b 767.6 MiB/s 2538.9 MiB/s
serpent-cbc 256b 83.9 MiB/s 657.0 MiB/s
twofish-cbc 256b 198.2 MiB/s 356.7 MiB/s
aes-xts 256b 3152.5 MiB/s 3165.3 MiB/s
serpent-xts 256b 612.8 MiB/s 541.7 MiB/s
twofish-xts 256b 343.1 MiB/s 351.5 MiB/s
aes-xts 512b 2361.9 MiB/s 2483.2 MiB/s
serpent-xts 512b 632.8 MiB/s 622.9 MiB/s
twofish-xts 512b 349.5 MiB/s 352.1 MiB/s

Numbers for AES based algorithms are through the roof on the host. The reason for this is a native AES implementation on recent Intel CPUs called AES-NI. Proxmox defaults the KVM “CPU model” to “kvm64”, which does not pass through AES-NI. Using host CPU type exposes the CPU directly to the VM which led to a huge boost again. Note that this might be a security risk on shared systems. In my case i’m in full control of the system so it does not matter. So lets check the final results:

Pattern IOPS MB/s
4K QD4 rnd read 26449 106
4K QD4 rnd write 6308 25
4K QD4 seq read 158490 634
4K QD4 seq write 6387 26
64K QD4 rnd read 9092 582
64K QD4 rnd write 2317 148
64K QD4 seq read 17847 1116
64K QD4 seq write 2308 148
1M QD4 rnd read 454 466
1M QD4 rnd write 240 246
1M QD4 seq read 806 826
1M QD4 seq write 223 229

Finally my VM is reaching the goal of saturating a 1Gbps link. 150 - 250MB/s random write on 3 disks while using encryption and compression is pretty neat!

Lessons learned

  1. Always question and validate changes done to complex systems
  2. Use virtio-blk, host CPU, iothread and no storage cache on KVM
  3. Make sure dataset block size is aligned to hardware
  4. Consider disabling compression, and access time on datasets
  5. Avoid using LVM within VMs, consider ext3 over ext4

I recently started to replace the HDD storage of my home server since my three WD RED 4TB drives got rather old and i required more space. After lots of experimenting i ended up with ZFS, three new HGST 10TB drives and a shiny Optane 900p. Here is my story so far.

What is ZFS?

There are many videos, articles and other documentation out there, describing in detail what ZFS is. Lets make this brief. ZFS is a copy-on-write file system created by Sun Microsystems for Solaris and available under a Open-Source (-ish) license for Linux and other operating systems. It combines the abilities of a volume manager (like LVM) with a file system (like ext4). Compared to most other file systems, it natively handles multi-device situations by creating all kinds of stripes, mirrors and parity based constructs for data redundancy. Unlike any other file system (yes i know BTRFS…) it sets its priority on data consistency, self-healing capabilities, error prevention and has a proven track-record in the enterprise storage industry.

ZFS works best when exposing disks directly to it, favouring a “JBOD” configuration over RAID controllers. It strictly is NOT “Software RAID / Ghetto RAID”, in fact it offers feature no other file system or hardware RAID controller can offer. Lets face it, RAID controllers are just expensive, optimized computers with crappy, often incompatible firmware and a bunch of SATA/SAS connectors. Since i evaluated multiple solutions (Linux MD, a LSI 9260-8i hardware controller, BTRFS and ZFS) i dare to have an opinion on that topic. The only thing ZFS does not have is a battery-backup unit (“BBU”), however the risk of losing any data during a power outage is extremely low and data corruption can not happen with ZFS. A external UPS is a lot cheaper than a entry level RAID controller with BBU. This only leaves PSU failures, cable errors and software bugs as risk.

As usual there are concessions to make - for ZFS that was higher resource usage (and subsequently potentially lower performance), compared to file systems that care less about data integrity. It has to go many extra miles to make sure data is not just received from disks but the data is actually the correct one, intact, unmodified and gets repaired in case its corrupted. This by the way means using ECC RAM is a very good idea, as faulty data in RAM would lead to “incorrectly repaired” (aka. corrupted) data. Optional features like compression, de-duplication and encryption take an extra toll. ZFS has intelligent caches which are quite memory hungry and can easily use 16GB of available RAM even on small systems. That being said, unused RAM is wasted RAM and its important to understand what ZFS is using it for. To offload some of this resource usage, ZFS allows a second level of caching being written to non-volatile memory called the L2ARC (“Level 2 adaptive replacement cache”) which acts similar to a “read cache”. Next there is a mechanism called ZIL (“ZFS intent log”) which is similar to a “write cache” that collects and streamlines write operations and ZFS then flushes them to disk every couple of seconds.

Performance of ZFS can be greatly enhanced by using a SLOG (“separate log device”) for ZIL and also offload L2ARC to high-speed, low-latency storage. Since DRAM is volatile it’s not a consideration, except some super expensive battery/capacitor buffered DRAM devices. SSDs are a lot more affordable, non-volatile by nature and really fast compared to hard drives. However, compared to DRAM, SSDs are several multitudes slower. Just recently a new technology has been released, claiming to fit between DRAM and traditional SSDs and therefor be an obvious choice for ZIL and L2ARC: Intel Optane.

What is Optane?

  • It’s a product range based on 3D-XPoint memory
  • It’s built for very specific use-cases like caching
  • It’s cheaper than DRAM but more expensive as typical SSDs
  • It uses proprietary memory tech from Intel and Micron
  • It’s NOT a typical SSD, since it’s not based on NAND flash
  • It’s NOT DRAM, since it’s non-volatile

3D-XPoint “3D cross-point” memory technology was announced years ago and first products, called “Optane”, hit the market in early 2017. The first release was a datacenter-grade memory product called “Optane SSD DC P4800X”, available as 375GB and 750GB capacities and as U.2 drive and PCIe card formats. Roughly at the same time some much more consumer oriented “Optane Memory” M.2 cards became available as 16GB and 32GB configuration. In late 2017 Intel released the “Optane SSD 900p” product with capacities of 280GB and 480GB as PCIe card and U.2 drive.

While all Optane products are based on 3D-XPoint memory, their scope and performance varies a lot. Those small “Optane Memory” M.2 cards are meant to serve as system cache/accelerator for HDD-based desktop and mobile computers, while the P4800X and 900P are targeting server and enthusiast desktop computing. The latter two use much more power but also deliver significantly better performance as they pack more 3D-XPoint modules and speedier controllers. The P4800X is Intels top-of-the-line offering and comes with more integrity checks, capacitor based buffer to avoid data loss and better durability. Performance-wise it’s rather close to the 900p, and both share stunning specs.

  • 2500MB/s read, 2000MB/s write
  • 500.000 IOPS read and write
  • 10usec latency for read and write
  • 5PBW, 1.6M hours MTBF
  • 1 sector per 10^17 bits read uncorrectable

Intel claims that those cards require a 7th generation Intel Core CPU, which is just half of the truth. In fact those drives use the NVMe protocol and can be used as regular block device with any current CPU and platform. To run Intels software for automated caching indeed a 7th generation Intel Core CPU is enforced, which appears to be a sales oriented decision. Anyway, for my use-case the 900p meets a 5th generation Xeon E3 CPU on a C232 chipset - and it just works fine.

Now, whats the fuzz about? Why is Optane spectacular? When looking at the typical benchmarks, Optane based products deliver okay-ish performance compared to NAND-based NVMe SSDs like a Samsung 960 Pro - but come as a steep price premium. SSD Benchmarks usually assume large block sizes (>=1M) and high queue-depth (>=16). These values do not represent typical server workloads, in fact i dare to claim they represent almost no relevant workload and are made up by vendors to present large numbers. NAND based SSDs are great in producing high throughput when reading large quantities off many NAND chips in parallel (sequential access), and this is a good thing. However, the fun starts at small block sizes (e.g. 4K) and low queue depths (e.g. 2 or 4) often seen at server workloads like databases. Consumer grade NAND SSDs are usually also terrible at random write performance. Intel claims Optane can fix that.

Benchmarking the beast

Disclaimer: I’ve not received any freebies or been in contact with any of the brands mentioned here. All stuff has been bought from my own money. I understand benchmarks can be in-comprehensive and i admit that the SM951 was in use for some years so it might not produce perfect results anymore. Also the system was running some load during the benchmark and potentially lacking optimization. While my results might not be scientifically perfect, they represent a real-world configuration.

Lets have a look at a Samsung SM951 running at the same system as a Intel Optane SSD 900p, both connected via PCIe x4:

1M blocksize, QD16, random read
$ fio --name=test1M --filename=test1M --size=10000M --direct=1 --bs=1M --ioengine=libaio --iodepth=16 --rw=randread --numjobs=2 --group_reporting --runtime=5
* 900p: 2563 IOPS, 2536 MB/s, 1247 usec avg. latency
* SM951: 2005 IOPS, 2005 MB/s, 1594 usec avg. latency

So far so good, both products are almost toe to toe while the 900p delivers a bit more performance justifying its higher price point. Note that both products appear to maxed out regarding bandwidth. Now, lets write some data.

1M blocksize, QD16, random write
$ fio --name=test1M --filename=test1M --size=10000M --direct=1 --bs=1M --ioengine=libaio --iodepth=16 --rw=randwrite --numjobs=2 --group_reporting --runtime=5
* 900p: 2152 IOPS, 2152 MB/s, 1485 usec avg. latency
* SM951: 399 IOPS, 409 MB/s, 7981 usec avg. latency

Things start to become interesting as the 900p suddenly pulls away with 5x higher IOPS while still being maxed out and bandwidth. Write intense workloads are obviously an issue for consumer NAND SSDs.

As said before, 1M block sizes and a queue-depth of 16 are unusual for server workloads, lets lower the block size to 4K:
4K blocksize, QD16, random read
$ fio --name=test4k --filename=test4k --size=10000M --direct=1 --bs=4k --ioengine=libaio --iodepth=16 --rw=randread --randrepeat=1 --rwmixread=75
* 900p: 310227 IOPS, 1211 MB/s, 51 usec avg. latency
* SM951: 177432 IOPS, 710 MB/s, 90 usec avg. latency

Again, the SM951 does a good job in reading, however the gap becomes a lot bigger. The 900p now delivers 75% better throughput. Let’s write some data…

4K blocksize, QD16, random write
$ fio --name=test4k --filename=test4k --size=10000M --direct=1 --bs=4k --ioengine=libaio --iodepth=16 --rw=randwrite --randrepeat=1 --rwmixread=75
* 900p: 188632 IOPS, 755 MB/s, 84 usec avg. latency
* SM951: 22012 IOPS, 88 MB/s, 712 usec avg. latency

While 22k IOPS are still very respectable from the SM951, the 900p again obliterates it, now producing about 9x higher performance.

Conclusion

Those numbers being crunched, NAND based SSDs remain to be great products, just not for every workload and use-case. 3D-XPoint clearly defines a new standard for such workloads, somewhere in between DRAM and NAND.

Back to specs, the 900p’s endurance is rated as 5PBW (five petabytes written) compared to 400TBW (four hundred terabytes written) of the SM951. The datacenter focused P4800X is even rated at 20PBW. To be fair on specs, the 900p uses a lot more power (5W idle, 14W load) compared to 40mW idle and 5W load of the Samsung and other NAND SSDs.

Both the latency advantage and higher durability make 3D-XPoint based products a very interesting device for enterprise workloads and caching. Therefor i decided to get a 900p and use it as cache device for my home server. Before doing so yourself, consider that Optane is a 1st generation product, there are likely to be improved cards around the corner.

Upgrading my home server

The server runs a bunch of KVM managed by Proxmox, sports a E3-1260L CPU, 32GB of DDR4 ECC memory and a P10S-I board.

Spinning up ZFS

Creating the primary storage pool is quite straight forward:
$ zpool create -O compression=lz4 -O normalization=formD -o ashift=12 storage raidz1 ata-HGST_HUH721010ALN600_1SJ5HXXX ata-HGST_HUH721010ALN600_1SJ5JXXX ata-HGST_HUH721010ALN600_1SJ6KXXX

Explanation:

  • compression=lz4 means LZ4 compression is used on compressible data. ZFS will find out if a block is actually compressible.
  • normalization=formD means file names are stored as normalized UTF-8
  • ashift=12 means native 4K blocks are used, which my drives feature
  • raidz1 means the provided drives are organized in a way traditional RAID5 does, storing a parity as redundancy to allow recovering one failed drive

Tuning

ZFS is quite reasonably configured by default, however there are a few useful knobs to adjust to both workload and hardware. Please always verify that a change has positive impact and adjust, there is no perfect universal config otherwise this would be the default anyway. I’ll write a separate post about file-system tuning in a broader scope.

Adding Optane ZIL/L2ARC

To use the Optane 900p as caching devices, i created a GPT partition table with a 10GB ZIL (“log”) and 120GB L2ARC (“cache”) partition. Adding them to the pool is easy:

1
2
$ zpool add storage log nvme-INTEL_SSDPED1D280GA_PHMXXX2301DU280CGN-part1
$ zpool add storage cache nvme-INTEL_SSDPED1D280GA_PHMXXX2301DU280CGN-part2

Now my pool looks like this:

1
2
3
4
5
6
7
8
9
10
11
12
13
14
15
16
17
18
$ zpool status -v
pool: storage
state: ONLINE
scan: scrub repaired 0B in 20h37m with 0 errors on Sun Feb 11 21:01:09 2018
config:

NAME STATE READ WRITE CKSUM
storage ONLINE 0 0 0
raidz1-0 ONLINE 0 0 0
ata-HGST_HUH721010ALN600_1SJ5HXXX ONLINE 0 0 0
ata-HGST_HUH721010ALN600_1SJ5JXXX ONLINE 0 0 0
ata-HGST_HUH721010ALN600_1SJ6KXXX ONLINE 0 0 0
logs
nvme-INTEL_SSDPED1D280GA_PHMXXX2301DU280CGN-part1 ONLINE 0 0 0
cache
nvme-INTEL_SSDPED1D280GA_PHMXXX2301DU280CGN-part2 ONLINE 0 0 0

errors: No known data errors

Migrating images

I was previously using the “qcow2” disk format on ext4, which is now a bad idea since ZFS is already a copy-on-write system. Those images can easily be transformed to RAW images and dd’ed back to the ZFS dataset.

1
2
$ qemu-img convert -f qcow2 -O raw vm-100-disk-1.qcow2 vm-100-disk-1.raw
$ dd if=vm-100-disk-1.raw of=/dev/zvol/storage/vm-100-disk-1 bs=1M

ZFS allows to create sparse datasets, which will only grow if their space is actually used. Since zeros are highly compressible, writing and deleting a large “zero file” within the VMs can actually free up ZFS storage. After moving to RAW images, run the following within the VM:

1
2
$ dd if=/dev/zero of=zerofile bs=1M
$ rm zerofile

Swapping to Optane

Since i’m running virtual machines, there is another thing which should go to low-latency storage: swap. I try to conserve as much memory as possible, which means VMs sometimes use their swap space, which gets horribly slow in case it resides on spinning disks. For that reason i created another partition, created a separate ZFS pool and created disk images that will hold the VMs swamp data.

Creating a new pool is very simple and as i don’t need redundancy on swap it will just be one “device”, actually a partition. Using unique hardware identifiers instead of device paths (e.g. “/dev/nvme0n1p3”) is quite helpful as PCIe enumeration and partition order may change.

1
$ zpool create -O normalization=formD -O sync=always swaps INTEL_SSDPED1D280GA_PHMXXX2301DU280CGN-part4

Now new virtual disks are created on this ZFS pool and get attached to their virtual machine.

1
2
3
4
5
$ zfs list
swaps 33.1M 96.8G 24K /swaps
swaps/vm-100-disk-1 30K 96.8G 30K -
swaps/vm-101-disk-1 1.02M 96.8G 1.02M -
...

Replacing old swap and re-claiming that space for the root partition is easy if the VMs are using LVM. /dev/sdb is the new virtual device available to the VM, stored at the ZFS “swaps” pool on Optane.

Add the new swap space to LVM:

1
2
3
$ pvcreate /dev/sdb
$ vgcreate vm-optane /dev/sdb
$ lvcreate -l 100%FREE -n swap vm-optane

Create the swap file system and use the UUID as device identifier in /etc/fstab:

1
2
$ mkswap /dev/vm-optane/swap 
$ vim /etc/fstab

Disable and remove the old swap partition:

1
2
$ swapoff /dev/vm-system/swap 
$ lvremove /dev/vm-system/swap

Extend the root partition and file system to use the free’d up space:

1
2
$ lvextend -l +100%FREE /dev/vm-system/root
$ resize2fs /dev/vm-system/root

…and reboot the VM, just to be sure the file system is undamaged.

With the holiday season at the doorsteps, some may look for a new camera and following up a discussion i recently had, i’d like to share some advice on what to buy. While owning Canon cameras and lenses, i try to be as vendor agnostic and unbiased as possible. In fact i will not propose a specific camera but try to provide a list of useful parameters as a basis for you to decide. The goal is to avoid wasting money on cameras and lenses which would be much better spent on a vacation to see the world and actually take photos.

Basic decisions

First, do you need a dedicated camera for still photos? Ask yourself the following questions:

  • Are you able and willing to spend at least €1000 on a camera body and lens?
  • Are you ready for a (temporary) world of pain when moving beyond automatic mode?
  • Are you limited by your smartphones camera abilities?

If the answer to any of those questions is “no”, please don’t waste your time and money and continue using your phones camera. It will be do an exceptional job for capturing still photo and video. Why?

Today there really is no camera market at the sub-€500 section, those simple point and shoot cameras got pretty much extinct by phones. There are lots of offers between €500 and €1000, so-called “bridge cameras” which provide a very small upgrade from your phone but have a fixed lens and cheap “system cameras” that are not really better either but allow to exchange the lens. By “system cameras” i mean DSLR and mirrorless cameras alike, the differentiation to “bridge cameras” really is to swap the lens and other accessories. A good camera and lens combination to get started will cost about €1000, regardless the vendor. Those cameras have good specs, can shoot RAW images and offer creative access to exposure. Looking for used gear is a great option but note that lenses are quite stable in price.

If you stick with automatic exposure mode, there really is not much use in switching to a dedicated camera either. Chances are that the automatic mode of your phone is much more powerful and constantly improving at a pace the camera industry currently is not. For the beginning its totally normal to use automatic exposure to get some useful images, however the power of a dedicated camera system lays in the way how the photographer can influence image composition, exposure and details in a creative way which is not possible in automatic mode. And no, “creative” does not mean bokeh simulation or subject isolation that current high-end phones offer.

In case you’re taking photos to post them on social networks or show them on your phone, there is a high probability that a dedicated camera will not really be used anyway. Getting photos off those cameras is still not trivial and a phone is the natural place to share and thus take selfies or food porn.

Marketing metrics

Lets assume the answer to any of those questions is “yes”, the next logical question is “what camera to buy?”. For 99% of photographers stepping up from smartphone photography, the answer is simple: it does not matter. Nowadays its impossible to buy a bad camera when choosing a well known vendor (Canon, Nikon, Sony, Fuji, Sigma, Olympus, Panasonic, Leica, Pentax…). Anyway, there has to be something to narrow down the camera market to take a decision. Typically this “something” is a list of technical parameters each camera has and is therefor easy to compare. Vendors and customers like large numbers, so the following parameters are often used for this decision:

  • Resolution (Megapixels)
  • ISO range (something between 50 and 51200, extended by some phantasy number)
  • Dynamic Range (measured in “stops”)
  • Video resolution and frame rate (like 4K@120fps)
  • Still photo frames per second (between 4 and 20fps)

While those parameters have impact on photography performance, they do not really matter nowadays and are vastly overrated.

Resolution

Any camera uses sensors exceeding 12 megapixels and except for special cases this is far more than needed to capture great images. The first professional digital cameras resolved at 4 megapixels and the resulting images have been printed to cover whole buildings. Really, megapixels is the last thing that should be considered for a decision. Except for wasting storage, very specific usages and “pixel peeping” there is no significant difference between a sensor resolving at 12 or 50 megapixels.

ISO range

ISO range is a similar story, unless taking pictures in really dark scenarios any modern camera will provide relatively clean images up to ISO 3200. If you know how to influence your other exposure parameters (lens aperture and shutter speed) you almost always can work around choosing high ISO settings that will mess up images regardless of the camera. Only when comparing a €1000 camera to a €4000 camera there will be noticeable difference. 35mm sensors (so-called “full frame”) tend to produce less noisy images but the benefit is not huge while the difference in price is significant and you need more expensive and heavy lenses.

Dynamic range

Dynamic range or “DR” is often used to rate a sensor. It describes the range of light intensities from the darkest shadows to the brightest highlights. A practical example is the ability to resolve details at areas with high contrast. Just like megapixels, there are situations where higher DR leads to better results but those are often neglectable and can be fixed by using proper exposure, filters or post processing. Any relevant camera today has a DR of at least 12 stops, which will do the job just fine. To be very clear, don’t buy gear solely by comparing results at DxOmark, many of their test results have no practical relevancy and only provide a very isolated rating.

Video

When looking for a camera to take still photos, video capabilities should be low in priority for most users. In fact, your phone will produce better video than a sub-€2000 still photo camera in most cases. Those who really need pro-grade video will spend a lot more but probably not choose a still photo camera. For the rest of us, like semi-pro video blogging, there are great and relatively inexpensive video cameras out there.

FPS

Last but not least frame rate can be of utmost importance for specialized photography like sports. But when stepping up from a phone camera, faster frame rates are quite overrated. There really is not much reason to take 40 photos (thats a 2-second burst on a Sony a9) of a single subject. Cameras with high fps (>8) need to have exceptional data throughput, mechanical stability and focusing capabilities which makes them really expensive. Anything around 5 fps will perfectly do its job for 99% of cases.

Useful metrics

Now, what should you look for instead? The list i propose is rather non-technical:

  • Ergonomics
  • User experience
  • Battery life
  • Size and weight
  • Native lenses
  • Shutter lag
  • Filter size
  • Noise
  • Buffer capacity

Ergonomics and UX

The first two items directly and critically influence your photography. Your camera has to be an extension of your hand and mind. If after some practice the camera still gets into your way and things are not happening intuitively, your photos will be far from what you could achieve. No additional megapixels or ISO settings could ever fix this. You’ll ultimately abandon photography if you’re uncomfortable holding and interacting with your camera. This is true for button placement, shape as well as how intuitive and responsive the software user interface is. Never underestimate the impact of details like the ability to operate the camera while writing to card and so on. Therefor always try out a camera for several days and different scenarios before deciding to buy it. For the same reason cameras tend to be terrible presents as only the photographer can decide which camera works best for individual requirements.

Battery life

Battery life has become an issue again with the advent of (semi-)professional mirrorless systems (“MILC”), which use power hungry components (sensor, screens) that are active very often while maintaining a small form factor. The physically unavoidable result is small batteries and less photos per charge. A typical DSLR will do about 1000 photos on one charge, while a MILC will struggle getting out more than 400. Battery tech and power conservation is improving a lot so this downside may vanish sometime in the future. Camera body “grips” can provide space for more than one battery at the expense of adding bulk and weight.

Size and weight

The topic of battery life and ergonomics is directly linked to size and weight. If you take a lot of photos with a power hungry system you’ll have to buy and carry a lot of extra batteries. Cameras with lots of features are usually bigger and have more knobs and dials than less sophisticated devices. If carrying a camera becomes a burden, there is a high probability not to take it with you but fall back to your phone again. Therefor always consider a small and light camera over a huge and heavy one, even if this means sacrificing features or image quality. The same is true for lenses, especially when deciding towards a 35mm system which always requires larger lenses compared to APS-C or even MFT. There is no magic sauce that can shrink lenses while maintaining a certain focal range and aperture for a given sensor size. That being said the weight and size of the camera body becomes less relevant when mounting a big ass lens, say a 600mm f/4 @ 4kg. Quite to the contrary, a large camera body (or a normal body with grip extension) is very often beneficial with regards to balancing and shake reduction when dealing with large and heavy lenses.

Native lenses

When focusing on image quality while being on a budget, always choose to invest in a better lens rather than a better camera body. Each camera vendor offers a set of lenses that fit their cameras natively, which means they “just work” and don’t require any adapters. Producing lenses is a different discipline than producing camera bodies. Sigma for example has a huge range of lenses but produces relatively few models of bodies. On the other hand Sony produces lots of bodies but has to catch up with their lens selection. Building great lenses is really hard and takes a lot of resources. Optics stay optics and replacement cycles for lenses are usually decades, compared to a few years for camera bodies. Therefor the “old guys” like Nikon or Canon have a large variety of bodies as well as lenses for each and every use case. Some lenses are unique per vendor, for example the EF 11-24 f/4 while other more typical designs are implemented exceptionally well by one specific vendor, like the Zeiss Otus line. When adapting third-party lenses, features like autofocus or CA correction may get lost or work less perfect and ergonomics can suffer. Some combinations with third-party lenses work great and are both cheap and beneficial to creativity, however buying a Canon body to exclusively use Sigma lenses should make you think.

Shutter lag

Shutter lag is the delay between triggering and the actual process of exposure, not including focusing. Good cameras should have less than 100ms of shutter lag to make sure moving subjects are captured and in-focus. Cameras with high shutter lag will significantly increase the amount of “missed” or out-of-focus subjects and mess up image composition in extreme cases. Vendors do usually not provide numbers of this metric, some for “good” reasons.

Filter size

Some use-cases require to use filters in front of a lens, for example to reduce incoming light without stopping down (ND filters), to physically modify the image (polarized filters) or just safeguard the front element of a lens. Those filters fit exactly one diameter which gets defined by the lenses size and build. Good filters are typically expensive and having multiple lenses with the same filter size allows to save a lot of money. A very popular filter size ist 77mm which certain lens makers use for professional lenses from 16mm up to 200mm focal range.

Noise

When recording video, taking pictures at a wedding or similar, noise level is a critical factor. The best gear in the world won’t take pictures if you’re disturbing the cermeony. Mirrorless camera models obviously have an advantage since the flapping noise of the mirror is absent. Still there are multiple components that potentially create noise, for example shutters, lens motors and case cracking. When choosing a camera body and lens always try how loud those components are and decide if they are fit for the job. Many cameras offer a “silent” mode which reduces noise at the cost of frames-per-second.

Buffer capacity

Last but not least buffer capacity can be a real pain for sports photography and similar disciplines. There are cameras that take a lot of pictures per second but cannot store them well. This is related to both the interface type of the storage card and the internal buffer of the camera. For example a Canon 1DX Mark II with proper storage can take up to 170 RAW photos before slowing down while a Canon 70D gets slow after 15 photos. As the 1DX takes pictures at a rate of 14fps, this means 12 seconds of continuous shooting compared to 7fps or 2 seconds at the 70D.

History

During the past years mechanical keyboards have been re-appearing at the consumer IT market. While by far most keyboards sold and used are based on a membrane (“rubber-dome”), especially the gaming industry established keyboards with mechanical switches as a “new” gold standard for input devices. Looking back in the history of personal computing, such mechanical keyboards were the norm until the late 1990’s and got replaced by much cheaper, less complex and more light-weight rubber-dome desktop and scissor-style laptop keyboards during the 2000’s. While for laptops, the “thin and flat” paradigm was and is the reason to integrate such keyboard, the reason to use them at desktops and workstations was simply the race to the bottom of cost.

The lower tier of desktop computing did suffer a lot from tablets and notebooks, entry-level users rather opt for a cheap notebook than for a clunky stationary computer with peripherals. The market which continued to expand is gaming, government and professional grade workstations - rather expensive machines. However, even though enthusiasts spend a fortune on powerful GPUs, complex case-mods and electricity, peripherals like screens and keyboards were not considered to be relevant for a long time. The same is true for professional users. Employers provide high-end workstations well above the range of €5000 but equip it with a €200 screen and a €20 keyboard+mouse combo that lasts two years. At the first glance, this makes sense from a business side since broken peripherals can be replaced with low maintenance effort.

Health

In reality however peripherals which are already past their lifespan continue to be used for a long time, with disastrous impact on health and productivity. When thinking about how much time one uses such peripherals, ergonomics and hygiene are a extremely relevant but often ignored fact. Losing productivity at the end of a working day or even getting sick due to finger fatigue or bad eyesight has huge productivity impact. One would expect that employers realize this and start investing in proper peripherals, which is quite the opposite of expensive when looking at productivity gain. High-quality screens, mice and keyboards can outlast typical upgrade-cycles of computers many times, so on the long run it may even be financially cheaper to invest into proper peripherals.

Going mechanical

Fortunately the mindset and product ranges started to change some years ago and manufacturers expanded their portfolio with mechanical keyboards, ergonomic mice and great screens again. While this kind of equipment never really vanished at the government sector, to most PC users it appears as something entirely new. Now what makes a keyboard mechanical? There are lots of in-detail articles on the web about this topic so lets keep it brief:

“A mechanical keyboard uses some kind of electronic switch that get actuated by the force of a key press. Rubber-dome keyboards rely on actuating a rubber membrane to close a electronic circuit when pressing a key.”

In theory this sounds like a marginal difference but the practical difference is like comparing a Ford Model T to a Tesla Model S. Manufacturers did realize that people are willing to spend a multitude of money on a good mechanical keyboard compared to a rubber-dome keyboard. This did not only led to greater choice of mechanical keyboards but also allowed those manufacturers to differentiate by adding features, premium materials and actually invest into research instead of just throwing the same damn product on a dead low-margin market where the only differentiation is a brand name.

Regardless of features like connectivity, back lights or media keys, the main ingredients for a good mechanical keyboard are its switches and key caps. When moving to mechanical keyboards its perfectly normal to feel a bit more fatigued in the beginning since pressing a key usually requires more force. Rubber-dome veterans are used to bottom-out their keystrokes, which is not necessary on a mechanical keyboard but adds to fatigue. This is however temporary and gets diminished for the more pleasant typing feedback in the long run and getting used to the characteristics of a mechanical keyboard.

Of course there are many subtypes, yet there are some general characteristics:

Rubber-dome

  • Usually require to bottom-out the key press to actuate, soft feedback
  • Hard “confirmation” of the key press when hitting the bottom PCB layer
  • Low lifespan when using it many hours a day
  • Inconsistent typing feedback once the rubber wears out
  • Usually “pad printed” or “laser etched” key cap legends that wear out quickly
  • Hard or impossible to clean or change key caps, no real choice in caps
  • Cheap build quality of key caps and case due to overall low price point
  • Price point: €10 - €80

Mechanical

  • Consistent “actuation” point which does not require to bottom out, very precise and spot-on feedback
  • Optional characteristics like “tactile” (feel the actuation point) and “clicky” (acoustic feedback of the actuation point)
  • Long lifespan, typically 30-50 million keystrokes per key (~20 years at 8 hours usage 5 days a week)
  • Premium key cap materials (ABS, PBT) with robust legends (dye-sublimation, double-shot)
  • Translucent key caps and switches which allow back light, color LED effects
  • Different types of key caps, which can be removed, cleaned, replaced and customized
  • Overall better build quality due to higher price point, more rigid quality control
  • Price point: €60 - €350

Financials

Spending more than €200 on a keyboard is certainly a bit excessive and can’t be justified financially when looking at it from a neutral point of view. For some people however mechanical keyboards are a “hobby” and even “collectors items” when thinking about vintage or rare keyboards or artisan key caps. There are great mechanical keyboards at the sub-€100 range, especially from gaming peripherals makers. Those really expensive keyboards usually target the typists and software development community - people that type for a living.

When discussing the cost of mechanical keyboards, it has to be noted that both switches and high quality key caps are very expensive - and a keyboard needs 100+ of them. The next cost driver is the fact that most keyboards are using a 104-key ANSI layout. If you’re used to a 105-key ISO layout there is a good chance to either pay a premium for “exclusivity” or just not getting ISO-style keyboard off the shelf at all. As an example, a full set of high quality ABS double-shot or PBT dye-sublimated key caps costs €100+ alone, add €0,50 per switch, electronics, cables, casing. Last but not least high-end keyboards are not a mass-market product that get produced by the millions. All this puts a €100+ price tag for a keyboard into perspective, another way to view it is: Good keyboards cost good money, we just got used to low quality cheap keyboards.

Switches

There are two major types of mechanical switches: “Cherry MX” made by Cherry GmbH in Germany and “Topre electrostatic capacitive” made by Topre Corporation in Japan. Several clones of those switch types are being manufactured but should be avoided since they usually don’t get made with same amount of precision and quality requirements. Other less common switch types, like ALPS or vintage “buckling spring”, are built with different specification. Such specifications define the actual switch characteristics, the housing dimensions as well as the stem and key cap mount format. While Cherry MX have “+”-type stems, Topre have “o”-type stems which are incompatible to each other - with the exception of special-made stems for Realforce RGB and Novatouch (discontinued) keyboards that fit both key cap mounts. On top of these stems sits the actual key cap made of plastic, which is usually removable. A word on big numbers - it does not matter if a switch has a projected lifespan of 30 or 50 million keystrokes, in either way it will easily outlive the case, keycaps or even the connector. Try finding a recent computer with AT or PS2 connectors which were used 20-30 years back.

Cherry MX are traditional switches with a spring that requires a certain force to compress and move parts into place to close a electric circuit. Depending on the type (MX “color”), switches are either tactile or linear, clicky or silent. Their basic concept stays the same though. Topre is a very different story, in fact they are more rubber-dome than mechanical. The tactile feedback when pressing a key is provided by a high quality rubber-dome and beneath that dome a spring gets compressed. The spring is however not used to provide force but to indicate capacity. Beneath the spring a sensor registers the electrostatic capacity of the compressing spring and once a threshold is passed a actuation is registered. No traditional “mechanical” switch is used which is good for durability since the system is more “sealed” and suffers less from friction. The typing characteristics and durability are similar to a Cherry MX Brown (tactile, silent) but again completely different. Pressing a Topre switch feels more like pushing a piece of metal through a magnetic field and the push-back when releasing the key is significantly “different”. That being said, both switch types provide a extraordinary typing experience. Before spending lots of money on a new switch type though, definitely consider getting a sample switch or switch-tester to evaluate.

Reviews

Over time i bought several mechanical keyboards for different use-cases, so far none of them did break or has ever shown severe issues. This naturally reduces the amount of items i could compare.

  • Steelseries 6Gv2
  • Filco Majestictouch 2 TKL
  • Topre Realforce 105UB
  • Uniqey Q100

Disclosure: I bought all those boards from my own money and did not get any sponsored samples for review, neither has any of the manufacturers contacted me.

Steelseries 6Gv2

Steelseries 6Gv2
The 6Gv2 is a full-sized keyboard priced at an entry-level €70 and aims for the gaming community. It uses plate-mounted Cherry MX Black switches (rated at 50M keystrokes) which are “linear” meaning the actuation point can’t be felt when pressing a key. Resistance to the key is 60 grams which makes it a bit harder to press but also reduces unintended key presses. The case has a acceptable build quality and weights in at about 1.3 kilograms, big rubber feet make sure it stays in place like its glued to the table.

When using a USB-to-PS2 Adapter, and assuming the computer still offers a PS2 port, this keyboard allows n-key-rollover (“NKRO”) which means actuation of all 105 keys can be signaled to the computer at the same time. USB is limited to 6KRO by design on the other hand. The keyboard comes with a 2 meter non-detachable rubber USB cable, PS2 adapter and can be tilted.

Overall the keyboard is basic in functionality but does a great job when gaming is a priority - for typing and fatigue-reduction there are better alternatives though. The key caps start to get shiny after a few years and the white color at the laser-etched legends starts to fade. Since the cost-benefit ratio is excellent, its a great keyboard to get into the mechanical keyboard experience.

Filco Majestictouch 2 TKL

Filco Majestictouch 2 TKL
This is a premium (IMHO overpriced) €150 ten-keyless keyboard (“TKL”) which means the numblock is missing to make it more compact. While this might be a deal breaker for typists its great for gaming since the mouse-hand is much closer to the keyboard-hand which reduces fatigue. Most games won’t need the numblock anyway. The Majestictouch is available with different plate-mounted Cherry MX keys (Brown, Black, Blue, Red) which translates to different characteristics that can be looked up easily on the web. The build is very sturdy, despite its compact size and 88 keys it weights about 1 kilograms and has great rubber feet that fix it to the desk.

Just like the Steelseries it supports NKRO when using PS2, has a non-detachable rubber USB cable as well as the ability to be tilted. Key caps are made of ABS with laser-etched legends and are of good but not outstanding quality since they wear out after some years, especially when using the “WASD” section excessively. The cost-benefit ratio is quite bad compared to the Steelseries and it only makes sense when specifically looking for a nicely built ten-keyless Cherry MX gaming keyboard without any fancy features. On the other hand ten-keyless layouts are a niche configuration within a niche product range, which makes them even more exclusive and counting keys to justify the price does not take that into respect.

For personal preference i use the Cherry MX Brown switch option (tactile, non-clicky) of the keyboard. With regards to noise this is a good example how switches do affect noise but are not the only factor to take into consideration. Compared to other MX Brown keyboards, the Filco Majestictouch is much louder during typical use. This is caused by inherent keycap “rattling” and quite loud clicks when bottoming out the keys which is related to the material and quality of the keycaps. If i’d to chose again i’d probably go for a Corsair K65 which offers a similar form factor and quality for half the price.

Topre Realforce 105UB

Topre Realforce
Topre Corporation makes keyboards using their proprietary electrostatic capacitive switches, rated at 30M actuations. The “Realforce” brand is their high-end keyboard series which targets business users. While there are ten-keyless options and even numblock-only devices available, the “full-size” 104 or 105 key models with standard layout are most popular. There are few distributors and a ISO layout is rather hard to find. As described earlier the typing experience is one of a kind due to the specific switch characteristics. The keyboard is made of high quality plastic, including key caps made of PBT instead of ABS. PBT is more durable and less prone to getting shiny over time. The keys legends are dye-sublimated since there currently is no way to make double-shot PBT key caps and the space bar is made of ABS since large PBT key caps are also hard to manufacture. However, there are replacement space bars made of PBT available.

The Realforce comes with a solid 1,5 meter non-detachable rubber USB cable and some cable routing tunnels beneath the board, it can be tilted as well. Its weight of 1,5 kilograms and two rubber feets at the bottom make sure that the keyboard stays in place quite well. A nice feature is variable actuation weight, which makes sure keys usually triggered by less dominant fingers require 35 or 45 grams while more dominant fingers have to overcome 55 grams for their keys.

The overall build quality is flawless and as good as a plastic product could possibly be. So far i use this keyboard 8 hours per day at most days of the week for 6 years straight, it did never let me down and is a real workhorse. The only thing i noticed is that macOS sometimes does not recognize the keyboard after getting back from hibernation and i had to unplug/plug it in again. Over time even those PBT key caps got a bit shiny and some often-used keys start to fade. However, considering the heavy usage its the most durable keyboard i came across so far. The asking price including taxes and shipping from England is €260 in Germany, which is quite an investment.

Just recently Topre introduced the “Realforce RGB” keyboard which is more gaming oriented and sacrifices some of the typical Realforce features (like PBT keycaps) for more stylish things like illumination which requires ABS keycaps with shine-through legend. I had the opportunity to check it out for some minutes and if budget is not a limitation this would be a natural choice for a great gaming keyboard. The electrostatic capacitive switches allow a unique feature which is per-key actuation point configuration since the actuation is determined by measuring capacity instead of a mechanical switch. Illuminated keyboards are not my thing so i’d rather swap the ABS keycaps that come with it with some PBT caps which is easy since the Realforce RGB comes with key stems that are compatible to both Topre and Cherry MX keycaps. If only they would make a ISO layout of the RGB…

Uniqey Q100

Uniqey Q100
The Uniqey Q100 is the latest addition to my collection and appears to be pretty much unknown on the Internet and particularly among reviewers. The brand just started shipping their keyboards in late 2016 and is backed by the german industrial equipment manufacturer “GMK electronic design”, well respected for their high-end keycaps. Besides offering some pre-configured keyboards, their unique selling point is customization and their high quality double-shot ABS keycaps. ISO and ANSI layouts are offered whereas sections of the key layout can be customized with different colors and legends. Uniqey offers the full range of PCB-mounted Cherry MX switches and adds their own “QMX-Clips” as an option which reduce the noise of a key press significantly. Note that those are far better than rubber o-rings, which heavily influence typing feedback. The biggest difference to other keyboards are the materials used for the keyboards case. Every Q100 is made of a anodized aluminum body and can be customized with side-panels made of wood or anodized aluminum.

While other keyboards are said to be built like a tank, the Uniqey Q100 literally IS a tank. Its made of metal and weights 1,5 kilograms, has modular detachable rubber feet, a highly flexible detachable Micro-USB cable for power supply and data and offer a auxiliary USB port to connect mice. On top of USB connectivity it comes with an integrated Bluetooth module which allows to type on three different devices like tablets, phones and laptops and can easily switch the paired device on the fly. I opted for Cherry MX Brown (tactile, non-clicky) switches and added QMX clips, combined with the sturdy build quality and thick ABS keycaps typing is extremely silent even when bottoming out keys. By choosing switches with specific charactersitics the Q100 can be configured to be a perfect typing keyboard or a great gaming keyboard.

While using the keyboard for multiple months i could not find any downside of this product, its a truly remarkable piece of engineering and a prime example for quality stuff “Made in Germany”. That being said the price is just as remarkable with €265 to €338 depending on configuration. However, the product delivers just perfectly, after a few minutes one will understand why this thing costs as much as a entry-level laptop. It operates perfectly and the look and feel comes very close to the enclosure of a Mac Book Pro or comparable high-end devices. At the same time its visual appearance is very unobtrusive due to the absence of illumination and brand logos. In my personal opinion the Uniqey Q100 provides a better overall package than any other keyboard i have used, including the best-of-the-rest: Topre Realforce.

Conclusion

As always there is no “best” product but if budget is not a concern and you’re looking for the ultimate keyboard then figure out your preferred switch type, get a Uniqey Q100 or Topre Realforce and look no further. If fanciness is what you’re into, get a Topre Realforce RGB. If you’re on a budget or uncertain if mechanical keyboards are a thing for you, get a Corsair K65 or Steelseries G6v2. In any way, the typing experience and impact on health will be worth the investment, especially if your occupation means a lot of typing.

Many new cars infotainment systems come with a WLAN hotspot by default. Owners can use it for media consumption and internet access on the road and of course never change the SSID. Such access-points are quite noisy and constantly broadcast their SSID, MAC addresses, a fact that might be interesting for multiple reasons:

  • Polluting frequencies within areas that are already short on channels
  • Tracking individual vehicles using a set of APs or large networks like Freifunk or even a TelCo
  • Checking if a certain vehicle gets close to certain “etablissements” (hello cheaters)
  • Estimating the worth of equipment when selecting a car to steal
  • Traffic census

Checking the last 30 days of my access-points “neighbouring access points” log did reveal quite interesting data about drive-by cars:

  • 77 Mercedes Benz (SSID: “MB WLAN XXXXX” or “MB Hotspot XXXXXX”, MAC vendor “Harman/B”)
  • 73 Opel (SSID “WiFi Hotspot XXXX”, MAC vendor “MitsumiE”)
  • 14 Skoda (SSID “SmartGate_XXXXXX”, MAC vendor “Universa”)
  • 7 Audi (SSID “Audi_MMI_XXXX”, MAC vendor “WistronN”)
  • 6 Volvo (SSID “MyVolvoXXXX”, MAC vendor “Actia”)

Hello Mr. Benz
When using a WLAN enabled car, the first thing to do would be changing the SSID, disable broadcasting or change the MAC but since cars are not quite hacker-friendly such options are most certainly disabled.

Introduction

HTTP Public Key Pinning (HPKP) is a mechanism to make sure a HTTP client (e.g. web browser) only trusts a pre-defined set of certificates when establishing a TLS (“https”) connection. If the certificate presented by the server does not (or no longer) match the previously defined hashes, the connection does not get established. This is useful to counter man-in-the-middle attacks where someone intercepts the connection and in cases where DNS records or the certificate gets compromised. HPKP information is provided as a HTTP header with a list of hash values of certificate fingerprints as content. The client then checks the certificate used for the TLS connection against this list and will only trust the specified list of certificates for future connections to the domain. This highlights a important detail: Since HPKP operates on HTTP level and certificates are exchange on the (lower) TLS protocol level, the first connection to the host will not check for certificate fingerprints since the client does not yet know about them or the fact that the server offers HPKP. This also means there is no way to tell the client that a HPKP setting has changed prior to establishing a TLS connection and talking HTTP.

While HPKP is useful to enhance security, it’s a two-sided sword as well. Incorrect configuration may render your domain useless if clients look for the wrong certificate fingerprint. HPKP information is usually preserved by the client for two months or longer before getting refreshed. While clearing a clients history or settings will force a reset, there is no way to communicate this to users since the client will not even try to establish a HTTP connection. Worst case, the domain won’t be valid to serve content for the defined refresh interval. That being said, careful selection about what gets “pinned” at the header information helps to avoid most of the trouble.

The header is designed to contain a number of base64 encoded hash values which are valid for the specific domain and includes an obligation to pin “backup” hashes in case the “primary” hashes do not match anymore. A client will just iterate through the full trust-chain for provided certificate and look if any certificates fingerprint matches any of the hashes provided by HPKP headers. If any certificate matches, the check passes and the TLS connection is established. Now, what should be pinned at HPKP headers? The obvious answer would be “the certificate!” but wait - certificates may change quite often, especially when using short-living validity like Let’s Encrypt does. In this case the new certificates hash is not yet part of HPKP information stored with the client but the old one is expired, as a result the client would not be able to connect until the client re-requests HPKP information. More information can be checked at RFC 7469.

Primary hashes

Lets start with the “primary” hashes. Adding the hash of the domains certificate will certainly not harm, however that means the header information needs to be updated as soon as a new certificate gets issued for the domain. Next should be the Intermediate certificate(s) of the CA in case the CA uses them, this means any other certificate for the domain issued by the CA and signed with the same intermediate certificate will be valid for the host. Third is the Root certificate of the CA itself, which means that any certificate issued directly or via any Intermediate certificate by the CA would be trusted as well. Taking Let’s Encrypt for example, the following certificate hashes would get pinned:

  • DST Root CA X3
  • Let’s Encrypt Authority X3
  • Domain certificate

Great, now what happens if your domain certificate expires and “Let’s Encrypt Authority X3” or the “DST Root CA X3” go out of business or get banned from the clients trust stores (hello WoSign, hello DigiNotar…)? The client would not accept any of the certificates because they are either removed from its trust store (Root, Intermediate) or not covered by HPKP information (new domain certificate). This is where pinned “backup” hashes come into play.

Backup hashes

Since there is no limitation in hashes, except the 8192 bytes limit for HTTP headers, it’s possible to pin hashes of Intermediate and Root certificates of other CAs which may be an option in case your primary CA gets into trouble. The next best thing to Let’s Encrypt might be Comodo, which means pinning Comodos Intermediate certificates or their Root CA in addition to Let’s Encrypt would flag their certificates to be valid as well.

There is another way though. Since what we’re pinning is not the hash of the actual certificate but the “SPKI Fingerprint”, we can also pin fingerprints of one or more Certificate Signing Request (CSR) which are not yet issued as a certificate. With this, a future certificate issued for this CSR is already pinned, regardless which CA signs the certificate. So in case of a problem with the current CA, that CSR is used to create a certificate at an arbitrary other CA. The certificates fingerprint would then already be part of the HPKP information since it matches the CSR fingerprint.

Creating hashes

HPKP transfers the SHA256 hash of the SPKI fingerprint of a certificate or CSR, generated with OpenSSL and no other hash algorithms are supported.

Certificate hashes

When pinning a CAs root or intermediate certificate, the first step is to acquire the correct public key. Usually CAs offer support pages where those can be obtained. The information about which root or intermediate certificates are used, can easily be looked up from the domain certificate, for example by inspecting it at a browser.

In this case the “DST Root CA X3” is the CAs root certificate and “Let’s Encrypt Authority X3” is a intermediate certificate. Searching for those names leads to the download page https://letsencrypt.org/certificates/ where the public keys can be downloaded as PEM format.

Creating the SHA256 hashes for the CAs root or intermediate certificates SPKI fingerprint is quite straight forward:

1
2
$ openssl x509 -in lets-encrypt-x3-cross-signed.pem -pubkey | openssl pkey -pubin -outform der | openssl dgst -sha256 -binary | base64
YLh1dUR9y6Kja30RrAn7JKnbQG/uEtLMkBgFF2Fuihg=

The same command can be applied for the actual domains certificate:

1
2
$ openssl x509 -in /etc/letsencrypt/live/heiland.io/fullchain.pem -pubkey | openssl pkey -pubin -outform der | openssl dgst -sha256 -binary | base64
/kZe5gjCVOhEw1g9eW5NXD/st3sZhI2rRvDZ70RY3cA=

CSR hashes

To create a CSR and a hash of its SPKI fingerprint, a private key is required to start with. Both the private key and the created CSR must be stored at a safe place for future use. The hash of the CSRs fingerprint can be used immediately for HPKP though.

Create private key

1
$ openssl genrsa -out backup1.key 2048

Create CSR for single or wildcard domain name

Note that CAs may require or check the provided data of a CSR, for example the legitimization of the specified organisation or address. At the very least however, the “Common Name” is critical since it must contain the domain name for which the certificate will be created for.

1
2
3
$ openssl req -new -sha256 -key backup1.key -out backup1.csr
...
Common Name (e.g. server FQDN or YOUR name) []: sub.domain.tld OR *.domain.tld (for wildcard certificates)

Create CSR for SNI

In case our certificate should contain multiple domains at its Server Name Indication (“SNI”) information, the default OpenSSL configuration needs to be tweaked a bit. The following additional parameters are required for the OpenSSL configuration file which comes with Debian GNU/Linux.

1
2
3
4
5
6
7
8
9
10
11
12
13
$ cp /etc/ssl/openssl.cnf backup.cnf
$ vim backup.cnf
...
[ req ]
req_extensions = v3_req
...
[ v3_req ]
subjectAltName = @alt_names
...
[ alt_names ]
DNS.1 = www.domain.tld
DNS.2 = domain.tld
DNS.3 = something.domain.tld

The the configuration file gets included when creating the CSR.

1
$ openssl req -new -sha256 -key backup1.key -out backup1.csr -config backup.cnf

Create hash from CSR

With that done, a SHA256 hash of the CSRs fingerprint gets created to be used as HPKP information. The command is equal for SNI and non-SNI CSRs.

1
2
$ openssl req -pubkey -in backup1.csr | openssl pkey -pubin -outform der | openssl dgst -sha256 -binary | base64
HQZ03DioNrXVV7/zEuQONyO8cwUo3ncA71fzLO+o/d8=

HQZ03DioNrXVV7/zEuQONyO8cwUo3ncA71fzLO+o/d8= is the base64 encoded SPKI fingerprint of the CSR.

Creating the HPKP header

The header is a quite straight forward list of hashes and adds max-age information to define the maximum time a client (e.g. browser) will cache HPKP information once it got provided. This sample pins the CAs root certificate, two intermediate certificates and several CSRs as backup. The client will validate the presented certificate against all entries at this list, regardless of its order. Maximum age should be set to two months (expressed in seconds) or longer.

HTTP Servers like nginx allow to simply add those headers at the respective sites configuration:

1
2
3
4
5
6
$ vim /etc/nginx/sites-enabled/martin.heiland.io.conf
...
server {
...
add_header Public-Key-Pins 'pin-sha256="Vjs8r4z+80wjNcr1YKepWQboSIRi63WsWXhIMN+eWys="; pin-sha256="YLh1dUR9y6Kja30RrAn7JKnbQG/uEtLMkBgFF2Fuihg="; pin-sha256="sRHdihwgkaib1P1gxX8HFszlD+7/gTfNvuAybgLPNis="; pin-sha256="Ig+FSsJu4ZO9tifWAsH6k14pCdMObVq2fGMGjN3i/sw="; pin-sha256="Wq4cvMT8ci15dhEp5BKvbzZ480IReYQzYsmQKWih1m8="; pin-sha256="tACOv/4ANKQMZ3OV0QC0mglOrWCM2+dwLcLT25C+nFU="; pin-sha256="ULK51g7F7B4KkHQYRzmM2kAX9fiM1nMJ+iGS7A+1c+Y="; max-age=5184000';
}

Testing

General availability of the header can be checked by using a browsers development console and look for response headers. There are some more sophisticated sites that check syntax, content and validity of that headers information

Before deploying to production, HPKP settings need to be double-checked since they may lead to unavailability of the site in case their content is incorrect. If the syntax is wrong, a client may just ignore the header and not add any security.

At the end of 2016 i upgraded from a Late 2012 MacBook Pro (Retina) to a Late 2016 MacBook Pro with Touchbar. Again the 13” model with the fastest i5, 512GB SSD and 16GB of RAM. After having used it every day for one month, i think it makes sense to step back and review the changes which came with the redesign.

TouchBar & TouchID

To start with the bad news, TouchBar turned out to be as useless to me as anticipated, i rarely work with my laptop while not connecting external screens and peripherals to it. For mobile usage the absence of the Esc-key confirmed to be horrific. Even after weeks i’m having lots of mistypes simply due to the extreme sensitivity of the TouchBar whereas a regular key would not activate by just resting my hand on or even close to it. I reconfigured the TouchBar in a way that at least no critical functions are anywhere next to the upper left area, turning off the display by accident has been a major pain. The other thing which did drive me crazy was the ever-changing context when doing heavy multitasking. Changing from Terminal to Photoshop to Safari constantly changes icons, adds previews and overloads my peripheral area of view with junk. On top of all this the TouchBar sometimes does not get back from sleep or just gets blank out of the blue. This one one of the most non-Apple-like features i ever experienced.

That being said, it’s a cool showcase (scrobbling on YouTube, Emojis…) but i did not found myself really using it at any application during regular work. Perhaps it’s unusual for a “Pro” notebook to assume that its users are familiar with shortcuts, even with native apps like Mail i did not experience any real benefit. From a functionality point of view i agree that F1-F12 are not really used on a laptop but re-mapping would’ve been possible without a full-width touch screen. A small TouchBar at the right side with just 3 configurable actions like “lock”, “sleep” and play/pause would have been more than sufficient. All this context-aware non-sense falls apart and highlights its uselessness when getting down to “real” typing work. Obviously it can’t even come close to replace shortcuts and the speed of typing. The experience feels like being made for a device that gets controlled with a thumb rather than 10 fingers and software at the complexity of “Stocks” rather than an IDE. Tapping “and” for autocomplete after typing “an”? Come on!

TouchID was the real reason why i opted for a model with TouchBar, and it delivered. Unlocking the machine and using specific apps for banking and credentials storage is so much easier than typing the same password all the time. It also helps a lot to overcome the reluctance of locking the machine at work. The sensor operates perfectly and much better than any other laptop with fingerprint recognition i know of. Since Germany is still a developing country in terms of online payments, i could not use Apple Pay yet but can imagine how nice it would work. Some software integration should be improved though, for example confirming installations, system changes to bring down the need to enter passwords even more or just fixing odd behaviour like asking for a fingerprint if the laptop is closed.

Summing up, i think Apple seriously misstepped with the concept of a touch-sensitive display next to the keyboard. It’s cool to show and some niche software may have its benefits but overall its a pain during normal use and just feels not ready. I’d pay the same premium to have a ordinary Esc and Function-Keys bar with just a short TouchBar and TouchID next to it.

Keyboard & Trackpad

Coming from the old scissor-type MacBook Pro keyboard, the new keyboard feels a bit odd in the beginning, but i rapidly started to like it a lot. The sound is still a bit too “clicky” for my feeling but the actuation can be felt much better and my mobile typing speed got up significantly. For stationary use i connect a external mechanical keyboard (e.g. Topre Realforce, Filco), which of course is another league, but the current iteration is the best built-in laptop keyboard i experienced so far.

The Trackpad continues to be great and got even bigger and better. As with the keyboard i disliked the short/none travel at first but got used to it quickly. Getting back to the old Trackpad made it feel quite clunky, small and laggy - even though it was already stellar to any other laptops trackpad. The added size and palm-detection works great, no complains here.

Storage, CPU, RAM

Not much to complain here as well. Adding a NVMe SSD did add a significant speed boost compared to the old SATA/AHCI models. The dual-core 2.9GHz CPU with SMT (hyper-threading) is more than fast enough for software development, business tasks and even runs games like Diablo 3 or StarCraft 2 smoothly on 1080p+ screens with medium quality settings. Something which the 2012 model was struggling with. While my workstation/gaming machine and home server sport 32GB of DDR4 RAM, 16GB of DDR3 as maximum configuration seems low but honestly there are few workloads that require more memory on the given power budget.

Battery & Case

So far i can tell for sure that the battery does not last as long as the 2012 model. Usually i notice a bump in runtime when moving from a 1200+ cycle battery to a brand new one, not so with the 2016 model. The “upside” of this is that the lower rated battery is fully charged much quicker. While 4-6h of “real world” runtime for my workloads is not a issue, i would have happily traded 5mm more thickness for a bigger power budget.

The enclosure continues to raise the bar for laptops, it feels very durable, sturdy and high-end. The new darker color looks very good as well. Due to the reduced size the laptop feels even more “compact” and has a nice weight/size/thickness ratio. Again, i would sign up for bit less “thin and light” and more “powerful and pro” immediately. I hope this design is “light enough” for some years and battery development, component efficiency gains solve the rest.

Screen & Audio

The screen remains great and i can’t spot any weaknesses. Audio did significantly improve in terms of a more “neutral” sound, less trash-can influenced. Even though the “speaker grids” are cosmetic, it’s more than loud enough.

WiFi & Bluetooth

My old MacBook Pro got quite heavily used and saw some drops so it was not a surprise that the BT module was broken at some point. Getting to the new model solved that and connections are stable. WiFi was bumped to 802.11ac which works flawless again as well. Connections are established much faster than before.

Ports

Well, this certainly is the most critically discussed “flaw or feature” of the new MacBook Pro. I assumed that it would be a major issue for me but i was wrong. Of course you’d need a whole bunch of new adapters and the USB-C space is crowded with incompatible products. On top, the confusion of concepts for “port” and “protocol” makes it really hard to chose the right dongle. Compared with the older model, i lost USB-A, Mini-DisplayPort, Thunderbolt 2, SD and MagSafe but 4 USB-C Ports with Thunderbolt 3 easily replace them.

I max out four ports with 2 DisplayPort adapters, a USB/HDMI/SD/Ethernet hub with USB-C charging and still got one port for a fourth display, storage or another phalanx of ports using a second hub. For travel and legacy hardware i use a VGA/HDMI/USB/Ethernet hub. Lots of adapters but also a bunch of ports to use. In reality, those adapters stay at my desk, so they do not really become clutter when going mobile. Why Apple chose to drop the SD-Reader is beyond my understanding though.

Ports galore (Bqeel USB-C Hub)

Before, i used 2x Mini-DP for displays and got stuck with two USB-A ports which had to be extended by an external hub to connect mouse, keyboard, storage and ethernet devices. Looking at it this way, four Thunderbolt 3 ports are offering much more options and the adapters are much more potent than before. That being said, compatibility is an issue and choosing the right adapters is trial&error.

Would sticking to the old ports and protocols have been easier? Definitelly! But this transition again feels like the right point in time where legacy connectors got dropped. Both ports and protocols are extremely versatile and offer much more bandwidth. It’s funny enough that the headphone-jack survived, i guess there are more DJs than Photographers in Cupertino…

Connectivity to the Apple ecosystem is a mess if you need cable connections. Mobile devices? Lightning, Headphones? Micro-USB, Notebooks? USB-C. If only they would use USB-C for mobile devices as well… perhaps thats coming sooner than expected. While i liked MagSafe, it always felt a bit “too proprietary” for me. Certainly, when working in a mostly-Mac company, i always found someone with a spare power supply. The new USB-C chargers however make it easier to charge from either side and use shorter cables as well as just replacing the cable if it breaks. I never understood why Apple seriously dongled a really bad cable to a €80 brick. Obviously they made a billion per year from people replacing their perfectly fine chargers, but this really is a shameful waste of resources. Now you’re expected to pay €80 for the charger, €25 for the extension cord and €25 for the charging cable, but at least there are options to replace a worn-off cable.

Conclusion

Overall i’m delighted with the new MacBook Pro, the only real downside is that you can’t get a model with TouchID, four USB-C ports, high-end spec but without a TouchBar. Such a “plain workhorse” configuration would certainly sell like hot-cakes to the serious “pro” consumer. Looking at the “thin and light” mania which led to lower battery specs which led to the choice of chipset which translates to the 16GB memory cap, i’m a bit troubled though if Apple is still targeting that class of users without compromises. Lets see what refreshed models with Kaby Lake will bring except a CPU bump.

Stuff that works

A short list of third-party adapters that have proven to work well with this machine, just in case…

  • HooToo Shuttle USB-C Hub, 3x USB-A, SD, HDMI (4k), USB-C Power Delivery
  • Bqeel USB-C Hub, 3x USB-A, SD, Mini-SD, HDMI (4k), 1Gb Ethernet, USB-C Power Delivery
  • Dell DA200 USB-C Hub, HDMI (1080p), VGA, Ethernet, USB-A
  • KiwiBird Type-C to DisplayPort 1.2a (4k)
  • Ligawo 6518955 USB-C to DVI
  • LaCie Porsche Design Mobile Drive (2TB)
Your browser is out-of-date!

Update your browser to view this website correctly. Update my browser now

×