Since spying on citizens’ daily communication has shifted from being a rumour for paranoids to being a proven fact, some people think a lot harder about what they can do to preserve their privacy. With E-Mail still being the number one form of communication at the internet, this is one of the most obvious starting points. Due to the nature of the SMTP protocol, spying cannot be shut-down completely, even with content encryption. However, one aspect that can be worked on, is mail storage. Spying on each mail transferred via SMTP is quite expensive for an attacker while just fetching information from a multi-GB mailbox with years worth of social links and information is very cheap.
When relying on secure physical storage, most hosted mail services are not acceptable. They either make money from user data, closely work together with intelligence agencies, cannot provide an acceptable privacy policy - or simply are too expensive for personal usage. A possible solution is to use a local “at home” mail storage. Sadly, just putting some machine as a IMAP/SMTP host to a residential internet line means a couple of drawbacks. For one, most consumer internet connections will use dynamic IP addresses and force regular reconnections/assignments. Second, most telcos don’t offer proper reverse-resolution of the IP, many SMTP hosts use that to identify spammers as well as blocking whole IP ranges which are known for consumer internet connections.
Dynamic IP addressing could be worked around by using popular DynDNS services. However, a DNS MX entry must not be a CNAME but a “real” address. Some mail providers (e.g. GMX) check for this and deny taking mail from such hosts. The issue regarding reverse-resolution can be tackled by buying some mail re-direction services (e.g. dnsexit, dnsmadeeasy) that will relay your mail, but will set you back at least $25 a year with limited confidence to the “privacy” concern and limitations to mail throughput/features.
For me, the best solution has been using a small virtual server (VPS) as a SMTP relay. This gives full control on mail services, features and security. At home, i use a Synology DS214 for IMAP storage and SMTP submission. This box sends all mail to my VPS which then relays that mail to the destination recipient. The other way around it works the same way: incoming mail for my domain is relayed to the DS214 at home. The VPS costs me about €3 a month and of course allows more than just relaying mail. I’d like to share the configuration details with you.
Network hosts
client The clients mail application uses “ds214.example.com” as IMAP and SMTP server.
ds214.example.com This host is located at home and uses a residential ADSL line. It uses a dynamic DNS service to update its dynamic IP for “ds214.example.com”. Ports 25 and 993 are forwarded by the ADSL router to allow access by the client and the mail relay (vps.example.com).
vps.example.com This host does the mail relaying. It is added as DNS MX entry for “example.com”, it’s static IP address reversely resolves to example.com
mx.otherhost.com Other mail providers hosts just communicate with “vps.example.com”, not knowing anything about it’s relay functionality.
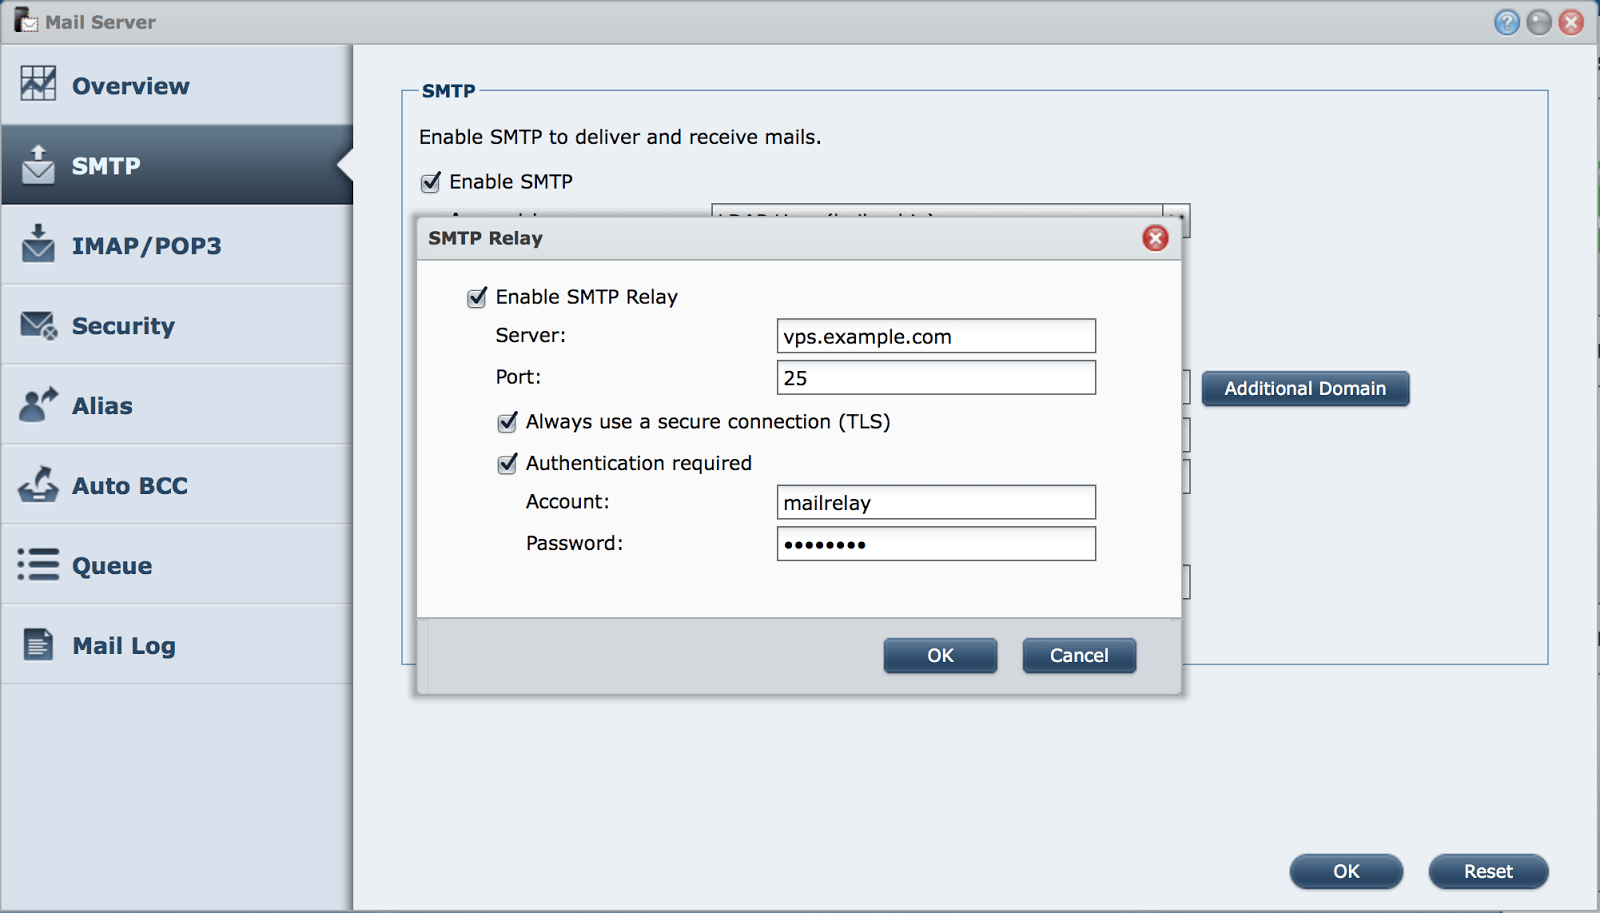
DS214 configuration
This is Synology specific, but may easily be achieved with other MTAs as well.
Postfix configuration
The MTA is running Postfix and Postgrey at vps.example.com is configured like this:
Relay domains and target hosts are configured at /etc/postfix/transport. In this case, all mail to “example.com” is relayed to ds214.example.com.
1
example.com smtp:[ds214.example.com]
Valid recipients for this domain are configured at /etc/postfix/recipients. In this case, only mail to any “example.com” address is allowed to get relayed.
1
@example.com OK
Make sure these files are converted to a binary format. relayed.
When relaying outgoing mail (from ds214.example.com), SMTP authentication is used to make sure no unprivileged users use this server as mail relay. In this case, i’ve used saslauthd for authentication. Postfix is advised to use saslauthd and accept “PLAIN” password authentication at /etc/postfix/sasl/smtpd.conf.
1
2
pwcheck_method: saslauthd mech_list: PLAIN LOGIN
Restart Postfix after applying this configuration
1
service postfix restart
saslauthd also needs to be configured to accept PLAIN authentication. As the user/pass database, sasldb should be used. This can be done at /etc/default/saslauthd:
Restart saslauthd and make sure the path specified with the -m option can be accessed. This is required since Postfix is supposed to run in a “chroot” environment.
1
2
service saslauthd restart dpkg-statoverride --add root sasl 710 /var/spool/postfix/var/run/saslauthd
Now we create a user within sasldb which is used to authenticate a client which is relaying mail through this MTA.
1
saslpasswd2 -u example.com -a smtpauth mailrelay
Make sure the user “mailrelay” and the given password is used at the SMTP client, which is ds214.example.com in this case.
When it comes to load testing a web application, usually JMeter comes up as the go-to solution. It has a huge amount of features, protocol support, is opensource, establishment - and boy it has a GUI! There are some other alternatives like pyLot, locust, Grinder, radview, wapt or LoadUI which are either commercial or not as feature rich and less established.
Lately, some hosted solutions like loader.io, neotys, blitz.io, blazemeter, loadstorm etc. joined the party. These offerings are nice for testing the whole stack from an end-user perspective or running limited tests. The downside is, that these are typically sold by bandwidth or threads (users) which is a good business model but comes unhandy when really stress testing an application over a long period of time or testing within an internal network.
Usability
One of the biggest benefits of JMeter, in many peoples minds, has been its graphical user interface. Well, it’s kinda powerful and it kinda allows easy test creation. People tend to think that a GUI makes everything easier since many concepts are well known.
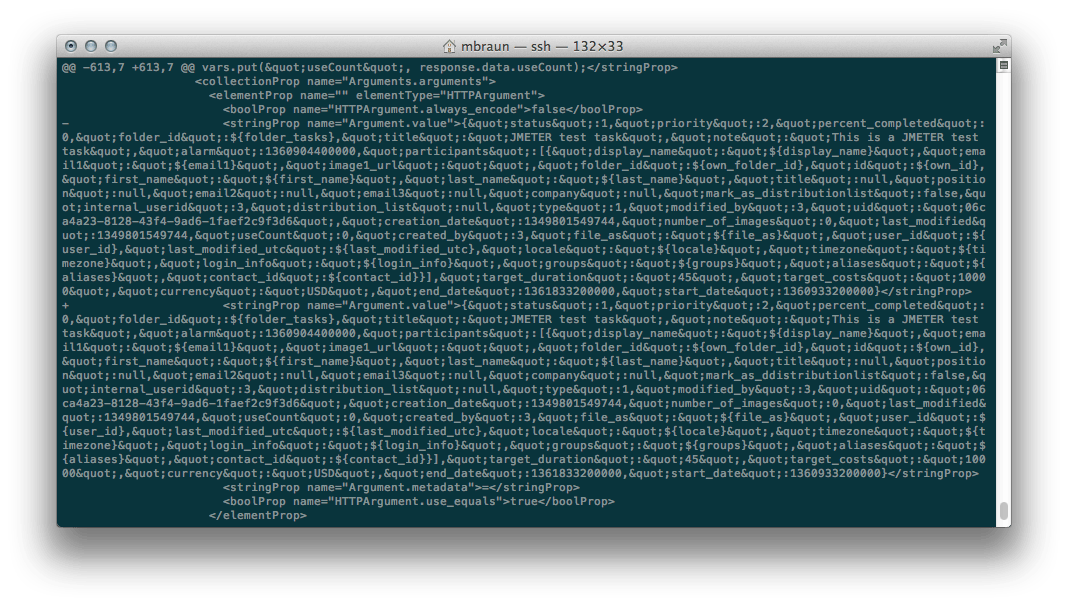
In my opinion the opposite is true, at least for JMeter. Its GUI is quite bloated, which is natural given its complexity and amount of features, but in the end is some button-input-and-knob representation of an XML structure. Under the hood, JMeter generates massive amounts of XML, based on what tests the user defined at the GUI. By itself, this is not bad. However, it shuts down any serious attempt on manual interaction on an XML level. This becomes very visible when using JMeter tests while working within a team. We use git for source control and due to a lack of good and powerful GUI based tools, primarily work with the command line implementation. Reviewing commits or merging is really a pain when you have to diff and compare on a XML level.
Readability of code is usually determined by the skills of the author, in this case the author really doesn’t do anything wrong - but by focusing on a GUI, readability for all other forms of representation suffers. Even if you manually tame the XML output, JMeter will just overwrite it using machine-readable-only code. XML is very well structured but apart from being structured, there are other requirements to good code. Even easy tasks like replacing some parameter or defining properties becomes a pain using the GUI since you have to browse it and manually spot elements. Either you got almost everything within variables, or you’re doomed.
In my opinion, JMeter is nice to rapidly create one-shot tests that can be shown around for education, validation or audit. For any kind of sustainable agile development or testing, it’s next to useless.
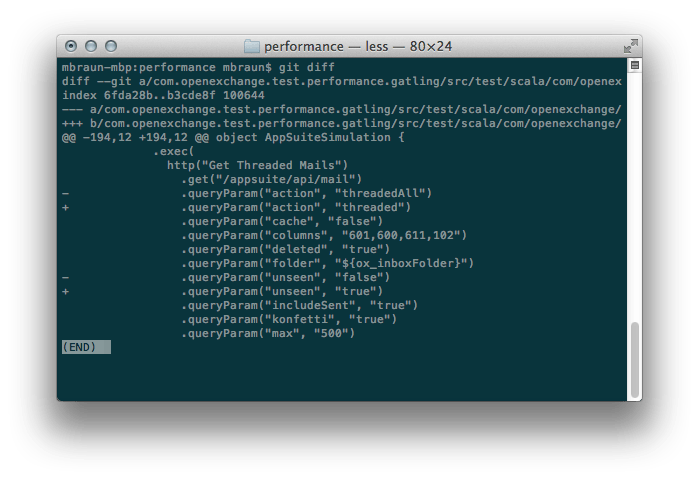
Gatling on the other hand uses Scala to define load tests. Scala is probably not as established as XML but (as programming languages in general) it allows to code much cleaner and use the power of a functional programming language. Being object oriented and relatively up to date, it allows re-using code to avoid redundancy and pretty much everything one would expect from a modern programming language. While coding Scala requires some specific toolchain, the compiled code runs within a standard JVM. This makes it very easy to deploy and leverage existing workflows and tools. If you’re a programmer you probably can start with Scala right away. If you’re not familiar with programming, some hurdle may exist but learning a programming language while creating load tests sounds a good deal, right? There is no need to learn each and every bit of Scala right away, tests usually consist of the same fragments that just need to get put together.
Since Gatling is under very active development and currently transitioning from version 1 to version 2, some API vs. documentation hickups and bugs may happen from time to time. The core developers and community is very responsive and most issues get covered within hours.
Performance
The funny thing about load tests is, that many environments actually test the efficiency and performance of the test runner, rather than the application thats supposed to be tested. In projects i’ve seen people building monstrous phalanxes of test clients to stress-test a single server. Distributed test clients and down-sizing both the servers spec and the test coverage seem to be appropriate measures to get the server under load. Lets check some real-world example.
At work we got a nice Intel Modular Server box dedicated for load testing. This baby sports a chassis with redundant PSU, networking, storage and six identical blades loaded with dual Xeons and lots of memory. In a nutshell, this is a datacenter within 6HE where testing can happen without external influences. Earlier, we used one virtual machine as test director and result-parser, 4 machines running JMeter and one machine running the application (including all infrastructure) we wanted to test. JMeter has been configured to spread the test scenario to all 4 machines, effectively cutting the number of threads by 4 and feed them to the test clients to execute them simultaneously. While this worked well, it really felt odd to have 4 specialised machines hammering on one specialised machine to push it to its limits.
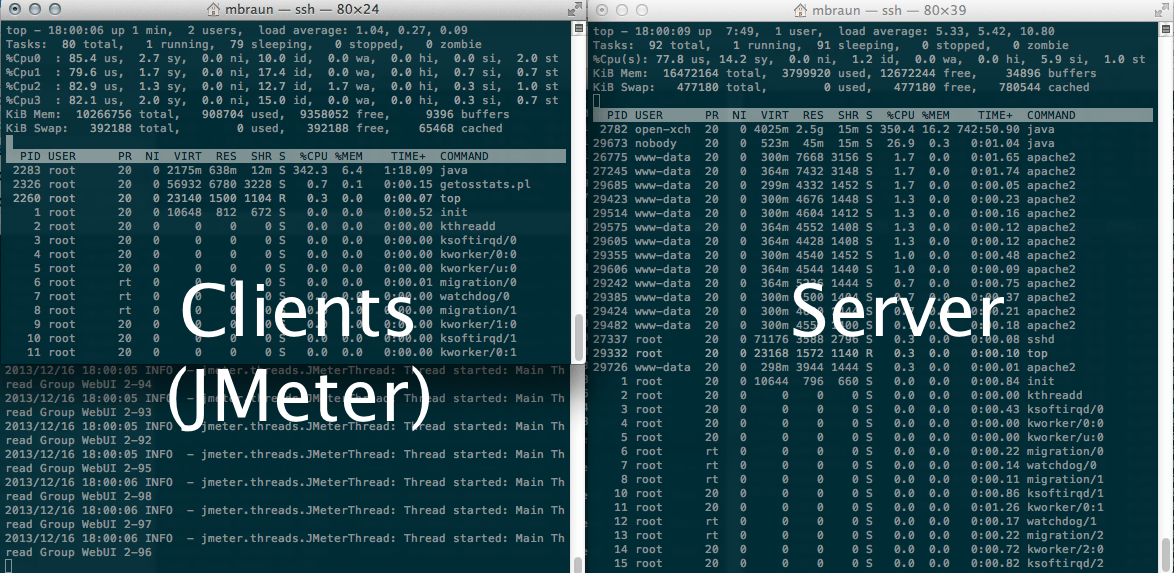
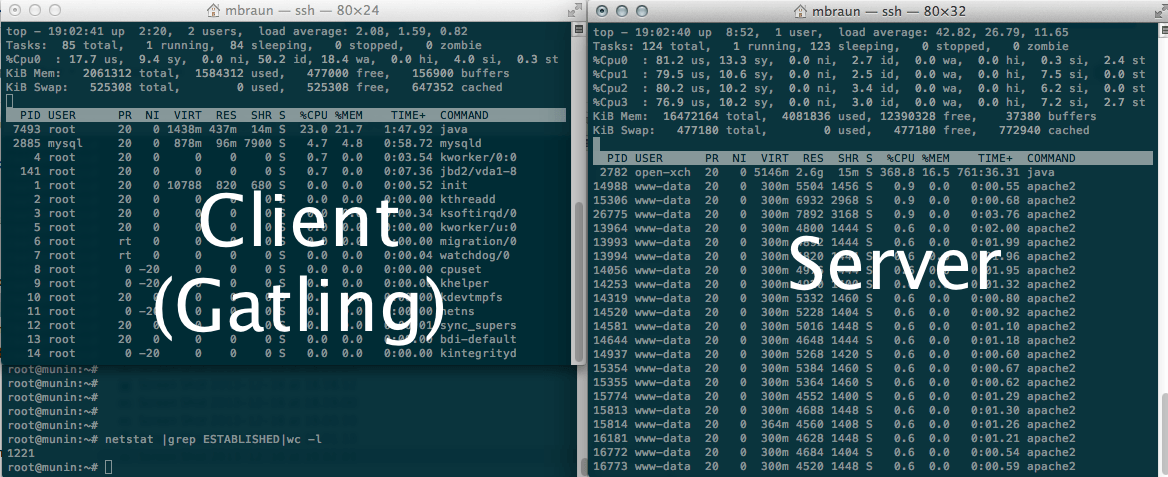
What we see at this screenshot is one machine running about 100 concurrent threads (“virtual users”) occupying 4 CPUs. The server on the other hand is also quite stressed but keep in mind there are 4 test machines with 4 CPUs each running 400 concurrent threads in total. Even these 4 test machines did not manage to create significant load at the server, to find out its diminishing or even tensile point. One major drawback with JMeter is that it uses one system thread per user, handling large numbers of active threads is very expensive on the CPU.
When using Gatling, we easily manage to get 1200 concurrent threads running at just 25% CPU load of one CPU of a single virtual machine. This is about 200x more efficient than JMeter (1/64th of the CPU load while creating 3x the load). The server is also stressed quite well and we’re able to push load testing far beyond its tensile point.
Reporting
When running JMeter using its GUI, reports are fairly nice, real time and the tool offers some help to dig through the results. However, when not being able to use the GUI (e.g. for unattended testing, continuous integration), you get a bunch of .jtl files, either XML or CSV. These can then be put into JMeter again for analysis or get processed using XSLT or tools that understand CSV (yeah… Excel). Thats all good and at this point highly structured data makes a lot of sense. There is a variety of tools that help with graphing, charting and analysing of its data. The downside is that you almost always need some kind of extra tool to make JMeter reports understandable - and you always have to wait until the test run finished. At least to my knowledge, there is no realtime graphing apart of the JMeter GUI.
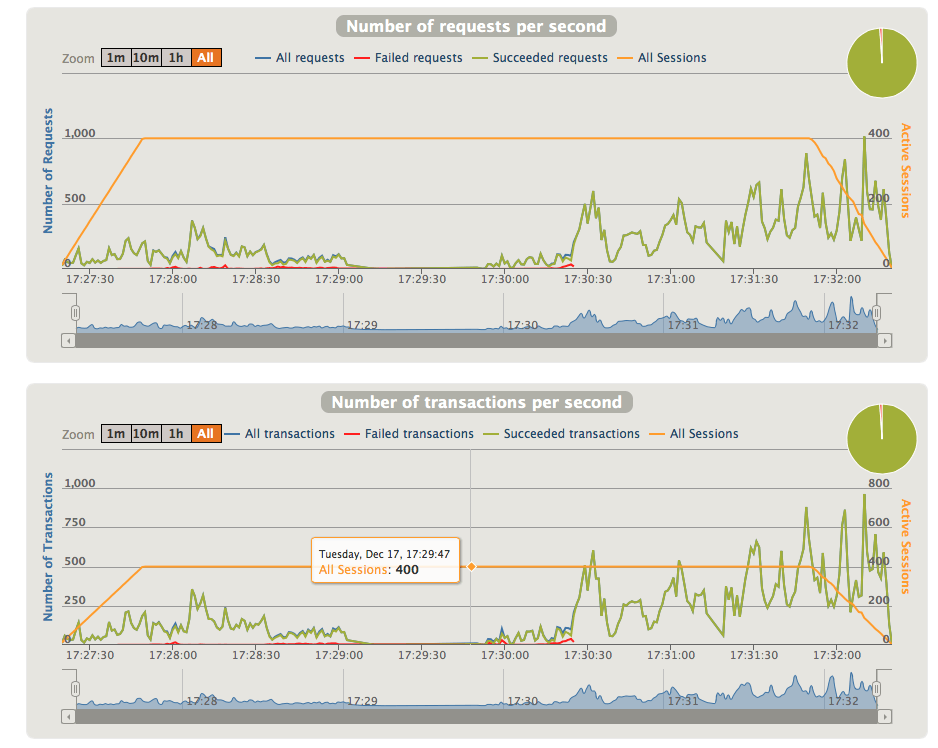
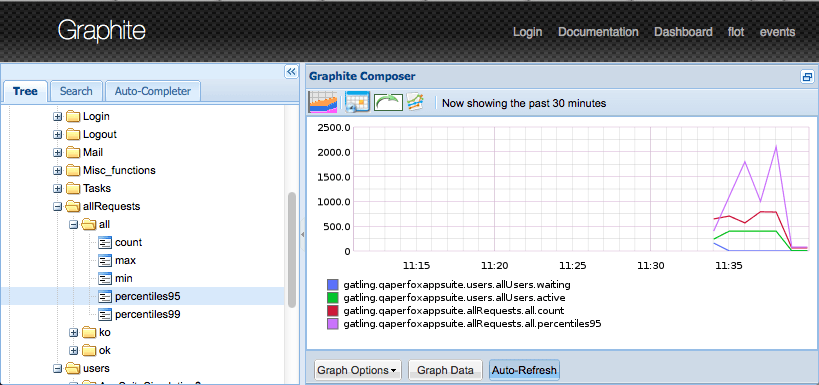
Gatling also creates machine readable data files, but already provides a really nice report module that generates HTML pages with charts and graphs. In addition, the integrated Graphite feeder allows real-time charting of test runs to tools like Graphite or Grafana. This becomes really powerful for showcases or unattended test runs. Overall i think the built-in reporting of Gatling outperforms JMeter by large, even if JMeter reporting may be more accurate and comprehensive on a scientific level.
As with every discussion, there is no “using the wrong tool” - it just depends on the job that needs to be done and some thinking outside the box. There are a lot of great tools that are not (yet) mainstream but help with every days work and contribute to getting better tests, results and software.
At work, we run a lot of automated integration, unit and system tests. This requires virtual machines that can be started up, get deployed with the software we want to test, run tests against it, shut it down and reset to a non-tainted state for the next test. While we’re working on a OpenStack based solution for that kind of internal deployment, i’ve had the joy of working with a, by all means, legacy Xen paravirtual hypervisor setup. It basically runs on a old machine with old debian and old XEN. The XEN guests (aka. domU’s) are stored within LVM on an old storage system.
The requirement in my case is, that all partitions exist as raw LVs without a partition table, so i can continue using existing tools for backup/restore. Sadly virt-install does not allow that (from what i found out at least) so i needed quite a workaround. To start with, i used virt-install to install the domain to a temporary image file.
Hint: virt-install requires a valid locale, just in case there is none set:
1
$ export LC_ALL=C
When installing, i’m not using a separate /boot or SWAP partition, just for the sake of ease. However, the provided steps may be used for more complex partition setups as well. When installing, do NOT create a LVM based storage setup within the VM.
In this case, i’m going to use Debian Wheezy, but when following some tricks, it’s possible to install every Linux Distro using this workflow. See “Other Distros” for more details. Since the old hardware does not support Hardware-assisted virtualization (HVM) either provided by AMD-V or Intel VT-x, i’ve to stick with “paravirt”.
Virt-install may print some error output, however in most cases it still succeeds. Just jump into the domU. For SLES, please see the “Other Distros” section.
1
$ xm console debian7-install
Observe the image partition table, sector size and starting block of a partition
1 2 3 4 5 6 7 8 9 10 11 12 13 14 15 16
$ fdisk -lu debian7-install.img You must set cylinders You can do this from the extra functions menu. Disk debian7-install.img: 0 MB, 0 bytes 181 heads, 40 sectors/track, 0 cylinders, total 0 sectors Units = sectors of 1 * 512 = 512 bytes Sector size (logical/physical): 512 bytes / 512 bytes I/O size (minimum/optimal): 512 bytes / 512 bytes Disk identifier: 0x000b3bee
Device Boot Start End Blocks Id System debian7-install.img * 2048 10483711 5240832 83 Linux Partition 1 has different physical/logical beginnings (non-Linux?): phys=(0, 32, 33) logical=(0, 51, 9) Partition 1 has different physical/logical endings: phys=(652, 180, 40) logical=(1448, 55, 40)
In this case, the sector size is 512b and the primary (only) partition starts at block 2048.
Now mount the image file to a loop device, starting at the offset calculated based on sector size and start block.
The image has been successfully restored to LVM, so the hard work is done. Next, some modifications within the image need to be performed, to make the system bootable.
For that, just mount the LV to an arbitrary mount point.
1
2
$ mkdir /mnt/debian7-install $ mount /dev/vg/debian7-install-disk /mnt/debian7-install/
XEN will use pygrub to boot the machine. Pygrub only understands the menu.lst style GRUB configuration files, not the more recent grub.cfg files. Therefor we have to create a new menu.lst file based on the new partition settings. The UUID value for the / disk is used here.
1 2 3 4 5 6 7 8 9 10 11 12 13
$ vim /mnt/debian7-install/boot/grub/menu.lst default 0 timeout 2
Note that the default text-mode CentOS installer is somewhat limited. It does not allow to modify the partition table, for example not using LVM but just a plain partition. If that’s the case for you, use the VNC (launched from the text-mode installer) or virt-viewer to launch the more sophisticated (GTK’ish) installer of CentOS. This will allow you to work around LVM.
RHEL6
For this, you need the binary DVD images of RHEL6 and make them accessible via HTTP (aka. create your own installation mirror). Therefor, you require a HTTP server and need to mount it to a directory which gets served:
1
$ mount -o loop /root/rhel-server-6.4-x86_64-dvd.iso /var/www/rhel/
Then, use virt-install to start the installation process from this HTTP site:
Note that the default text-mode RHEL6 installer is somewhat limited. It does not allow to modify the partition table, for example not using LVM but just a plain partition. If that’s the case for you, use the VNC (launched from the text-mode installer) or virt-viewer to launch the more sophisticated (GTK’ish) installer of RHEL6. This will allow you to work around LVM.
When booting, this errors tend to show up, however they won’t keep the domU from booting
1 2 3 4
PCI: Fatal: No config space access function found Could not set up I/O space Could not set up I/O space Could not set up I/O space
SLES11
For SLES, the process is similar to the one used at RHEL, but enhanced by the pitfall of SLES requiring some kind of “real” graphical interface rather than just a XEN console. In my case i had no X running at the XEN dom0, so i had to improvise quite a bit.
xm console just stopped responding at:
1 2 3 4 5 6
[ 9.479067] BIOS EDD facility v0.16 2004-Jun-25, 0 devices found [ 9.479084] EDD information not available. [ 9.646300] BIOS EDD facility v0.16 2004-Jun-25, 0 devices found [ 9.646317] EDD information not available. [ 9.813624] BIOS EDD facility v0.16 2004-Jun-25, 0 devices found [ 9.813641] EDD information not available.
For this, you need the binary DVD images of SLES11 and make them accessible via HTTP (aka. create your own installation mirror). Therefor, you require a HTTP server and need to mount it to a directory which gets served:
1
$ mount -o loop SLES-11-SP3-DVD-x86_64-GM-DVD1.iso /var/www/sles/
Then, use virt-install to start the installation process from this HTTP site:
Now the fun part starts. Usually there is a VNC console available from virt-install. This did not work for me when using a “real” remote VNC client. However, using “virt-viewer” did the trick. To use any kind of VNC, i’ve added the “vnc” parameter to the virt-install command.
Right after executing virt-install, call virt-viewer to jump into the installation process. In my case, i had to use a client computer running X, install xserver-xorg, xauth at the dom0 to run “virt-viewer”:
1
$ apt-get install xauth xserver-xorg
Check that SSHd on dom0 allows X forwards:
1
2
3
4
5
$ vim /etc/ssh/sshd_config [...] X11Forwarding yes X11DisplayOffset 10 X11UseLocalhost no
Connect to the dom0 machine from a client using X and enable forwarding:
When installing SLES, make sure to install the bootloader to MBR (the default is the “root” partition!) and select the option to install within a paravirtualizied environment. After installation, you’ll also need vnc to boot the machine since SLES uses an awkward “graphical” boot console. You can do that by adding this to your domU config file:
1
vfb = [ 'type=vnc' ]
Later on, modify the /boot/grub/menu.lst file and set
When talking SSL and HTTPS nowadays, the talk often goes about “Forward Secrecy” (aka. FS). Now, as Wikipedia perfectly explains what that is, there are basically two requirements that tend to conflict very often in politics, technology and every day life: Security and Compatibility. While it may be best from a security standpoint not to use a car for transportation, it’s quite an incompatible choice in many regions of the world. Same goes for SSL and encryption standards.
There are a lot of internet users today and many are using outdated technology. Based on the target group of your web service, you need to take these people into consideration, even if it means that most bleeding-edge and probably more secure standards cannot be used. It’s totally up to you what decision to take. For my personal site, i opted to force people using modern browsers and operating systems. If you run an online shop and care more about revenue than security or education of your visitors, the opposite decision may be fine for you.
While this is targeted to server administrators, there are quite a few ways for users to prefer more secure connections, for example by re-configuring their browser. For example, check out these german or english guides on how to remove RC4 usage from Firefox.
The provided configuration examples have been tested and implemented with Apache 2.4 and most current openssl - most Linux distributions won’t offer this yet so you may need a fallback to Apache 2.2 (and not use TLS1.2), switch to nginx or install packages from a different distribution flavour. OCSP stapling is also only available with Apache 2.3 or later. When working with any kind of SSL setting, please note that your users and your systems security depends on much more than just a potentially secure SSL link.
I am referring to some popular SSL testing services, however i think they’re not entirely accurate and a “80/100” rating does not mean that your server is insecure. Still, they are a good pointer and great for auditing the current configuration.
The first configuration mitigates the BEAST attack by not using TLS 1.0 as well as CRIME and BREACH by disabling SSL compression and it does not offer potentially broken RC4 ciphers. Note that since TLS 1.0 and 1.1 are disabled with this configuration, it will definitely cause compatibility issues. TLS 1.0 is the “gold standard” (read: legacy stuff everybody implemented) and almost every SSL enabled site uses it. SSLv2 and SSLv3 are definitely dead and should be avoided. TLS 1.2 is not as common yet, just the most recent browser versions do support it. Keep in mind that such settings will also keep some website crawlers from indexing your site and providing a less optimal SEO rating.
1 2 3 4 5 6 7
SSLEngine On SSLCertificateFile /etc/ssl/certs/your.crt SSLCertificateKeyFile /etc/ssl/private/your.key SSLHonorCipherOrder On SSLCompression off SSLProtocol +TLSv1.2 SSLCipherSuite ECDH+AESGCM:DH+AESGCM:ECDH+AES256:DH+AES256:DH+AES:RSA+AES:!aNULL:!eNULL:!EXP:!LOW:!MEDIUM:!ADH:!AECDH:!MD5:!RC4:!DSS
OCSP stapling needs to be configured outside of the “VirtualHost” scope. Note that the OCSP responder is usually provided by your CA. This is most likely not the case if you’re using self-signed certificates. The Strict-Transport-Security (HSTS) header signals, that the server only wants to talk via TLS/SSL and is used to avoid man-in-the-middle attacks on SSL.
1 2 3
Header add Strict-Transport-Security "max-age=15768000"
SSLUseStapling on
SSLStaplingCache shmcb:/var/run/ocsp(128000)
These settings will give you a Grade A 100-90-90 rating over at sslcheck.x509labs.com or ssllabs.com, however be assure that it’s not the most compatible setting. Connecting is possible with current versions of Chrome, Internet Explorer, Firefox and Safari.
The second configuration is more compatible to legacy browsers. However, it does not mitigate the BEAST attack since we have to stick with TLS 1.0 and 1.1 for compatibility reasons.
Not offering RSA+3DES as cipher did essentially kill off Internet Explorer on Windows XP so this cipher gets added in this configuration. Note that the order of ciphers is relevant to define their priority. Putting a potentially weak cipher first is not a good idea since it may lure browsers to a lower security level than they could provide.
This will still give you a Grade A 95-90-90 rating and will work with all browsers. FS is used for every browser except Internet Explorer. Keep in mind that this configuration will not mitigate the BEAST attack on web servers.
Overall, there is no “perfect” SSL configuration for Apache. Especially the lack of TLS 1.2 implementations legacy clients is quite a PITA when aiming to offer secure connections. Compared to the default Apache mod_ssl configuration, even the “more compatible” SSL configuration discussed here is a step forward in security for clients that run current operating systems and browsers.