Apple Inc. builds great computers. Well, at least the hordes of slave workers over at Asia do. Kudos to them for building astonishing precision and the design team to create beautiful machines that feel great when working with them. Shame on this $500bn+ company for taking advantage on such cheap labour, spending .5% of their margin on working conditions would provide hundreds of thousands of families a much better perspective and fair work. But lets put that aside for a moment.

A Mac can easily be sold for over 60% if its initial price two years from now. Try this with an Asus, Sony, Acer, HP, what have you. Almost all other Laptops i’ve seen so far - since IBM dumped the Thinkpad - look like a piece of junk after two years of transportation and serious usage (like 8-12 hours a day)

Now this is where the issue starts: Macs are re-sold regularly and people are trying to get their hands on a pre-owned device to cut some of the initial cost. On the other hand, Apple has built the perfect golden cage for it’s users. Services, hardware, software, complementary products - all very well integrated and made to work with each other quite smoothly (well, most times at least…). When buying a Mac, one does not just buy a computer but enters the realm of multiple services spun around the users “digital lifestyle” that tries to keep the user at the chosen platform. While hardware may and is meant to become obsolete, these services stay and are assigned to a user (via it’s Apple-ID) rather than to a specific piece of hardware. Obviously Apple is very successful in retaining users to proprietary services so they won’t flee back to good ol’ Windows or Android world.

One service that is tightly integrated with many Apple devices, is “Find My iPhone/Mac” (FMI from now on). In a nutshell, it geo-locates devices that are registered with the users Apple-ID in case a device got lost. This works for both phones/tablets by using GPS tracking as well as Laptops using wireless network information for approximate location. The service becomes very valuable over time and more than once it helped to give a good idea on where i’ve left my phone. Other than locating a device on a map it allows basic remote management features like making the device audible, lock it to avoid misuse and wipe it’s data in case it got potentially compromised.

Now, what’s the catch? Well, back in 2011 i bought a MacBook Air and used it for almost two years before selling it online. While using it, i had FMI activated and the device has been assigned to my Apple-ID. Also, i enabled FileVault which is an encryption feature of OSX that encrypts the whole computer storage, which by the way everybody should use. Additionally i’ve wiped all of that storage data to hand over a plain computer to the new owner. There is close to no chance that anybody outside of an intelligence agency or Apple could access my old (account) data. I sold it to one of these fixed-price dealers where you don’t get to know the buyer nor care about what happens with the machine.

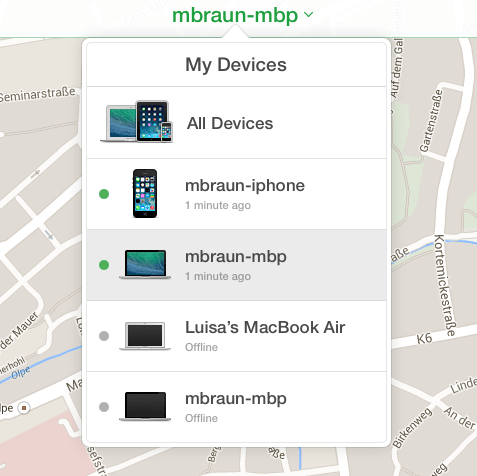
Roughly half a year after i sold that machine, i occasionally checked by FMI to see if there have been updates to the service. To my astonishment, a machine called “Luisa’s Mac Book Air” showed up at my list of machines.

Hello there, Luisa

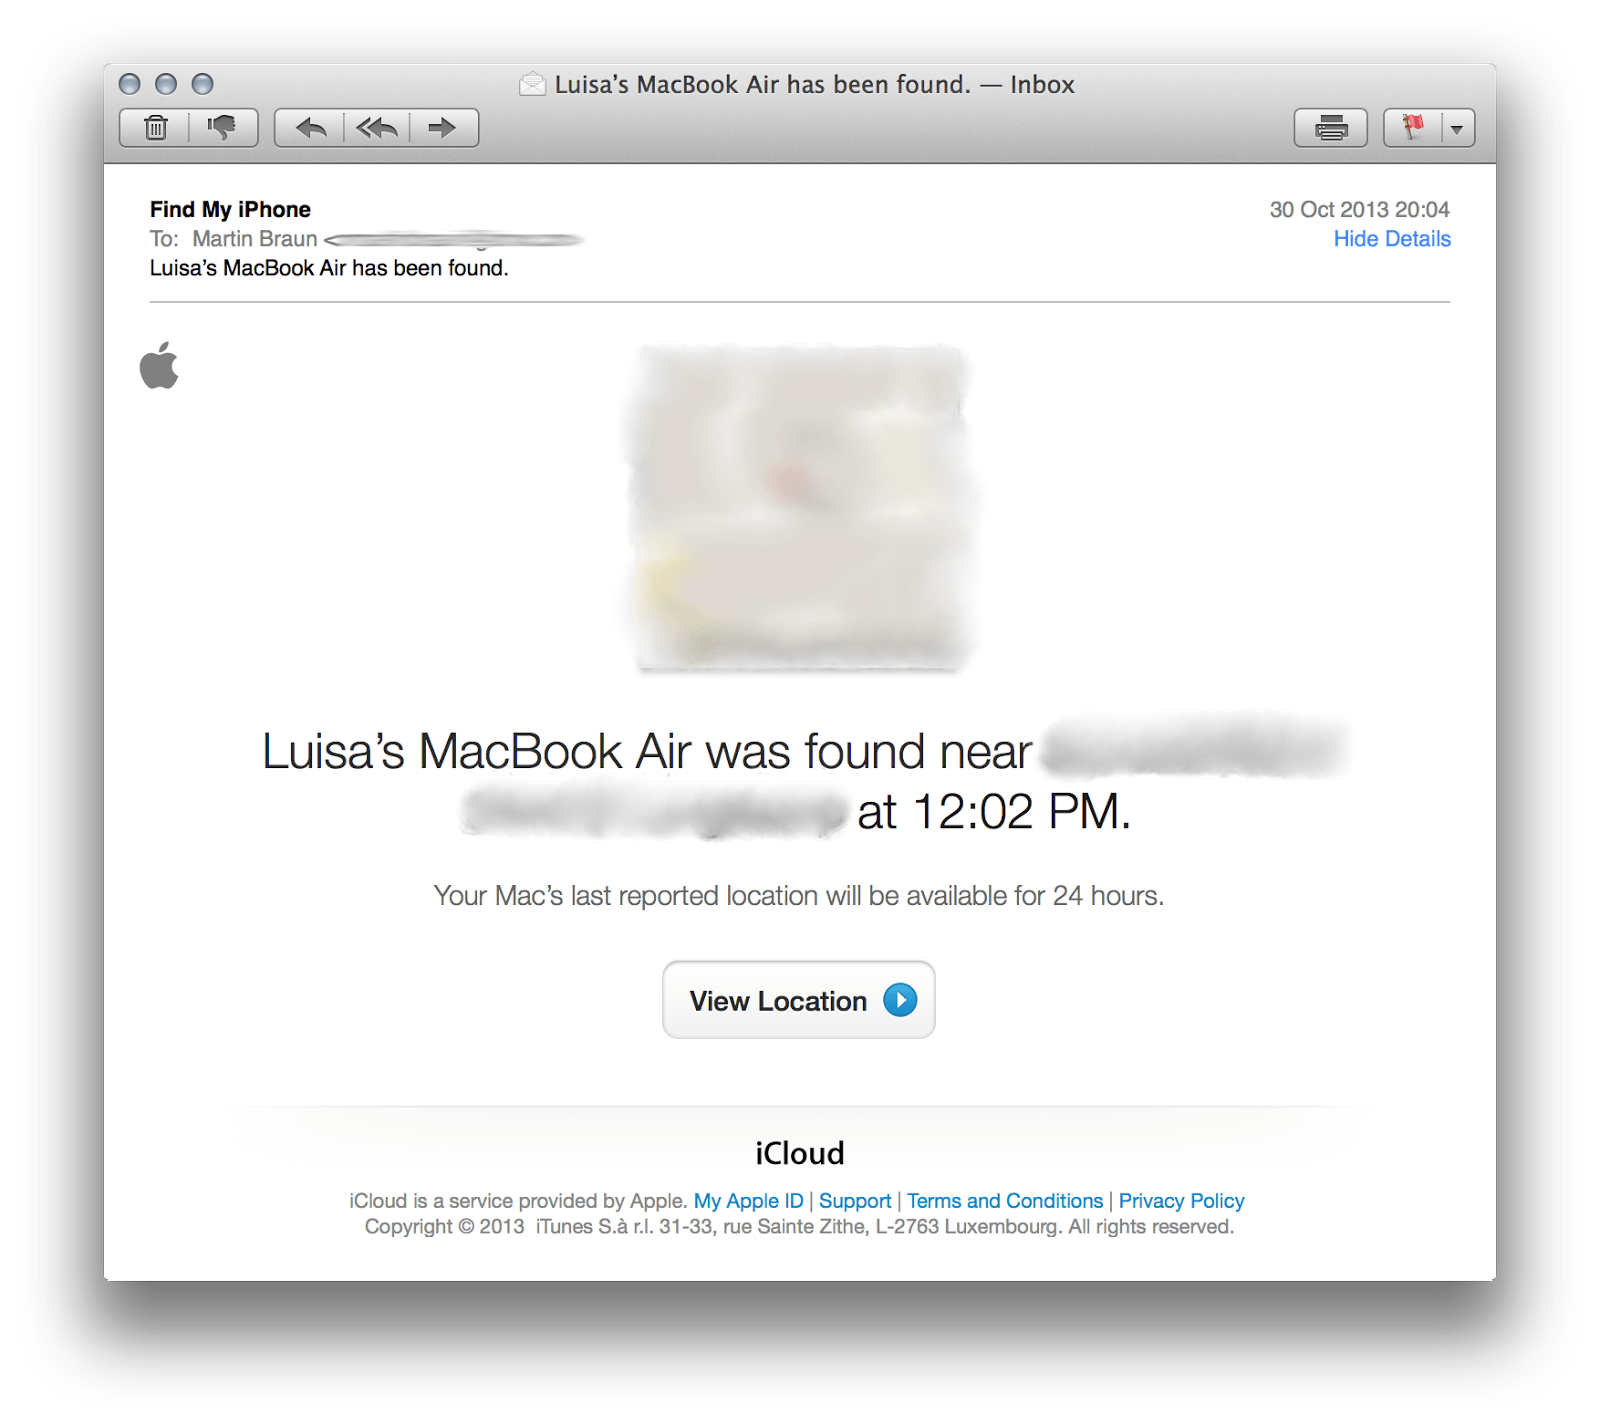
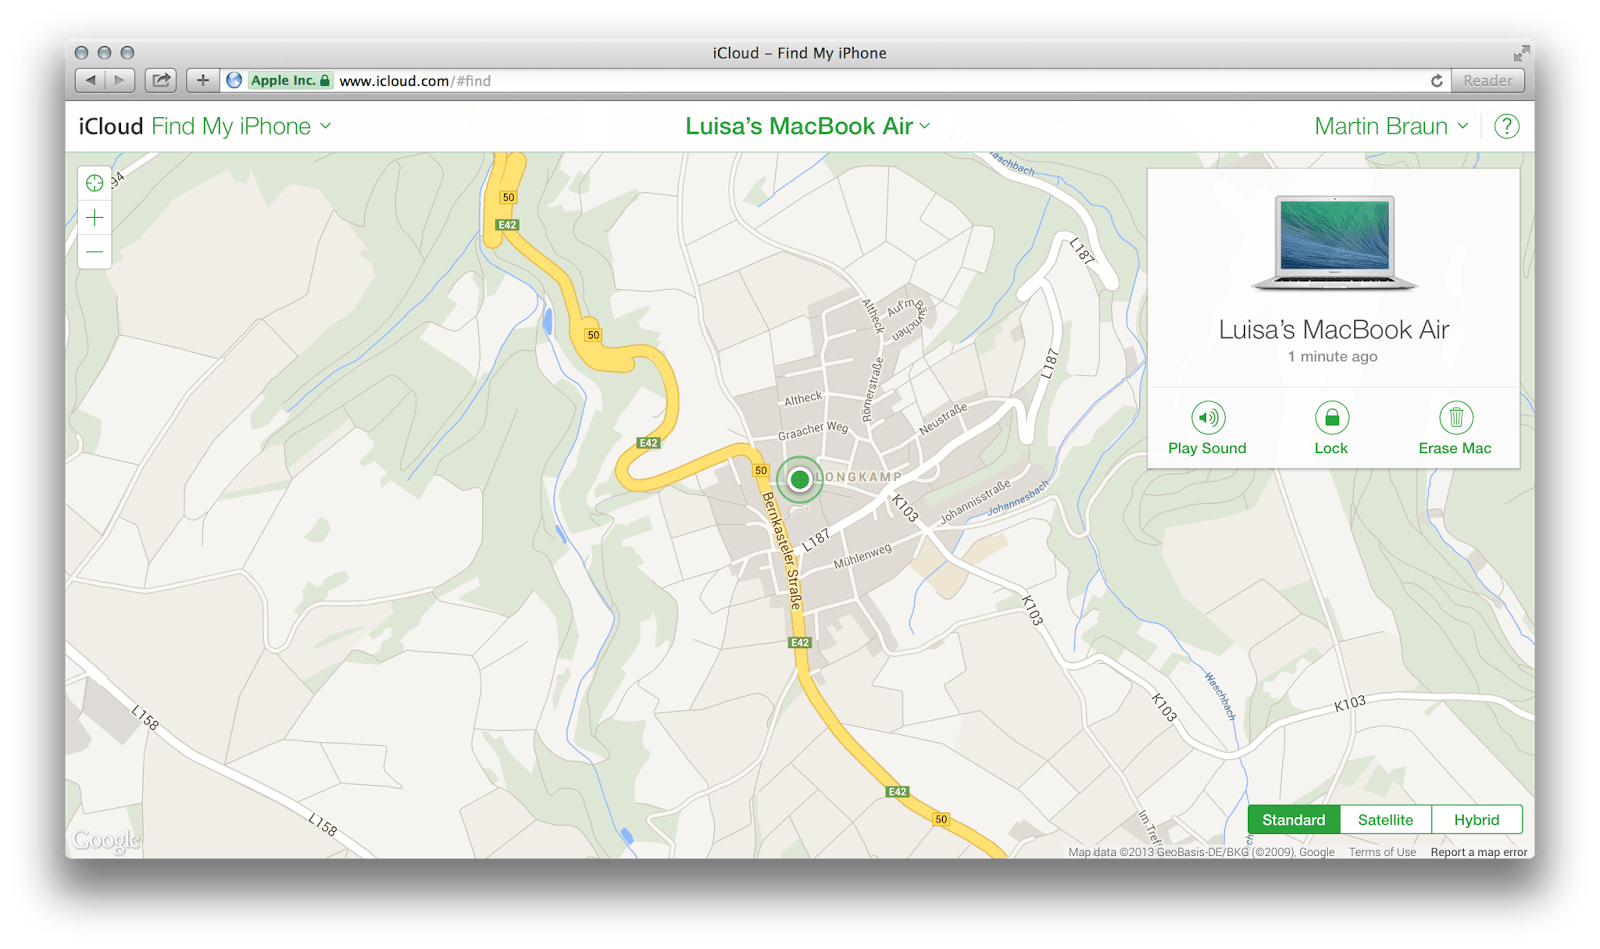
It was not online at the time i checked so i opted for “Notify me when found”. Shortly after, i received an E-Mail. My old Mac Book Air has been found. Yay! Interestingly enough that it has still been linked to my Apple-ID, all the location and remote management feature were still in place. Based on the location information and her name used to generate the computer name, i was able to look up Luisa on various online services. She’s a student and based on the transportation habit of her (my old) Laptop it should be easy to find out where she’s living, whom she’s meeting and what courses she’s taking… Well i’m not interested in stalking people so i took this much information to verify it’s real. Given a bit of criminal energy, i could lock her machine and blackmail her to re-gain access to her data. Not interested in this as well, just sayin’.

Lucky me.

There are stories of guys that recovered their stolen machines by hacking into it remotely, track it, identify the thief and all that stuff. Apple, pursuing the idea of “everything simple”, has just taken it a step further. In a nutshell, i got privileged remote access to a machine that has been wiped-clean, re-installed and i had no user account nor information about. Well, that’s one hell of a privilege escalation. Luisa for sure is not using my Apple-ID and has no clue that she can still be tracked.

Knock, knock...

There are various scenarios on what has happened. She uses FMI and all that iCloud stuff, that would point out a permission issue within iCloud when linking machines to Accounts. Or, she does not use FMI, which is worse since it implies this service is available regardless of the users choice made when setting up the machine. In both cases the new owner of the machine does not seem to have any possibility to opt-out from being tracked by the previous owner.

Digging deeper, i started to suspect that Apple is not really using the owners user or account credentials to get access to the machine. While this may be a logical implementation to track/manage machines where the user is not logged in, it’s quite critical in terms of privacy. A user may enter a strong password and connect the machine to it’s Apple-ID - but in the end it’s just identified and accessed by some kind of unique hardware identifier. At least the FMI web app uses such (hashed) identifiers. It’s a good guess that these IDs are used to bypass authentication at her Laptop. In this case, it is plausible that Apple has remote access to location data of all devices as well as powerful remote management capabilities (wipe, lock…). At the very least, remote access to the machine is not secured using credentials that the user has chosen at it’s Apple-ID but rather a static ID and vague trust-relationship with Apple. Authentication by shared secrets is an issue for itself, however it’s still better than obviously having no secret within the authentication process.

Now, i’ve contacted the Apple product-security contact and described the issue. The contact is very responsive, which definitely is a good sign for taking such issues seriously. However, they came back with the statement, that there is no actual security issue. I (as the previous owner) could just remove my old machine from my FMI account to stop tracking it. Well yeah, that may “help” me not tracking somebody - but it’s definitely not helping the person that gets tracked. Furthermore they pointed to a “how-to” document that describes what actions should be done before selling a Mac (e.g remove it from all iCloud services). This document of course is optional and the new owner has no way of verifying that the previous owner has removed the machine from these kind of services.

So what is this? Bad luck? Poor design? Wrong expectations? One could argue that if a machine gets stolen and logged out, the original user still needs to be able to wipe it. That’s true and valid, but does not require the machine to be bound to the original users Apple-ID for it’s whole lifetime. As soon as somebody wipes the storage or starts over using a different Apple-ID, the connection with FMI should be save to be reset. After all, FMI is not a thievery protection system, it’s a service to find a temporarily lost device. Is Apple doing this kind of hardware-service-lock-in to prevent users from reselling their hardware? Well that could be, but i don’t think they do it on purpose or to push their own “used hardware” service.

IMHO it’s a follow-up issue of the attitude to retain customers and all their credentials, data and devices to a closed ecosystem. This is just one more example where “simplicity over security” has a significant backlash. Also, it illustrates that open source software for infrastructure is not the only key to a more trustworthy and secure environment. Web services are already much more relevant to end-users than operating systems or infrastructure services are. Many of these underlying services have already become invisible. Trusting both web and infrastructure services with sensitive information like unrestricted access to physical location data is a huge problem if the service is running as a complete black box without the user in control of his or her own data.

There is a pressing need to discuss, spread and implement the definition of “who owns what” within the web services world. Right now, most people are extremely naive when blindly accepting these 70 page’ish TOS, since there is no real socially acceptable alternative to many of these services. Users must become sensitive to this an be in a position to claim their ownership on their data. Giving it away to industry giants for free will manifest the current situation and ultimately lead the way to a world with few players dominating not just the market but also their users habits and (digital) life.

At work, we run a lot of automated integration, unit and system tests. This requires virtual machines that can be started up, get deployed with the software we want to test, run tests against it, shut it down and reset to a non-tainted state for the next test. While we’re working on a OpenStack based solution for that kind of internal deployment, i’ve had the joy of working with a, by all means, legacy Xen paravirtual hypervisor setup. It basically runs on a old machine with old debian and old XEN. The XEN guests (aka. domU’s) are stored within LVM on an old storage system.

The requirement in my case is, that all partitions exist as raw LVs without a partition table, so i can continue using existing tools for backup/restore. Sadly virt-install does not allow that (from what i found out at least) so i needed quite a workaround. To start with, i used virt-install to install the domain to a temporary image file.

Hint: virt-install requires a valid locale, just in case there is none set:

1
$ export LC_ALL=C

When installing, i’m not using a separate /boot or SWAP partition, just for the sake of ease. However, the provided steps may be used for more complex partition setups as well. When installing, do NOT create a LVM based storage setup within the VM.

In this case, i’m going to use Debian Wheezy, but when following some tricks, it’s possible to install every Linux Distro using this workflow. See “Other Distros” for more details. Since the old hardware does not support Hardware-assisted virtualization (HVM) either provided by AMD-V or Intel VT-x, i’ve to stick with “paravirt”.

1
$ virt-install --paravirt --name debian7-install --ram 1024 --file /root/debian7-install.img --file-size 5 --nographics --location http://ftp.de.debian.org/debian/dists/wheezy/main/installer-amd64/

Virt-install may print some error output, however in most cases it still succeeds. Just jump into the domU. For SLES, please see the “Other Distros” section.

1
$ xm console debian7-install

Observe the image partition table, sector size and starting block of a partition

1
2
3
4
5
6
7
8
9
10
11
12
13
14
15
16
$ fdisk -lu debian7-install.img
You must set cylinders
You can do this from the extra functions menu.
Disk debian7-install.img: 0 MB, 0 bytes
181 heads, 40 sectors/track, 0 cylinders, total 0 sectors
Units = sectors of 1 * 512 = 512 bytes
Sector size (logical/physical): 512 bytes / 512 bytes
I/O size (minimum/optimal): 512 bytes / 512 bytes
Disk identifier: 0x000b3bee

Device Boot Start End Blocks Id System
debian7-install.img * 2048 10483711 5240832 83 Linux
Partition 1 has different physical/logical beginnings (non-Linux?):
phys=(0, 32, 33) logical=(0, 51, 9)
Partition 1 has different physical/logical endings:
phys=(652, 180, 40) logical=(1448, 55, 40)

In this case, the sector size is 512b and the primary (only) partition starts at block 2048.

Now mount the image file to a loop device, starting at the offset calculated based on sector size and start block.

1
$ losetup /dev/loop0 debian7-install.img -o $((2048 * 512))

Check if the partition has been mounted correctly

1
2
$ file -s /dev/loop0
/dev/loop0: Linux rev 1.0 ext4 filesystem data, UUID=18af6c1e-1c7e-4ccc-9828-a9a46770d0f8 (extents) (large files) (huge files)

As we see, the mounted data is a valid ext4 partition.

Create a new LV based on the size of the partition, calculated by start and end block, multiplied by the sector size.

1
$ lvcreate -L $(((10483711 - 2048) * 512))b --name debian7-install-disk vg

Now use partimage to create an image from the mounted partition.

1
$ partimage -z2 -o -d -M -b save /dev/loop0 /root/backups/debian7-install.new

Compression and use of partimage will save a lot of space since only used blocks are stored within the new image.

1
2
$ ls -lh /root/backups/debian7-install.new.000
-rw------- 1 root root 192M Nov 28 10:38 /root/backups/debian7-install.new.000

Unmount the loop device after getting the partition image

1
$ losetup -d /dev/loop0

You may also move the original image to another location and remove the domain from XEN

1
2
$ mv debian7-install.img debian7-install.img.old
$ xm delete debian7-install

Create a SWAP partition for later usage

1
2
3
4
5
$ lvcreate -L 512M --name debian7-install-swap vg
$ mkswap /dev/vg/debian7-install-swap
mkswap: /dev/vg/debian7-install-swap: warning: don't erase bootbits sectors on whole disk. Use -f to force.
Setting up swapspace version 1, size = 524284 KiB
no label, UUID=46d4b88f-1731-459d-9b98-edf8b2066717

Now restore the image created on the original image and it’s partition to the LV

1
$ partimage restore /dev/vg/debian7-install-disk /root/backups/debian7-install.new.000

Fetch the LVs UUIDs, these are required for the next steps

1
2
3
4
$ blkid
[...]
/dev/mapper/vg-debian7--install--disk: UUID="36aa2e94-9f2f-4ab1-b013-fd2cb960b55a" TYPE="ext4"
/dev/mapper/vg-debian7--install--swap: UUID="46d4b88f-1731-459d-9b98-edf8b2066717" TYPE="swap"

The image has been successfully restored to LVM, so the hard work is done. Next, some modifications within the image need to be performed, to make the system bootable.

For that, just mount the LV to an arbitrary mount point.

1
2
$ mkdir /mnt/debian7-install
$ mount /dev/vg/debian7-install-disk /mnt/debian7-install/

XEN will use pygrub to boot the machine. Pygrub only understands the menu.lst style GRUB configuration files, not the more recent grub.cfg files. Therefor we have to create a new menu.lst file based on the new partition settings. The UUID value for the / disk is used here.

1
2
3
4
5
6
7
8
9
10
11
12
13
$ vim /mnt/debian7-install/boot/grub/menu.lst
default 0
timeout 2

title Debian GNU/Linux 7
root (hd0,0)
kernel /boot/vmlinuz-3.2.0-4-amd64 root=UUID=36aa2e94-9f2f-4ab1-b013-fd2cb960b55a ro
initrd /boot/initrd.img-3.2.0-4-amd64

title Debian GNU/Linux 7 (Single-User)
root (hd0,0)
kernel /boot/vmlinuz-3.2.0-4-amd64 root=UUID=36aa2e94-9f2f-4ab1-b013-fd2cb960b55a ro single
initrd /boot/initrd.img-3.2.0-4-amd64

Adjust the kernel path, version and name based on the files located in /boot

Also adjust the fstab file, use the UUID of the / and SWAP disk.

1
2
3
$ vim /mnt/debian7-install/etc/fstab
UUID=36aa2e94-9f2f-4ab1-b013-fd2cb960b55a / ext4 errors=remount-ro 0 1
UUID=46d4b88f-1731-459d-9b98-edf8b2066717 none swap sw 0 0

Unmount the LV after modifying these settings

1
$ umount /mnt/rhel6-install/

Create a new XEN configuration file:

1
2
3
4
5
6
7
8
9
10
11
12
13
14
15
16
17
18
$ vim /etc/xen/debian7-install.cfg
bootloader = '/usr/lib/xen-default/bin/pygrub'

vcpus = '1'
memory = '1024'

root = '/dev/xvda2 rw'
disk = [
'phy:/dev/vg/debian7-install-disk,xvda2,w',
'phy:/dev/vg/debian7-install-swap,xvda1,w',
]

name = 'debian7-install'
vif = [ 'bridge=eth0,mac=00:16:36:1d:0f:b6' ]

on_poweroff = 'destroy'
on_reboot = 'restart'
on_crash = 'restart'

In some cases, the journal got corrupted, for the sake of consistency, run fsck on the newly created disk:

1
$ fsck /dev/vg/debian7-install-disk

Now we’re ready to boot the new XEN domain from LVM:

1
$ xm create -c /etc/xen/debian7-install.cfg

Other Distros

Debian 6 (Squeeze)

For Squeeze, just modify the location URL to point to a different dist.

1
$ virt-install --paravirt --name debian6-install --ram 1024 --file /root/debian6-install.img --file-size 5 --nographics --location http://ftp.de.debian.org/debian/dists/squeeze/main/installer-amd64/

CentOS6

Just call virt-install using a mirror repository:

1
$ virt-install --paravirt --name centos6-install --ram 1024 --file /root/centos6-install.img --file-size 5 --nographics --location http://mirror.netcologne.de/centos/6.4/os/x86_64/

Note that the default text-mode CentOS installer is somewhat limited. It does not allow to modify the partition table, for example not using LVM but just a plain partition. If that’s the case for you, use the VNC (launched from the text-mode installer) or virt-viewer to launch the more sophisticated (GTK’ish) installer of CentOS. This will allow you to work around LVM.

RHEL6

For this, you need the binary DVD images of RHEL6 and make them accessible via HTTP (aka. create your own installation mirror). Therefor, you require a HTTP server and need to mount it to a directory which gets served:

1
$ mount -o loop /root/rhel-server-6.4-x86_64-dvd.iso /var/www/rhel/

Then, use virt-install to start the installation process from this HTTP site:

1
$ virt-install --paravirt --name rhel6-install --ram 1024 --file /root/rhel6-install.img --file-size 5 --nographics --location http://example.com/rhel/

Note that the default text-mode RHEL6 installer is somewhat limited. It does not allow to modify the partition table, for example not using LVM but just a plain partition. If that’s the case for you, use the VNC (launched from the text-mode installer) or virt-viewer to launch the more sophisticated (GTK’ish) installer of RHEL6. This will allow you to work around LVM.

When booting, this errors tend to show up, however they won’t keep the domU from booting

1
2
3
4
PCI: Fatal: No config space access function found
Could not set up I/O space

SLES11

For SLES, the process is similar to the one used at RHEL, but enhanced by the pitfall of SLES requiring some kind of “real” graphical interface rather than just a XEN console. In my case i had no X running at the XEN dom0, so i had to improvise quite a bit.

xm console just stopped responding at:

1
2
3
4
5
6
[    9.479067] BIOS EDD facility v0.16 2004-Jun-25, 0 devices found
[ 9.479084] EDD information not available.
[ 9.646300] BIOS EDD facility v0.16 2004-Jun-25, 0 devices found
[ 9.646317] EDD information not available.
[ 9.813624] BIOS EDD facility v0.16 2004-Jun-25, 0 devices found
[ 9.813641] EDD information not available.

For this, you need the binary DVD images of SLES11 and make them accessible via HTTP (aka. create your own installation mirror). Therefor, you require a HTTP server and need to mount it to a directory which gets served:

1
$ mount -o loop SLES-11-SP3-DVD-x86_64-GM-DVD1.iso /var/www/sles/

Then, use virt-install to start the installation process from this HTTP site:

1
$ virt-install --paravirt --name sles11-install --ram 1024 --file /root/sles11-install.img --file-size 5 --nographics --location http://example.com/sles/ --vnc

Now the fun part starts. Usually there is a VNC console available from virt-install. This did not work for me when using a “real” remote VNC client. However, using “virt-viewer” did the trick. To use any kind of VNC, i’ve added the “vnc” parameter to the virt-install command.

Right after executing virt-install, call virt-viewer to jump into the installation process. In my case, i had to use a client computer running X, install xserver-xorg, xauth at the dom0 to run “virt-viewer”:

1
$ apt-get install xauth xserver-xorg

Check that SSHd on dom0 allows X forwards:

1
2
3
4
5
$ vim /etc/ssh/sshd_config
[...]
X11Forwarding yes
X11DisplayOffset 10
X11UseLocalhost no

Connect to the dom0 machine from a client using X and enable forwarding:

1
2
$ ssh -X root@your.dom0
$ virt-viewer sles11-install

When installing SLES, make sure to install the bootloader to MBR (the default is the “root” partition!) and select the option to install within a paravirtualizied environment. After installation, you’ll also need vnc to boot the machine since SLES uses an awkward “graphical” boot console. You can do that by adding this to your domU config file:

1
vfb         = [ 'type=vnc' ]

Later on, modify the /boot/grub/menu.lst file and set

1
splash=0

When talking SSL and HTTPS nowadays, the talk often goes about “Forward Secrecy” (aka. FS). Now, as Wikipedia perfectly explains what that is, there are basically two requirements that tend to conflict very often in politics, technology and every day life: Security and Compatibility. While it may be best from a security standpoint not to use a car for transportation, it’s quite an incompatible choice in many regions of the world. Same goes for SSL and encryption standards.

There are a lot of internet users today and many are using outdated technology. Based on the target group of your web service, you need to take these people into consideration, even if it means that most bleeding-edge and probably more secure standards cannot be used. It’s totally up to you what decision to take. For my personal site, i opted to force people using modern browsers and operating systems. If you run an online shop and care more about revenue than security or education of your visitors, the opposite decision may be fine for you.

While this is targeted to server administrators, there are quite a few ways for users to prefer more secure connections, for example by re-configuring their browser. For example, check out these german or english guides on how to remove RC4 usage from Firefox.

The provided configuration examples have been tested and implemented with Apache 2.4 and most current openssl - most Linux distributions won’t offer this yet so you may need a fallback to Apache 2.2 (and not use TLS1.2), switch to nginx or install packages from a different distribution flavour. OCSP stapling is also only available with Apache 2.3 or later. When working with any kind of SSL setting, please note that your users and your systems security depends on much more than just a potentially secure SSL link.

I am referring to some popular SSL testing services, however i think they’re not entirely accurate and a “80/100” rating does not mean that your server is insecure. Still, they are a good pointer and great for auditing the current configuration.

The first configuration mitigates the BEAST attack by not using TLS 1.0 as well as CRIME and BREACH by disabling SSL compression and it does not offer potentially broken RC4 ciphers. Note that since TLS 1.0 and 1.1 are disabled with this configuration, it will definitely cause compatibility issues. TLS 1.0 is the “gold standard” (read: legacy stuff everybody implemented) and almost every SSL enabled site uses it. SSLv2 and SSLv3 are definitely dead and should be avoided. TLS 1.2 is not as common yet, just the most recent browser versions do support it. Keep in mind that such settings will also keep some website crawlers from indexing your site and providing a less optimal SEO rating.

1
2
3
4
5
6
7
SSLEngine On
SSLCertificateFile /etc/ssl/certs/your.crt
SSLCertificateKeyFile /etc/ssl/private/your.key
SSLHonorCipherOrder On
SSLCompression off
SSLProtocol +TLSv1.2
SSLCipherSuite ECDH+AESGCM:DH+AESGCM:ECDH+AES256:DH+AES256:DH+AES:RSA+AES:!aNULL:!eNULL:!EXP:!LOW:!MEDIUM:!ADH:!AECDH:!MD5:!RC4:!DSS

OCSP stapling needs to be configured outside of the “VirtualHost” scope. Note that the OCSP responder is usually provided by your CA. This is most likely not the case if you’re using self-signed certificates. The Strict-Transport-Security (HSTS) header signals, that the server only wants to talk via TLS/SSL and is used to avoid man-in-the-middle attacks on SSL.

1
2
3
Header add Strict-Transport-Security "max-age=15768000"
SSLUseStapling on
SSLStaplingCache shmcb:/var/run/ocsp(128000)

These settings will give you a Grade A 100-90-90 rating over at sslcheck.x509labs.com or ssllabs.com, however be assure that it’s not the most compatible setting. Connecting is possible with current versions of Chrome, Internet Explorer, Firefox and Safari.

The second configuration is more compatible to legacy browsers. However, it does not mitigate the BEAST attack since we have to stick with TLS 1.0 and 1.1 for compatibility reasons.

Not offering RSA+3DES as cipher did essentially kill off Internet Explorer on Windows XP so this cipher gets added in this configuration. Note that the order of ciphers is relevant to define their priority. Putting a potentially weak cipher first is not a good idea since it may lure browsers to a lower security level than they could provide.

1
2
SSLProtocol +TLSv1 +TLSv1.1 +TLSv1.2
SSLCipherSuite ECDH+AESGCM:DH+AESGCM:ECDH+AES256:DH+AES256:DH+AES:RSA+AES:RSA+3DES:!aNULL:!eNULL:!EXP:!LOW:!MEDIUM:!ADH:!AECDH:!MD5:!RC4:!DSS

This will still give you a Grade A 95-90-90 rating and will work with all browsers. FS is used for every browser except Internet Explorer. Keep in mind that this configuration will not mitigate the BEAST attack on web servers.

Overall, there is no “perfect” SSL configuration for Apache. Especially the lack of TLS 1.2 implementations legacy clients is quite a PITA when aiming to offer secure connections. Compared to the default Apache mod_ssl configuration, even the “more compatible” SSL configuration discussed here is a step forward in security for clients that run current operating systems and browsers.

Your browser is out-of-date!

Update your browser to view this website correctly. Update my browser now

×